Complete Guide to Installing and Configuring Claude Code in VS Code: A Detailed Step-by-Step Tutorial
A step-by-step guide to installing and configuring Claude Code in VS Code from scratch.
This comprehensive tutorial walks developers through the complete process of setting up Claude Code in VS Code. It covers obtaining an API key, installing Node.js (v18+), globally installing the Claude Code CLI via npm, configuring the settings.json file, verifying the setup in the terminal, and installing the VS Code extension. The guide also addresses common issues like permission errors, environment variable configuration, and JSON formatting mistakes.
Introduction
With the release of Claude Code, more and more developers want to integrate this powerful AI programming assistant into their favorite editor. Claude Code is an AI coding assistant tool developed by Anthropic, built on their Claude large language model series. Unlike traditional code completion tools, Claude Code can understand project context, engage in multi-turn conversational programming assistance, and directly execute code modifications in the terminal or editor. It uses a CLI (Command Line Interface) architecture — essentially a locally running command-line program that communicates with Anthropic's cloud-based models via API, while providing a graphical interaction interface through editor plugins. This architecture allows it to flexibly adapt to various editor environments, rather than being limited to a single IDE.
However, from Node.js environment setup to API key configuration, there are quite a few pitfalls along the way. This article provides a detailed installation and configuration guide to help you get Claude Code up and running smoothly in VS Code.
Configuring the API Key
To use Claude Code in VS Code, you first need to configure an API access token. An API Key (Application Programming Interface Key) is an authentication mechanism used to establish a trusted communication channel between the client and server. When you send a request to Claude's API, the Key is attached to the HTTP request header, and the server verifies the Key to confirm the requester's identity and permissions. Different Keys may correspond to different usage quotas, billing accounts, and model access permissions.
Here are the specific steps:
- Find the token configuration entry in the Claude plugin settings in VS Code
- Edit and add your API Key
- In the model selection, choose the Claude model you want to use (e.g., Claude 3.5 Sonnet)
- Quota settings can be configured as unlimited based on your needs
- Submit the Key and save
This step is relatively straightforward, but make sure the Key is entered correctly — otherwise, none of the subsequent steps will work properly. Important reminder: API Keys are sensitive credentials. If leaked, others can use your quota to call the API. Therefore, avoid committing Keys to public code repositories or sharing them with untrusted third parties.
Installing the Node.js Environment
The Claude Code plugin depends on the Node.js runtime environment — a prerequisite that many beginners tend to overlook. Node.js is a JavaScript runtime environment built on the Chrome V8 engine, enabling JavaScript to run on servers or local computers outside the browser. The Claude Code CLI tool is written in JavaScript/TypeScript, so it requires Node.js as the underlying runtime to interpret and execute its code.
Version Requirements
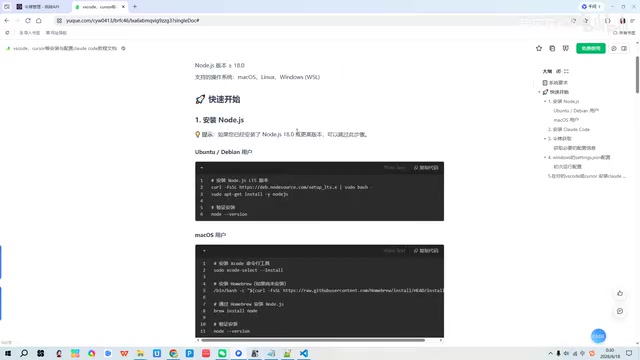
- Node.js version must be greater than 18
- Supported operating systems: Windows, Linux, macOS
The reason for requiring version 18 or higher is that Node.js 18 introduced native fetch API support, improved ESM (ECMAScript Module) compatibility, and more modern cryptographic libraries — features essential for Claude Code to function properly. If you have an older version of Node.js installed, it's recommended to use a version manager to upgrade rather than overwriting the existing installation directly.

Installation Methods by Platform
- Windows users: Go to the Node.js official website to download the installer and follow the wizard to complete the installation
- Linux users: Install via a package manager (such as apt or yum) or nvm
- macOS users: Homebrew or nvm is recommended
nvm (Node Version Manager) is a widely recommended Node.js version management tool that allows users to install and switch between multiple Node.js versions on the same machine — particularly useful for developers maintaining multiple projects. Another benefit of using nvm is that global npm packages are installed under the user's home directory, eliminating the need for additional system permissions.
After installation, open a terminal and type node -v to verify the version number. Confirm that the version is greater than 18 before proceeding to the next step.
Installing the Claude Code CLI Tool
With Node.js installed, the next step is to globally install the Claude Code command-line tool via npm. npm (Node Package Manager) is the default package manager for Node.js and one of the world's largest open-source software registries. When you run a global install command (with the -g flag), npm installs the package to a system-level directory, making it callable directly from the command line at any path. This differs from a local install, which only places the package in the current project's node_modules directory.
Steps for Windows Users
- Search for PowerShell in the search bar
- Run as Administrator (this is crucial — otherwise, the installation may fail due to insufficient permissions)
- Copy and execute the corresponding npm install command
Global installation on Windows requires administrator privileges because the global npm directory is typically located in protected system paths like Program Files, which ordinary user permissions cannot write to.

Steps for Linux/macOS Users
Open a terminal and execute the corresponding installation command for your platform. If Linux and macOS users encounter permission issues, they can elevate privileges with the sudo command, or better yet, use nvm to manage the Node.js installation so that global packages are installed under the user's home directory without requiring extra permissions. During installation, you may be prompted to configure environment variables — follow the prompts to complete the setup.
After installation, verify success by checking the version number.
Configuring the settings.json File
This is the most critical and error-prone step in the entire process. Claude Code requires the API address and key information to be written into a configuration file.
settings.json is a JSON-format file used by Claude Code to store user-level configuration. JSON (JavaScript Object Notation) is a lightweight data interchange format that organizes data in key-value pairs, offering good readability and broad language support. In the Claude Code configuration context, settings.json serves as the bridge connecting the local CLI tool to the remote API service — it tells the CLI tool which URL to send requests to (API endpoint) and what credentials to use for authentication.
Configuration on Windows
On Windows, you need to locate the settings.json configuration file on the C drive and add the following content:
- API URL: Enter the corresponding endpoint address
- API Key: Enter the key obtained earlier
The configuration takes effect once the file is saved.
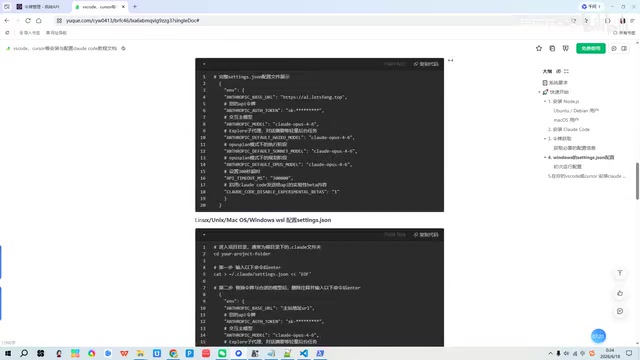
Configuration on Linux/macOS
The configuration logic is the same — only the file path differs. The path differences across operating systems stem from each system's conventions for storing user configuration data: Windows typically uses the AppData directory, macOS uses Library/Application Support, and Linux follows the XDG Base Directory specification, generally located under ~/.config. Refer to the official documentation for the exact path.
Configuration Notes:
- The URL and Key in the configuration file must be accurate
- JSON formatting must be strictly correct — an extra comma or missing quotation mark will cause parsing failures. JSON does not support trailing commas or comments, which is an important distinction from JavaScript object literals
- After configuration, it's recommended to test in the terminal first to confirm there are no errors before proceeding
Launching Claude Code and Verifying
Once configuration is complete, run the Claude Code command directly in the terminal to start the service.
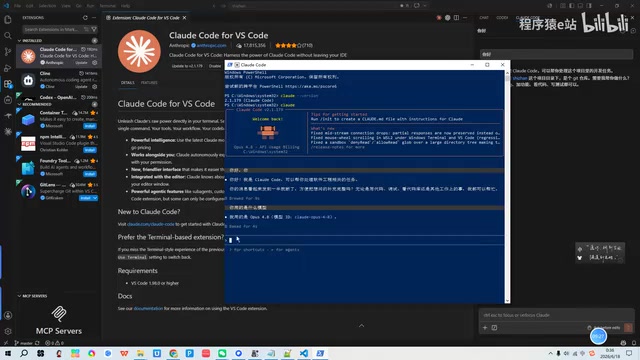
If everything is configured correctly, no error messages will appear in the terminal, and you can type conversation content directly in the terminal to test. After confirming the terminal is running properly, you can return to the VS Code editor to use the plugin.
Installing the Claude Code Plugin in VS Code
After terminal configuration is verified, the final step is to install the Claude Code extension in the editor:
- Open the VS Code Extensions Marketplace (shortcut
Ctrl+Shift+X) - Search for Claude Code
- Click Install
- After installation, open the chat interface from the sidebar or by searching "Claude Code Open" via the Command Palette (
Ctrl+Shift+P)
Now you can chat directly with Claude in VS Code and have it assist you with writing code.
Also Works with Cursor Editor
It's worth mentioning that Cursor editor is itself a fork of VS Code, so the same configuration method applies entirely. Cursor is a code editor specifically designed for AI-assisted programming, built on the open-source version of VS Code (Code - OSS). It inherits VS Code's core architecture, including its extension API, editor engine (Monaco Editor), terminal integration, and most UI components. As a result, the vast majority of VS Code extensions can be installed and run directly in Cursor without any modifications.
As long as Claude Code runs properly in the terminal, you can install the same VS Code plugin in Cursor and use it — the steps are completely identical. For developers already using Cursor, the Claude Code configuration process is exactly the same as for VS Code, which significantly reduces the cost of cross-editor migration.
Common Issues and Troubleshooting Tips
During the actual configuration process, the following issues are most common:
- Node.js version too low: Make sure the version is greater than 18 — older versions will cause compatibility issues. Use
node -vfor a quick check. If the version doesn't meet requirements, nvm is recommended for version upgrades and management - Insufficient permissions: Windows users must run PowerShell as Administrator when installing npm packages. Linux/macOS users can either use sudo for elevated privileges or use nvm to avoid permission issues
- Environment variables not configured: If the terminal can't find the command after installation, you need to manually configure environment variables. The PATH variable contains a series of directory paths — when you type a command in the terminal, the operating system searches these directories in order for the corresponding executable. Windows users can configure this via "System Properties → Advanced → Environment Variables." Linux/macOS users need to edit their shell configuration file (such as
~/.bashrcor~/.zshrc), add an export PATH statement, and run thesourcecommand to apply changes - Configuration file format errors: JSON syntax is strict — use VS Code's built-in JSON validation feature. VS Code automatically highlights JSON syntax errors such as missing quotes or extra commas, making it easy to quickly locate formatting issues
- Invalid API Key: Confirm the Key has sufficient quota by checking the balance in the corresponding platform's console. Also verify the Key was copied correctly, ensuring there are no extra spaces or line breaks at the beginning or end
Summary
The entire installation and configuration process can be summarized as: Obtain API Key → Install Node.js → Install Claude Code CLI via npm → Configure settings.json → Verify in terminal → Install VS Code plugin. No single step is complicated, but they're all interconnected — a problem at any stage will affect the final result. It's recommended to follow this guide step by step, verifying after each stage, so you can quickly pinpoint any issues.
From an architectural perspective, the entire configuration process is essentially building a complete communication pipeline: the VS Code plugin serves as the frontend interaction layer, the Claude Code CLI acts as the middleware processing layer, settings.json provides the connection parameters, and ultimately everything communicates with Anthropic's cloud-based large language model via API. Understanding this architecture helps you troubleshoot more effectively by identifying exactly which layer is causing the problem.
Key Takeaways
Related articles

Codex + Claude Code in Practice: From Vibe Coding to Enterprise-Grade AI Engineering
A deep dive into Codex and Claude Code for real-world AI programming—from Vibe Coding prototypes to Plan mode and SuperPAL engineering, with LLM selection strategies and enterprise workflows.
Hands-On Tutorial: Building an AI Trending News Dashboard from Scratch with Claude Code
Learn to build an AI trending news dashboard from scratch with Claude Code — no coding required. Covers CC setup, domestic model integration, and full-stack development.
HAMAS Multi-Agent Framework in Practice: A Guide to Building 5 AI Personas Working in Harmony
Learn how to build a multi-Agent AI team with the HAMAS framework: 5 role configurations, Skill mechanisms, gradient model scheduling, and solutions for AI hallucination and deception.