Claude Code Installation & Setup: A Complete Guide to Building Your AI Coding Environment from Scratch

A complete guide to installing and configuring Claude Code from scratch
This article walks through the full installation and configuration process for Claude Code, Anthropic's AI-powered CLI tool. It covers Node.js 20+ and Git prerequisites, npm global installation, proxy configuration for users in China, API key options (official subscription vs. third-party proxies), and an advanced features learning path.
Introduction
Claude Code is Anthropic's AI-powered command-line tool that lets you interact with Claude directly in your terminal for code generation, project management, and more. Unlike traditional IDE plugins (such as GitHub Copilot), Claude Code uses the terminal as its primary interface, capable of reading/writing the file system, executing Shell commands, and managing Git operations — essentially an AI Agent with system-level access. This design stems from Anthropic's exploration of "agentic coding" — enabling AI to not only generate code snippets but also understand the full project context and autonomously complete complex, multi-step development tasks.
This article provides a complete Claude Code installation and configuration guide to help users set up their development environment from scratch.

Prerequisites: Installing Node.js and Git
Installing Node.js (Version 20+ Required)
Claude Code runs on Node.js and requires version 20 or above. This requirement is tied to Node.js technical evolution: Node.js 20 introduced a stable native Fetch API, improved ES Module support, and a more efficient V8 engine (v11.3) — all critical for Claude Code's network request handling, module loading, and runtime performance. We recommend installing an LTS (Long Term Support) version, which receives 30 months of official maintenance including security patches and bug fixes. The currently recommended LTS version is the Node.js 22.x series.
Verify your installation:
- Run
node -vto check the Node version - Run
npm -vto check the npm version
If both commands output version numbers, your environment is ready.
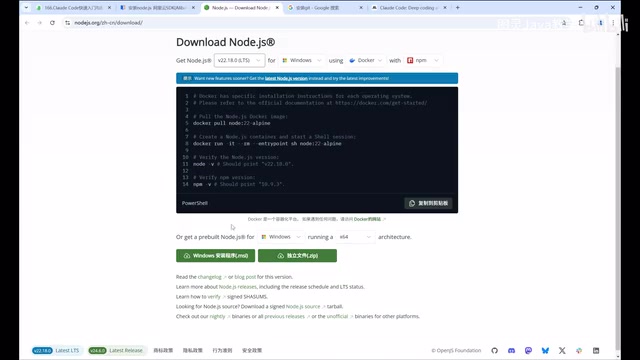
Installation methods by OS:
- Windows: Use the MSI installer (auto-configures environment variables) or the Zip package (requires manual configuration)
- Mac: Download and install the pkg package
- Linux: Download the tar.gz package or install via your package manager
Installing Git (Required for Windows Users)
Claude Code requires a Bash terminal environment, which is provided via Git Bash on Windows. Claude Code's underlying architecture relies on a Unix-like Shell environment for file operations, process management, and command chaining. Windows' native CMD and PowerShell differ significantly from Bash in syntax and behavior (e.g., path separators, pipe operations, environment variable syntax). Git Bash is actually a distribution of MinGW (Minimalist GNU for Windows) that emulates a lightweight POSIX-compatible environment on Windows, allowing Claude Code to run with unified Shell script logic across platforms.
After installing Git, run git --version to confirm the installation.
Installing the Claude Code CLI Tool
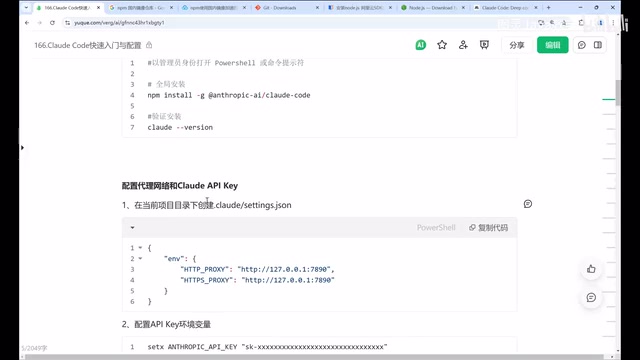
Install Claude Code globally via npm:
- Linux/Mac:
sudo npm install -g @anthropic-ai/claude-code - Windows:
npm install -g @anthropic-ai/claude-code
npm's global install (-g flag) places the package in a system-level directory rather than the current project's node_modules, making the claude command available from any directory. Linux/Mac requires sudo because the global install directory (typically /usr/local/lib/node_modules) needs root write permissions. To avoid using sudo, you can manage your Node.js installation with nvm (Node Version Manager), which stores global packages in your user directory.
If download speeds are slow, configure an npm mirror registry for faster downloads. Mirrors redirect package downloads from npmjs.org to local CDN nodes. Configure with: npm config set registry https://registry.npmmirror.com. After installation, run claude --version to verify success.
Proxy Configuration (Essential for Users in China)
Users in mainland China may encounter regional restriction errors when using Claude Code directly. Claude Code needs to establish HTTPS connections with Anthropic's API servers (api.anthropic.com) to send prompts and receive responses. Since this service restricts access from mainland China IPs, requests need to be routed through a proxy server.
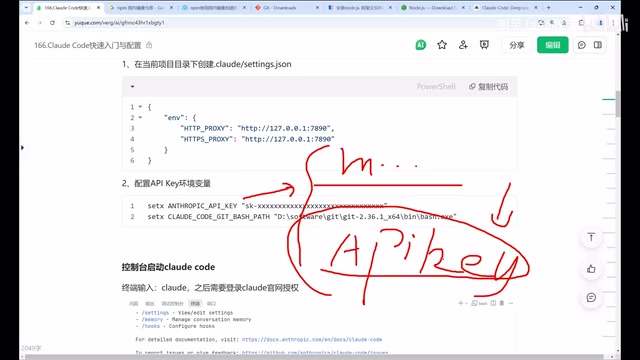
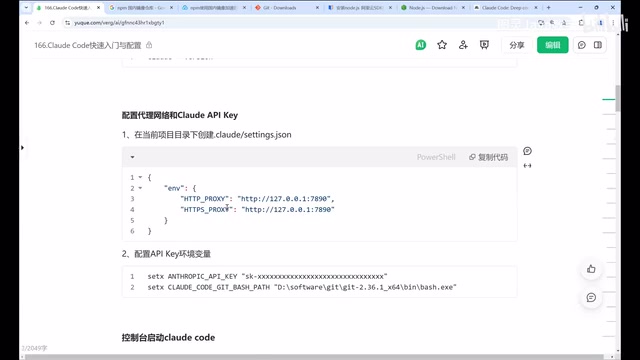
The solution is to create a proxy configuration in your project root:
- Create a
.claude/settings.jsonfile - Add proxy settings to route HTTP and HTTPS requests through your local proxy service
This configuration is essentially equivalent to setting HTTP_PROXY and HTTPS_PROXY environment variables. It routes all of Claude Code's outbound network requests through the specified local proxy port (typically SOCKS5 or HTTP proxy protocol), which then forwards them to the target server. It's important to note that terminal programs do not inherit system proxy settings by default — this is why command-line tools may fail to connect even when your browser can access external sites normally.
If you already have a global proxy setup that covers command-line traffic, you can skip this step.
API Key and Login Authorization
Official Authorization
Running the claude command for the first time will guide you through the login flow: select a theme → redirect to the official website for authorization → the token is automatically written to your local config. This requires registering and paying on the Anthropic website.
Anthropic offers two billing options: the Max subscription plan (monthly fee with a certain Claude Code usage quota), or pay-per-use API billing (charged by input/output token count). Note that Claude Code's token consumption is typically much higher than regular conversations, as it needs to pass large code files as context. A single complex code refactoring task can consume hundreds of thousands of tokens, so keep an eye on your usage.
Third-Party Proxy Services
Users who prefer not to use the official service can connect through third-party proxy providers. This requires setting the environment variables ANTHROPIC_API_KEY and ANTHROPIC_BASE_URL to point to the third-party API address. These proxy services typically forward API requests through a middleware layer — users point their BASE_URL to the provider's server, which then forwards requests to the official Anthropic API, offering value-added services such as bypass access, multi-model aggregation, and billing management.
The Claude Code desktop version also supports login-free usage and integration with third-party models like DeepSeek, making it ideal for users who want a lower barrier to entry.
Verifying Your Claude Code Installation
After completing all configurations, run claude in your project directory. Seeing the "Welcome to Claude Code" screen confirms your environment is fully set up.
Claude Code Advanced Features Learning Path
Setting up the environment is just the beginning. Advanced Claude Code features include:
- Core Mode Switching: Choose the optimal interaction mode for each scenario
- CLAUDE.md Global Memory: Let AI remember your project context. CLAUDE.md is Claude Code's project memory file, placed in the project root directory and automatically read as system-level context at the start of each session. It functions like a traditional README.md but is designed for AI rather than humans — you can define project architecture, coding standards, tech stack preferences, common error handling patterns, and more. This mechanism addresses the core pain point of LLMs being "stateless," enabling AI to continuously accumulate understanding of your project.
- Session Management: Prevent tasks from spiraling and efficiently drive development forward
- Resource Monitoring & Batch Tasks: Control token consumption
- Custom Skills: Extend Claude Code's capabilities
We recommend mastering the basic commands first, then gradually exploring advanced features to fully unlock the potential of this AI coding tool.
Key Takeaways
- Claude Code installation requires Node.js 20+ and Git
- Users in China must configure a proxy or they'll encounter regional restriction errors
- API keys can be obtained through official subscriptions or third-party proxy services
- The desktop version supports localization, login-free usage, and integration with third-party models like DeepSeek
- The complete learning path covers advanced topics including core modes, global memory, and session management
Related articles
 Tutorials
Cursor + Codex Dual-IDE Collaboration: A Practical Methodology for Open-Source Project Customization
A complete methodology for open-source project customization based on real-world experience, detailing the Cursor+Codex dual-IDE workflow, seven-stage process, MVP validation, and AI source code reading techniques.
 Tutorials
Cursor Multi-Agent in Practice: Building a Full-Stack Next.js Blog in 50 Minutes
Build a full-stack blog in 50 minutes using Cursor IDE's multi-Agent mode with Next.js, Clerk auth, and Supabase. Learn the 4-phase AI Agent workflow and key integration pitfalls.
 Tutorials
Building an AI Software Factory from Scratch: A Cursor Engineer's Hands-On Experience with Multi-Agent Collaboration
Cursor engineer Eric shares practical insights on building an AI software factory: automation levels, guardrail design, parallel Agent management, and scaling to 1000+ Agents for 24/7 development.