Complete Guide to Connecting Claude Code with DeepSeek-V4

Connect DeepSeek-V4 to Claude Code in three steps for a free AI programming assistant
DeepSeek-V4 launches with a 1-million-token context window and best-in-class open-source Agent coding capabilities. This guide covers connecting it to Claude Code in three steps—installing Node.js, installing Claude Code, and configuring environment variables—using the OpenAI-compatible API specification. Real-world testing with a Three.js game development task shows performance approaching top closed-source models, offering developers a free high-quality AI programming solution.
What DeepSeek-V4 Brings to the Table
DeepSeek-V4 was officially released recently, delivering significant improvements over its predecessor V3 across multiple dimensions. The most notable changes include: context window expansion from 128K to 1 million tokens, substantially enhanced Agent capabilities, and leading reasoning performance among domestic open-source models.
The Technical Significance of Context Windows: A context window is the maximum number of tokens a large language model can process at once, directly determining how much information the model can "remember." Expanding from 128K to 1 million tokens represents a qualitative leap—128K is roughly equivalent to a medium-length novel, while 1 million tokens corresponds to approximately 7.5 million English words, enough to contain the entire contents of a mid-sized codebase. This long-context capability is particularly critical for Agent tasks: when AI executes multi-step programming tasks, it needs to simultaneously track project structure, modified files, error logs, and user instructions. The longer the context, the more generous the Agent's "working memory" becomes, and the lower the probability of information loss or contradictions. The main technical challenge in achieving ultra-long context lies in the quadratic growth of attention mechanism computational complexity—DeepSeek broke through this bottleneck using techniques like sparse attention and positional encoding optimization.
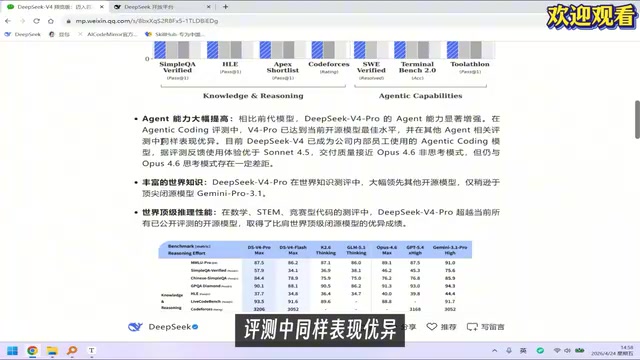
According to official benchmark data, DeepSeek-V4 Pro has achieved the best performance among open-source models in agentic coding evaluations. Its coding experience is reportedly superior to Sonnet 4.5, with code quality approaching Opus 4.6 (non-thinking mode). Even more noteworthy is that DeepSeek's parent company has internally adopted V4 as their daily programming model—a powerful endorsement of its capabilities in itself.
What is Agentic Coding: Agentic Coding refers to AI models no longer passively generating code snippets, but proactively executing complete development workflows like human programmers: reading files, running commands, analyzing error output, and iteratively fixing issues until the task is complete. This is fundamentally different from traditional "Q&A-style" code generation. Benchmarks like SWE-bench measure a model's success rate in fixing real GitHub Issues, which reflects actual development value far better than simple code completion. DeepSeek-V4's leadership in such evaluations means it possesses stronger multi-step task planning and self-correction capabilities.
So how do we connect this powerful open-source model to Claude Code and make it our AI programming assistant? This article provides a complete guide from installation to configuration.
Environment Setup: Installing Claude Code
Installing Node.js
Claude Code depends on a Node.js environment, so the first step is ensuring Node.js is installed on your computer. Node.js is a JavaScript runtime built on Chrome's V8 engine that allows JavaScript code to run outside the browser in servers or local terminals—Claude Code is precisely a Node.js command-line program that runs in the terminal. Simply go to the Node.js official website to download the LTS (Long Term Support) version and complete the installation.
Installing Claude Code via npm
npm (Node Package Manager) is Node.js's official package manager. The -g flag indicates global installation, allowing you to invoke the claude command from any directory after installation. Open your command-line terminal (CMD or PowerShell on Windows) and execute the following command to install Claude Code:
npm install -g @anthropic-ai/claude-code
The installation process is extremely simple—just one command. After installation, you can verify success by running the claude command.
Core Configuration: Connecting to DeepSeek-V4
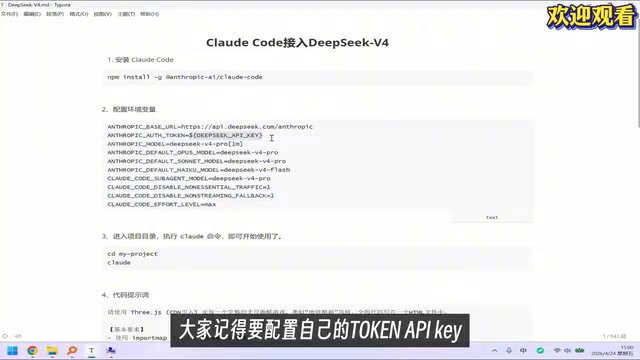
Claude Code uses Anthropic's own Claude models by default. To switch it to DeepSeek-V4, you need to configure system environment variables. This is the most critical step in the entire process.
How Environment Variables and API Redirection Work: Environment variables are OS-level key-value pair configurations that programs automatically read at startup to determine their behavior—no source code modification required to change runtime logic. Claude Code can switch its underlying model through environment variables because it follows the OpenAI-compatible API specification—the de facto interface standard in the AI industry today. Many providers including DeepSeek, Groq, and Together AI have implemented interfaces fully compatible with the OpenAI API format. This means any client tool supporting this specification can seamlessly switch to different model providers by simply modifying the base_url and api_key parameters. The ANTHROPIC_BASE_URL variable redirects Claude Code's API requests from Anthropic's servers to DeepSeek's servers, a process completely transparent to the Claude Code program itself.
Configuring Environment Variables
On Windows, follow these steps:
- Open "System Properties" → "Advanced" → "Environment Variables"
- In the System Variables section (note: not User Variables), click "New"
- Add the following three environment variables:
| Variable Name | Value Description |
|---|---|
ANTHROPIC_BASE_URL | DeepSeek API base URL address |
ANTHROPIC_API_KEY | Your own DeepSeek API Token |
ANTHROPIC_MODEL | Specify the model name to use (e.g., deepseek-v4) |
Important Notes
You must use your own API Key—do not directly copy example values from tutorials. You need to register an account on the DeepSeek Open Platform and create your own API Key. An API Key is essentially an identity credential used for billing and access control. Leaking someone else's Key not only violates terms of service but may also incur unexpected charges.
After configuration, be sure to restart your command-line terminal for the environment variables to take effect. This is because environment variables are read at process startup—already-running terminal windows won't automatically detect newly added variables.
Model Mapping Explanation
In Claude Code, model names will display as their corresponding Claude series names, but the actual calls go to DeepSeek's models. This mapping design stems from Claude Code's abstraction of model capability tiers: Opus represents the highest capability tier, Sonnet represents the balanced tier, and Haiku represents the lightweight/fast tier. The specific mapping is:
- "Opus" model displayed in Claude Code → Actually corresponds to DeepSeek-V4 Pro
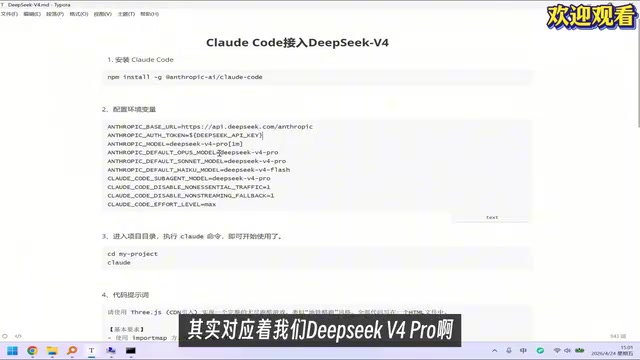
You can directly ask "which model are you using" in Claude Code to verify whether the configuration is working. Although it might respond with a Claude model name (because the system prompt contains Claude's identity information), the underlying engine is actually DeepSeek-V4.
Hands-On Testing: Coding Capability Verification
Test Task Design
To verify DeepSeek-V4's actual coding capabilities within Claude Code, a moderately complex test task was used: implementing a "Jump Jump"-style 3D mini-game using Three.js.
Three.js is a WebGL-based JavaScript 3D graphics library and the mainstream choice for frontend 3D development. This task is highly representative because it involves multiple interdependent technical modules: Three.js Scene Graph management, perspective camera and render loop, geometry and material systems, user input event handling, basic physics simulation (gravity, collision detection), and game state machine logic. This type of task demands far more from a model than simple algorithm problems—it requires the model to understand the collaborative relationships between different systems and generate code that actually runs in a browser environment, making it an excellent test of comprehensive code generation capabilities.
Test Results
After inputting the prompt into Claude Code, DeepSeek-V4 automatically generated the complete project code. A minor interaction issue appeared on the first run—the game rendered correctly, but click operations were unresponsive. This type of bug typically stems from event listener binding timing issues or coordinate system conversion errors between Canvas and screen coordinates—a classic problem in cross-system integration.
By describing the problem to Claude Code and requesting a fix, DeepSeek-V4 successfully located and resolved the bug. The fixed game ran smoothly with normal interactions, delivering satisfying overall results.
Comprehensive Capability Assessment
Based on this hands-on test, DeepSeek-V4's programming capabilities through Claude Code have indeed reached a high level:
- Code Generation Quality: Capable of generating a structurally complete Three.js project in one pass, including scene setup, physics logic, animation loops, and other core modules
- Bug Fixing Ability: Can accurately locate and fix code defects based on problem descriptions, demonstrating strong code comprehension and debugging capabilities
- Agent Collaboration Experience: Runs smoothly within the Claude Code framework, with stable tool invocation and file operation performance
The minor bug in the first-pass generated code indicates there's still some gap between V4 and top-tier closed-source models. However, considering it's a free open-source model, this performance is quite impressive.
Summary and Recommendations
The entire process of connecting DeepSeek-V4 to Claude Code can be summarized in three steps: Install Node.js → Install Claude Code → Configure Environment Variables. The whole process takes under 5 minutes with an extremely low configuration barrier. Thanks to the widespread adoption of the OpenAI-compatible API specification in the AI industry, this "model replacement" approach is highly versatile—if other excellent open-source models emerge in the future, they can be connected to Claude Code in exactly the same way.
For developers, the core value of this approach is: getting an AI programming experience close to top-tier commercial models using a free open-source model. Especially for everyday development scenarios like code generation, refactoring, and debugging, DeepSeek-V4 can already handle the majority of tasks. The 1-million-token ultra-long context window gives it a natural advantage when working with large projects.
However, it's worth noting that there's often a gap between benchmark data and actual usage experience. I recommend testing with your own real development scenarios to find the configuration that best fits your workflow. For critical production code, manual review and test verification are still recommended.
Key Takeaways
- DeepSeek-V4 expands its context window from 128K to 1 million tokens, achieving best-in-class Agent coding capabilities among open-source models
- Connecting to Claude Code requires only three steps: install Node.js, install Claude Code, and configure system environment variables
- Environment variables redirect Claude Code's model requests to the DeepSeek-V4 API, leveraging the OpenAI-compatible API specification, with the Opus tier mapping to V4 Pro
- Real-world testing with a Three.js mini-game development task showed a minor bug on first generation but achieved results approaching Opus 4.6 level after one round of fixes
- This approach offers developers a free, open-source, high-quality AI programming assistant option, with the 1-million-token long context being especially suitable for large project development
Related articles
 Tutorials
Cursor + Codex Dual-IDE Collaboration: A Practical Methodology for Open-Source Project Customization
A complete methodology for open-source project customization based on real-world experience, detailing the Cursor+Codex dual-IDE workflow, seven-stage process, MVP validation, and AI source code reading techniques.
 Tutorials
Cursor Multi-Agent in Practice: Building a Full-Stack Next.js Blog in 50 Minutes
Build a full-stack blog in 50 minutes using Cursor IDE's multi-Agent mode with Next.js, Clerk auth, and Supabase. Learn the 4-phase AI Agent workflow and key integration pitfalls.
 Tutorials
Building an AI Software Factory from Scratch: A Cursor Engineer's Hands-On Experience with Multi-Agent Collaboration
Cursor engineer Eric shares practical insights on building an AI software factory: automation levels, guardrail design, parallel Agent management, and scaling to 1000+ Agents for 24/7 development.