PyTorch Beginner Tutorial: A Complete Guide to Tensor Operations and Neural Network Construction
PyTorch Beginner Tutorial: A Complete …
PyTorch is Meta AI's open-source deep learning framework featuring dynamic computational graphs and GPU acceleration.
PyTorch is an open-source deep learning framework created by Meta AI in 2016, evolved from the Lua-based Torch library, and is essentially a tensor programming library. Its core advantages include: dynamic computational graphs (Define-by-Run) that implement automatic differentiation through directed acyclic graphs, supporting flexible runtime network structure modification; and GPU parallel acceleration via the CUDA platform, delivering performance improvements of tens of times. Developers can build neural networks by inheriting nn.Module to define network structures and forward methods, and it has been widely applied in top AI products like Tesla Autopilot and Stable Diffusion.
What is PyTorch?
PyTorch is an open-source deep learning framework created by Meta AI Research (formerly Facebook AI Research Lab) in 2016. Its history traces back to the Torch library built on the Lua programming language in 2002—Torch was developed by researchers including Ronan Collobert, with excellent performance thanks to its underlying C/CUDA implementation, but Lua's niche status became the biggest barrier to its adoption. In 2016, the Facebook AI Research (FAIR) team decided to port Torch's core capabilities to the Python ecosystem, giving birth to PyTorch. The timing was perfect: Python had already become the de facto standard language for data science, with scientific computing libraries like NumPy and SciPy forming a robust ecosystem foundation, allowing PyTorch to rise rapidly.
At its core, PyTorch is a tensor programming library—tensors are multi-dimensional arrays used to represent data and parameters in deep neural networks.
While this may sound complex, PyTorch's design philosophy has always centered on "ease of use." With just a few lines of Python code, you can train a machine learning model. This is one of the key reasons it has been used to build some of the world's most well-known AI products.
Core Features of PyTorch
Dynamic Computational Graphs: The Foundation of Flexibility
One of PyTorch's most beloved features among developers is the Dynamic Computational Graph. To understand its value, you first need to understand its opposite—static computational graphs. TensorFlow 1.x was the quintessential example of static graphs: developers had to first "declare" the entire computation flow using symbolic APIs, build the complete computational graph, and then "compile" it for execution. It's like drawing a complete construction blueprint before breaking ground—error messages during debugging were often cryptic, and Python's native breakpoint debugging couldn't be used.
PyTorch's dynamic graph (also known as "Define-by-Run") is entirely different: it tracks all operations performed on tensors by building a Directed Acyclic Graph (DAG) composed of functions. In this DAG, nodes represent tensor operations (such as addition, matrix multiplication), and edges represent data flow. When you execute an operation, PyTorch not only computes the result but also records the complete computation history chain, providing the foundation for subsequent automatic differentiation (Autograd)—when loss.backward() is called, PyTorch traverses the DAG in reverse, using the chain rule to automatically compute gradients for each parameter without manual derivation of partial derivatives. The "acyclic" constraint ensures that backpropagation never falls into infinite loops.
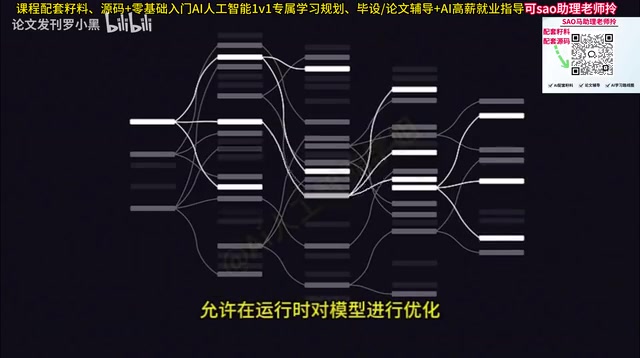
This means that after each iteration, you can flexibly adjust the network structure as needed, rather than having to predefine the entire computation flow as with static graph frameworks. The execution result of every line of Python code can be inspected immediately—this "what you see is what you get" debugging experience allows researchers to quickly validate ideas, dramatically shortening the cycle from hypothesis to experimental results. It was precisely this difference that enabled PyTorch to rapidly surpass TensorFlow in the academic research community, becoming the framework of choice for top AI papers.
GPU Acceleration: High-Performance Computing with CUDA
Leveraging NVIDIA's CUDA platform, PyTorch can achieve high-performance parallel computing on GPUs. CUDA (Compute Unified Device Architecture) is a parallel computing platform released by NVIDIA in 2006 that allows developers to directly program and control thousands of GPU compute cores. The architectural differences between GPUs and CPUs determine their respective use cases: CPUs have a small number of powerful cores, excelling at complex serial logic; GPUs have thousands of relatively simple cores (e.g., NVIDIA H100 has over 16,000 CUDA cores), designed specifically for massively parallel computation.
Operations in deep learning such as matrix multiplication and convolution are inherently highly parallelizable—when computing a 1000×1000 matrix multiplication, the calculation of each output element is independent and can proceed simultaneously. PyTorch migrates tensors and models to GPU memory via the .to(device) method, with the underlying system automatically invoking optimized CUDA kernels for computation. For large-scale matrix operations and deep learning training, GPU acceleration often delivers performance improvements of tens to even hundreds of times.
Real-World Applications of PyTorch
PyTorch has been widely used in training various top-tier AI products:
- Computer Vision: Tesla Autopilot
- Image Generation: Stable Diffusion
- Speech Recognition: OpenAI's Whisper
These examples fully demonstrate PyTorch's versatility and powerful capabilities across different AI domains.
Getting Started: PyTorch Tensor Operation Basics
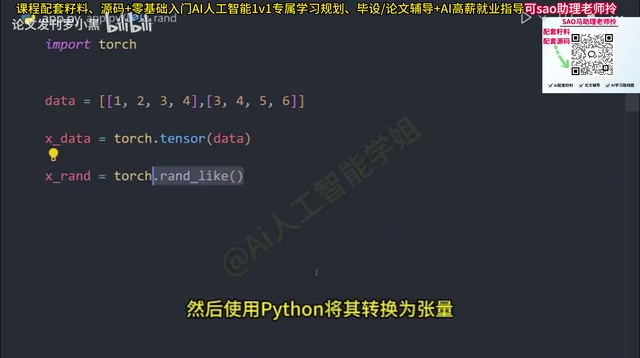
The first step to using PyTorch is installing a Python environment, and if GPU acceleration is needed, installing the corresponding version of CUDA. After importing PyTorch into your Python file, you can begin working with tensors.
Tensors are essentially similar to multi-dimensional arrays. We can first create a two-dimensional array (matrix) in Python, then use PyTorch to convert it into a tensor. On tensors, we can perform various computational operations, such as converting integers to random floating-point numbers, or performing linear algebra operations through matrix multiplication.
These basic operations may seem simple, but they are the building blocks for constructing complex neural networks. Understanding tensor creation, transformation, and operations is the first hurdle to mastering PyTorch.
Building Your First Neural Network with nn.Module
The Design Philosophy of nn.Module
nn.Module is PyTorch's foundational abstract class for building neural networks, embodying a deep fusion of object-oriented programming and deep learning requirements. Each nn.Module instance maintains two types of core state: learnable parameters (Parameters, automatically tracked and updated by the optimizer) and submodules (nested nn.Module instances). This hierarchical design allows complex networks to be assembled like building blocks—a ResNet can be composed of multiple residual blocks, each residual block consisting of convolutional layers, batch normalization layers, and other basic modules, all of which are subclasses of nn.Module. Additionally, the state_dict() and load_state_dict() methods standardize model saving and loading, which is crucial for model deployment and transfer learning.
Defining the Network Structure
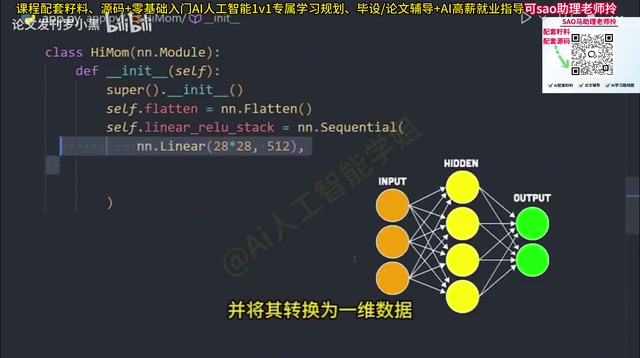
Taking an image classifier as an example, we need to define a new class that inherits from nn.Module and build the network layer by layer in the constructor:
- Flatten layer: Converts multi-dimensional input (such as images) into one-dimensional data
- Sequential container: Creates a layer container through which data flows sequentially
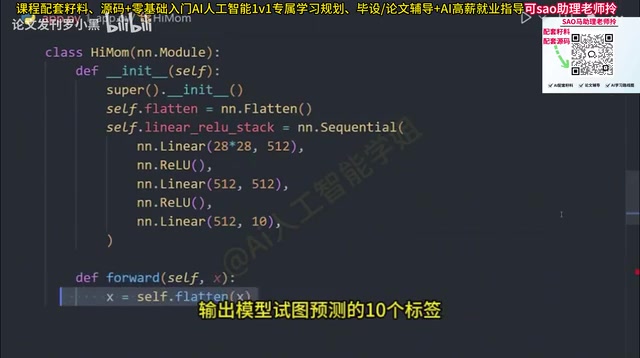
- Linear fully-connected layer: Transforms the flattened 28×28 image into 512 outputs, where each node acts like a small statistical model that continuously guesses outputs and updates weights as data flows through
- ReLU activation function: ReLU (Rectified Linear Unit) is mathematically defined as f(x) = max(0, x), introducing non-linearity—without activation functions, no matter how deep the network, stacking multiple linear transformations still results in a linear transformation, and the network loses its ability to fit complex functions. Compared to Sigmoid and Tanh, ReLU is computationally efficient and effectively mitigates the "vanishing gradient" problem, with a constant gradient of 1 in the positive region, allowing signals to backpropagate without attenuation. When a feature is deemed important, it outputs that node's value; otherwise, it outputs 0
- Output layer: The final fully-connected layer that outputs the 10 class labels the model is trying to predict
Forward Propagation and Model Execution
After defining the network structure, the crucial step is defining the forward method, which describes the data flow path through the network. The forward method defines the forward data flow path, while backpropagation is automatically handled by the Autograd engine based on the computational graph—developers don't need to explicitly define a backward method in nn.Module—this is precisely the elegance of PyTorch's dynamic graph mechanism.
Finally, instantiate the model and deploy it to the GPU. When input data is passed in, the forward method is automatically called, completing the full training and prediction workflow.
# Simplified code logic
model = NeuralNetwork().to(device)
output = model(input_data)  # Automatically calls the forward method
PyTorch Learning Path: From Beginner to Practitioner
For beginners, mastering PyTorch can follow this progressive path:
- Foundation stage: Understand tensor concepts and basic operations, become familiar with converting between NumPy and PyTorch tensors
- Core stage: Master
nn.Moduleusage, loss function selection, and optimizer configuration - Hands-on stage: Start with simple image classification tasks, gradually exploring projects in different domains like NLP and CV
- Advanced stage: Learn custom datasets, model tuning, distributed training, and other advanced features
PyTorch's ecosystem is very comprehensive, with abundant official documentation and community tutorial resources. The key is hands-on practice—theoretical knowledge can only truly be internalized through actual coding. Learning a deep learning framework is never an overnight achievement, but PyTorch's design philosophy has indeed significantly lowered the barrier to entry, enabling more developers to get started quickly and build valuable AI applications.
Key Takeaways
- PyTorch is an open-source deep learning framework created by Meta AI, evolved from the 2002 Lua-based Torch library, centered on tensor programming with support for dynamic computational graphs and GPU acceleration
- Dynamic computational graphs implement automatic differentiation based on Directed Acyclic Graphs (DAGs), allowing runtime modification of network structures—a key advantage distinguishing PyTorch from static graph frameworks
- The CUDA platform enables PyTorch to leverage thousands of parallel GPU compute cores, delivering performance improvements of tens of times for matrix-intensive deep learning training
- PyTorch has been used to train well-known AI products including Tesla Autopilot, Stable Diffusion, and OpenAI Whisper
- The core steps for building a neural network include inheriting
nn.Moduleto define network layer structure, implementing the forward propagation method, and deploying to GPU for training - The recommended learning path starts from tensor operation basics, progresses through nn.Module core concepts, and gradually transitions to hands-on projects
Related articles
 Tutorials
Cursor + Codex Dual-IDE Collaboration: A Practical Methodology for Open-Source Project Customization
A complete methodology for open-source project customization based on real-world experience, detailing the Cursor+Codex dual-IDE workflow, seven-stage process, MVP validation, and AI source code reading techniques.
 Tutorials
Cursor Multi-Agent in Practice: Building a Full-Stack Next.js Blog in 50 Minutes
Build a full-stack blog in 50 minutes using Cursor IDE's multi-Agent mode with Next.js, Clerk auth, and Supabase. Learn the 4-phase AI Agent workflow and key integration pitfalls.
 Tutorials
Building an AI Software Factory from Scratch: A Cursor Engineer's Hands-On Experience with Multi-Agent Collaboration
Cursor engineer Eric shares practical insights on building an AI software factory: automation levels, guardrail design, parallel Agent management, and scaling to 1000+ Agents for 24/7 development.