A2 System Kiro Channel Configuration Tutorial: Complete Integration Guide from Scratch
A step-by-step guide to configuring the Kiro channel in the A2 API management system from scratch.
This tutorial provides a complete walkthrough for setting up the Kiro channel in the A2 API management system. It covers generating API keys, enabling preload for Kiro nodes, configuring proxies, adding accounts via Google/GitHub/AWS authorization or batch import, testing models, and integrating with Claude Code. Key pitfalls like missing preload settings, skipped proxy configuration, and incomplete IDC fields for AWS enterprise users are also addressed.
Overview
The A2 system (also known as the A2 API Management System) supports integration with multiple AI model channels. Among them, Kiro is an important free channel that allows users to call models like Claude through a proxy. This article walks through the complete Kiro channel configuration process from scratch, covering configuration management, node pool setup, authorization login, model testing, and practical integration with Claude Code — helping you get the entire pipeline up and running quickly.
Configuration Management: Completing the Basic Setup
Generating an API Key and Preload Settings
Navigate to the Configuration Management page in the A2 system and complete two foundational tasks:
-
Generate an API Key: Click the "Regenerate" button, then click "Show" to copy and save the key. You'll need this key later when configuring your client.
-
Check Kiro under Preload Model Providers: This step is critical — you must check Kiro. Only when selected will the system initialize all Kiro nodes at startup, allowing the auto-refresh feature to cover every node.
Why are some Kiro nodes not being refreshed even though auto-refresh is enabled? The reason is that preload wasn't checked. The A2 system uses a lazy loading strategy — nodes that haven't been initialized (i.e., never requested) won't be touched by auto-refresh. If you need a full refresh of all Kiro nodes, make sure to check Kiro under preload settings.
Of course, if you don't actually need that many accounts, there's no need to load them all — just configure as needed.
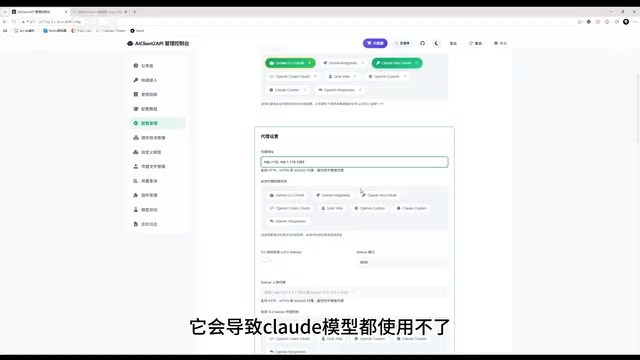
Proxy Configuration (Required Step)
The second step is setting up a proxy, and this step cannot be skipped. Without a proxy, Kiro will have limited model access, and in severe cases, Claude models will be completely unusable. The proxy address should be filled in based on your own network environment.
After completing the proxy configuration, enable the "Auto Refresh" feature, then click Save.
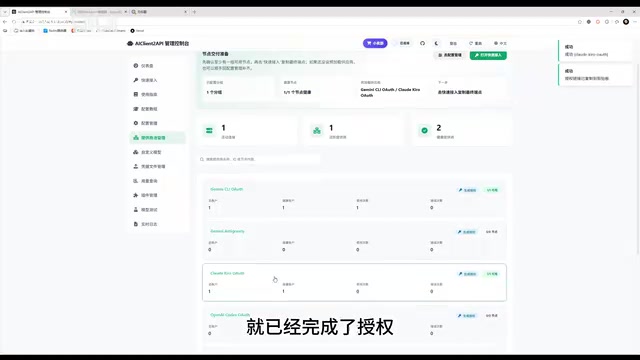
Node Pool Management: Adding Kiro Accounts
Navigate to the Node Pool Management page. Kiro supports five account import methods: the first three are authorization login methods, and the last two are file import methods.
Method 1: Google Account Authorization Login
After clicking Google authorization, the system will open a webpage for OAuth authentication. Note the following:
- Local deployment: The authorization callback requests go to a local address, which usually completes without issues
- Server deployment: The callback address may not be directly accessible, requiring the manual authorization method
Manual Authorization Steps:
- When the authorization prompt fails, press F12 to open the browser developer tools
- In the Network panel, find the link that starts with the Kiro protocol
- Copy the complete link
- Paste it into the "Manual Authorization Input" field and submit
Once authorization is complete, click the "Test" button to verify success. If the test results show that Claude 4.5 works properly, the authorization is active.
Method 2: GitHub Account Authorization Login
The process is essentially the same as Google authorization, and also supports the manual authorization method.
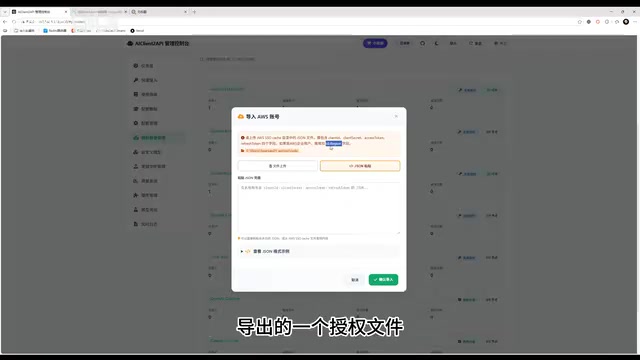
Method 3: AWS Account Authorization Login
AWS authorization login has some special considerations:
- Start URL: Enterprise users need to change this to their company's corresponding URL
- Region: Enterprise users may need to adjust this based on their actual setup
- Personal AWS accounts: These two fields can usually be left at their default values
Click authorize and complete the login in the browser. If you encounter callback issues, you can similarly manually enter the address from the final window to complete authorization.
Methods 4 & 5: Batch File Import
When batch importing accounts, pay special attention to the following:
- AWS enterprise users: The imported file or JSON must include the IDC (region) field. Session files exported from other software may only have a Region field without the IDC prefix, which will cause refresh failures or even request failures for enterprise users.
- Google and GitHub accounts can be batch imported via refresh tokens, which is ideal for scenarios where accounts are purchased in bulk — just enter one refresh token per line to batch import into the system.
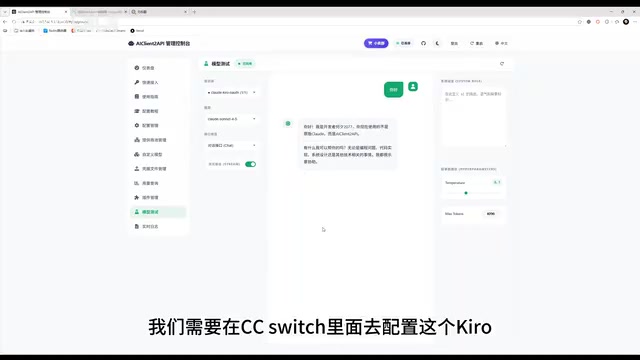
Model Testing and Usage Notes
Model Limitations for Free Accounts
When testing Kiro on the model testing page, be aware of an important limitation: free Kiro accounts can only use up to Claude Sonnet 4.5.
During testing, the system will return a message similar to:
"I am Developer Core R07. You are not using the original Claude, but the AI Cloud API."
This is a built-in system prompt in the A2 system's Kiro provider, designed to make users clearly aware that they are not using the official model interface. This also serves as a security reminder: if a third-party reseller claims to provide the original Claude model but is actually routing through the Kiro channel, it is not a genuine API.
Configuring Integration in Claude Code
Getting the Connection Information
Go to the "Quick Integration" page in the A2 system, find the Claude endpoint path for Kiro, and copy it.
Filling in the Claude Code Configuration
In the settings of Claude Code (or tools like Cline), enter the following information:
- API Key: The key generated in Configuration Management
- API Base URL: The A2 system's address — note that you do not need to include the full route path
Claude Code will automatically append the remaining path, so you only need to enter the base address.
Verifying the Configuration
After completing the configuration, confirm everything works with these two checks:
- Send a test request: Confirm that you can receive a normal model response
- Fetch the model list: Retrieve the model list via API and confirm that you can see all Kiro-supported models configured in the backend
If both verifications pass, the configuration is complete and ready for use.
Claude Code Forced Login Issue
Some first-time users may encounter Claude Code forcing a login. There are well-established solutions for this issue — searching for the relevant keywords will help you find workarounds.
Summary: Five Steps to Complete Kiro Channel Configuration
The entire Kiro channel configuration process can be summarized in five steps:
- Configuration Management: Generate a key, check preload, set up proxy, enable auto-refresh
- Node Pool Management: Add accounts via authorization login or file import
- Model Testing: Verify node availability
- Client Configuration: Enter the API Key and Base URL in tools like Claude Code
- Functional Verification: Confirm successful requests and correct model list
Three common pitfalls: Preload must have Kiro checked, proxy configuration cannot be skipped, and the IDC field must be complete for AWS enterprise users. Master these key points, and you'll be able to smoothly complete the full Kiro channel configuration.
Related articles
Five Common Claude Code Mistakes — How Many Are You Making?
Five common Claude Code mistakes developers make: copy-pasting code, skipping CLAUDE.md, inefficient prompting, ignoring docs, and poor context management — with fixes.

Andrew Ng's New Course Explained: A Practical Guide to Using OpenAI's O1 Reasoning Model
Deep dive into Andrew Ng and OpenAI's Reasoning with O1 course covering test-time scaling, new prompting paradigms, multi-model orchestration, and practical applications for developers.

Learning AI After College Entrance Exams: A Complete Path from Zero to Freelancing
How to efficiently learn AI skills during summer break after exams? A complete path from mastering prompts and hands-on projects to freelancing on platforms.