Building an R Language AI Programming Workstation with Positron + Continue + DeepSeek
Complete tutorial for building an R language AI coding environment with Positron, Continue, and DeepSeek.
This article systematically explains how to build an R language AI programming workstation from scratch: installing the Positron editor (built on VS Code core with RStudio advantages, stable version recommended), configuring the open-source Continue AI plugin, editing config.yaml to connect DeepSeek models, enabling code autocomplete, and leveraging preset prompts with the COSTAR framework to improve AI interaction efficiency. The entire setup is extremely low-cost and highly flexible.
Introduction
For R language users, setting up an efficient AI-assisted programming environment has been a popular demand. Based on a detailed tutorial from a Bilibili creator, this article systematically walks through how to build a complete R language AI programming workstation from scratch using the Positron editor, Continue plugin, and DeepSeek models, covering installation, configuration, code completion, and preset prompts.
Installing Positron and Choosing the Right Version
What is Positron
Positron is an open-source IDE built on the VS Code core, incorporating the strengths of RStudio, specifically designed for R language and Python data science workflows. It's completely free, hosted on GitHub, and supports Windows, Mac, and Linux.
From a technical architecture perspective, Positron's design approach is quite clever. VS Code (Visual Studio Code) is Microsoft's open-source code editor, with core advantages in cross-platform capability through the Electron framework and a rich extension ecosystem. Positron is developed by Posit (formerly RStudio, Inc.), embedding RStudio's signature functional modules on top of VS Code's open-source core—including an interactive R console, variable explorer, data viewer, and plot panel. This means users can enjoy VS Code's massive plugin marketplace and modern editing experience while retaining the workflow tools that data scientists rely on in RStudio. This "best of both worlds" design philosophy is Positron's core competitive advantage over simply using VS Code with an R plugin.
Version Selection Recommendations
Since Positron is still under rapid development, the latest version may have compatibility issues. The tutorial specifically mentions that some users couldn't successfully install the Continue plugin after installing the latest version. The solution is to downgrade to a stable version (such as version 2025.02.1-5). Users can find all historical versions on the GitHub Releases page and choose the appropriate installer for their operating system.

Tip: Positron updates frequently. It's recommended to choose a verified stable version to avoid compatibility issues affecting your productivity.
Installing and Configuring the Continue Plugin
Installation Method
After opening Positron, find the Extensions panel in the left activity bar, search for "Continue" to locate this open-source AI Code Agent plugin. After clicking install, the Continue icon will appear in the left activity bar.
Continue is a flagship project in the open-source AI coding assistant space. Its core design philosophy is "model-agnostic." Unlike GitHub Copilot, which is tied to OpenAI models, Continue allows users to freely connect to any large language model service compatible with the OpenAI API format, including locally deployed Ollama models. It works by intercepting the user's coding context within the editor (current file content, cursor position, selected code, etc.), constructing this information into structured Prompts sent to the configured AI model, and then presenting the model's responses as inline suggestions, chat replies, or code diffs. This architecture enables users to flexibly switch backend models based on cost, privacy, and performance requirements.
Two Paths to the Configuration File
After installation, the core task is editing the config.yaml configuration file. There are two ways to access it:
- Path One: Click the Continue icon, find the "Local Config" entry in the panel, and click to directly open the configuration file
- Path Two: Click the gear icon (Open Settings), find the Config option, and click to open
config.yaml
Note: Don't casually modify the visual options in Continue's settings panel. Some users have accidentally triggered buttons that caused voice narration after every execution.
config.yaml Configuration File Explained
Overall Structure
The configuration file uses YAML format and mainly contains the following modules:
- Workstation name and version: Custom identifiers
- AI model list (models): Configure available model providers
- Autocomplete model (tabAutocomplete): Specify the model used for code completion
- Preset prompts (prompts): Shortcut prompts for common operations
YAML (YAML Ain't Markup Language) is a data serialization format designed with readability as its core goal, widely used in configuration file scenarios. Compared to JSON, YAML uses indentation to represent hierarchy instead of curly braces, dashes (-) to denote list items, and colons (:) to separate key-value pairs. YAML is extremely sensitive to indentation—spaces must be used instead of tabs, and items at the same level must have consistent indentation. Common mistakes made by R users new to YAML include: mixing tabs and spaces causing parse failures, missing spaces after colons, and unquoted strings containing special characters. It's recommended to use Positron's built-in YAML syntax highlighting when editing config.yaml, and check formatting issues promptly when red squiggly lines appear.
Model Configuration Example
Each model configuration entry contains four key fields:
models:
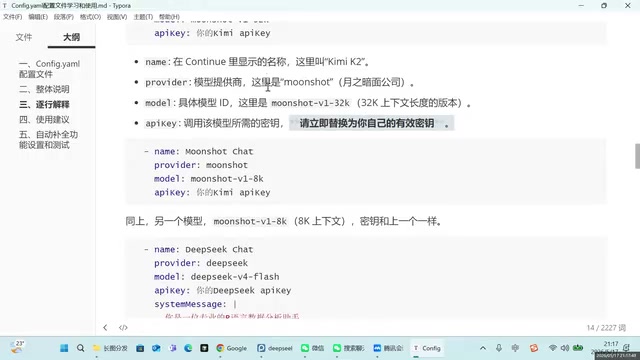
- name: DeepSeek Chat # Custom display name
provider: deepseek # Model provider
model: deepseek-v4-flash # Specific model name
apiKey: your-api-key # API key
The tutorial configures two providers: Kimi and DeepSeek. Three model variants are configured for DeepSeek:
- DeepSeek Chat: Daily conversation, using deepseek-v4-flash
- DeepSeek Code: Code generation, also using deepseek-v4-flash but with an additional system prompt
- DeepSeek R1: Complex reasoning, using a specialized reasoning model
There's clear logic behind the selection of these three model variants. DeepSeek is a large language model series from the Chinese company DeepSeek. DeepSeek-V4-Flash is a speed-optimized lightweight version with low response latency and extremely low token pricing (typically less than one-tenth of GPT-4o), making it ideal for high-frequency scenarios like code completion and daily conversation that require fast responses. DeepSeek-R1 is a specially trained reasoning model that employs Chain-of-Thought techniques, performing multi-step logical reasoning before answering. It's suitable for complex algorithm design, debugging tricky bugs, and other tasks requiring deep thinking, but has slower response times and higher costs. Assigning different models to different task scenarios is a key strategy for controlling API costs.
System Prompt Settings
You can add a systemMessage field to specific models to preset the AI's role and behavioral preferences:
"You are a professional R language data analysis assistant. When answering questions, please prioritize using the Tidyverse ecosystem's R coding style. Comments should be in Chinese, and answers should also be in Chinese."
The Tidyverse mentioned here is the most influential package ecosystem in R, primarily developed by RStudio's Chief Scientist Hadley Wickham. It includes core packages like ggplot2 (data visualization), dplyr (data manipulation), tidyr (data tidying), readr (data import), purrr (functional programming), and stringr (string processing), all sharing a unified design philosophy—pipe operator (|> or %>%) chained calling style, tidy data principles, and consistent function naming conventions. Compared to Base R syntax, Tidyverse code is closer to natural language expression logic, with significantly better readability and maintainability. Specifying Tidyverse style in the system prompt ensures that AI-generated code aligns with mainstream coding practices in the modern R community.
How to Obtain API Keys
DeepSeek API Keys are obtained from their developer platform, with a minimum top-up of 10 RMB for long-term use. The same applies to Kimi, with extremely low costs. After configuration is complete, all configured models will appear in the model selection dropdown in the Continue panel.
Configuring Code Autocomplete
Configuration File Settings
Add the tabAutocomplete module in config.yaml:
tabAutocomplete:
  provider: deepseek
  model: deepseek-v4-flash
  apiKey: your-api-key
The Flash model is chosen because autocomplete requires fast responses, and the Flash version strikes a good balance between speed and quality. The code autocomplete mechanism works as follows: whenever the user stops typing, the plugin sends the current file's context (including code before and after the cursor, file type, imported packages, etc.) to the AI model, which predicts the code the user is most likely to write next and displays it as a gray ghost text. This process typically needs to complete within 200-500 milliseconds to ensure a smooth coding experience, making the choice of a low-latency Flash model crucial.
Key Steps to Enable Autocomplete
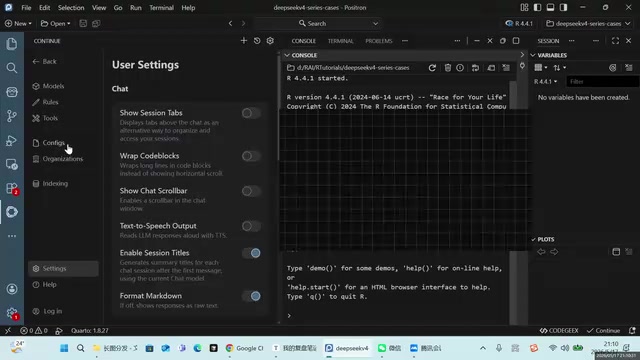
Configuration alone isn't enough—you also need to manually enable it in Positron's user settings:
- Press
Ctrl+Shift+Pto open the command palette - Search for "Open User Settings (JSON)"
- Add the line:
"continue.enableTabAutocomplete": true - Save and restart Positron
Verification and Troubleshooting
Once enabled, the status bar at the bottom of the editor will display the Continue autocomplete icon (a checkmark indicates it's active). If it's not working:
- Search for "Continue"-related commands in the command palette
- Find the autocomplete enable/disable toggle option
- Click to toggle
In practice: typing a comment like "import tidyverse package" and pressing Tab accepts the AI-generated library(tidyverse) code, with subsequent automatic suggestions for data reading, structure inspection, and other common operations.
Preset Prompts and the COSTAR Framework
Three Common Preset Prompts
The configuration file includes preset prompts for three high-frequency operations:
- Code Explanation: Select code and get a one-click explanation of its functionality and logic
- Code Optimization: Convert Base R style to Tidyverse style with added comments
- Error Fixing: Analyze error causes, provide fix solutions and prevention tips
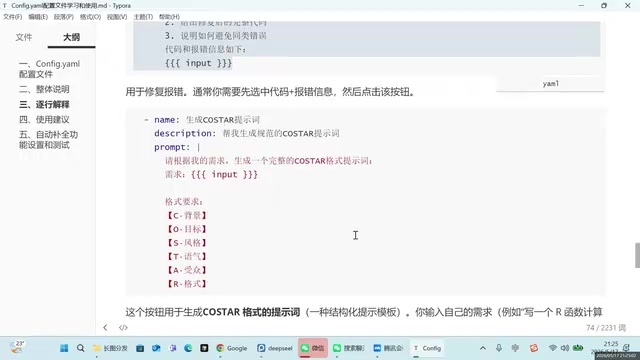
The COSTAR Prompt Framework
The tutorial also recommends the COSTAR prompt framework, which constructs professional prompts across six dimensions:
- Context
- Objective
- Style
- Tone
- Audience
- Response (format)
The COSTAR framework originates from Singapore's Government Technology Agency (GovTech) prompt engineering practices and is a widely recognized structured methodology in the field of Prompt Engineering. Prompt engineering, as an emerging discipline, studies how to guide large language models to produce more accurate and expected outputs through carefully designed input instructions. The six dimensions of COSTAR essentially help users eliminate ambiguity in prompts: Context provides necessary background information to reduce the model's guesswork, Objective clarifies the task goal to prevent off-topic responses, Style and Tone control the level of professionalism and expression, Audience helps the model calibrate explanation depth, and Response constrains the output format for easier downstream processing. For R language users, a good practice is to save commonly used COSTAR templates as preset prompts, avoiding the need to build complex instructions from scratch every time.
COSTAR can be used as a preset template—input a topic and it automatically generates a structured prompt, achieving an efficient "using AI to guide AI" workflow.
Project Management and R Script Creation
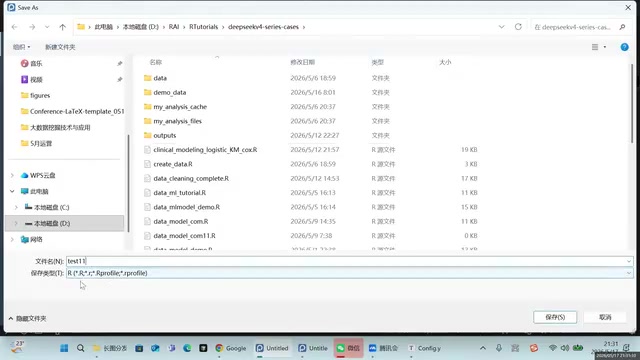
Creating R projects in Positron differs slightly from RStudio. The recommended approach uses built-in templates:
- Select an R project template through the command palette
- Specify the directory and project name
- The system automatically configures the R language interpreter
When creating R scripts, you can directly create a new file with a .R extension, or select R Script type through the "New File" menu. It's recommended to organize all work as projects for easier management and reuse. Positron's project management inherits VS Code's Workspace concept, where each project folder can contain independent settings files and extension configurations, while also being compatible with RStudio's .Rproj project file format for a smooth transition for users migrating from RStudio.
Summary
The complete workflow for building an R language AI programming workstation is: Install stable Positron → Install Continue plugin → Edit config.yaml to configure models → Enable autocomplete → Set up preset prompts. The core of the entire process lies in understanding the YAML configuration file structure—once mastered, adding any new model requires only a few lines of code. DeepSeek-V4-Flash, with its low cost and fast response times, is currently the optimal model choice for R language AI programming.
Related articles
 Tutorials
Cursor + Codex Dual-IDE Collaboration: A Practical Methodology for Open-Source Project Customization
A complete methodology for open-source project customization based on real-world experience, detailing the Cursor+Codex dual-IDE workflow, seven-stage process, MVP validation, and AI source code reading techniques.
 Tutorials
Cursor Multi-Agent in Practice: Building a Full-Stack Next.js Blog in 50 Minutes
Build a full-stack blog in 50 minutes using Cursor IDE's multi-Agent mode with Next.js, Clerk auth, and Supabase. Learn the 4-phase AI Agent workflow and key integration pitfalls.
 Tutorials
Building an AI Software Factory from Scratch: A Cursor Engineer's Hands-On Experience with Multi-Agent Collaboration
Cursor engineer Eric shares practical insights on building an AI software factory: automation levels, guardrail design, parallel Agent management, and scaling to 1000+ Agents for 24/7 development.