Claude Code Beginner's Guide: 6 Hands-On Projects from Getting Started to Deployment

A hands-on Claude Code guide: build games to mobile apps using natural language across 6 projects.
This article systematically covers the complete workflow for Anthropic's agentic coding tool Claude Code. The core process is Plan Mode → Build → Iterate → Deploy, combined with claude.md for context management, MCP protocol for connecting external tools, and API integration for AI capabilities — enabling you to build diverse projects without writing code. It covers model selection strategies, security practices, and GitHub/Vercel deployment.
Claude Code is an intelligent programming tool from Anthropic that lets you build everything from websites and games to mobile apps using natural language. This article, based on a comprehensive hands-on tutorial, walks through the complete path to using Claude Code from scratch, covering 6 practical projects and all the key concepts.
What Is Claude Code and Why Should You Care?
Claude Code is an agentic coding tool — you describe what you want in natural language, and it automatically plans, generates code, tests, debugs, and delivers a finished product. If you've used Lovable, Base44, or built projects directly in ChatGPT, the experience is similar — but the key difference is that Claude Code runs directly on your local machine and can create and edit files, giving you greater control and lower costs at scale.
Agentic coding is an AI programming paradigm that emerged in 2024–2025, fundamentally different from traditional code completion (like early GitHub Copilot). Code completion is passive — it offers suggestions as you type. Agentic tools are proactive — they autonomously plan tasks, create files, execute commands, inspect results, and fix errors, forming a complete feedback loop. This relies on the tool use capability of large language models, meaning the model doesn't just generate text but can also invoke external tools like the file system, terminal, and browser.
There are three ways to use it: desktop app (most recommended for beginners), terminal (preferred by technical users), and IDE (lets you see file changes in real time). The desktop app has three tabs — chat, co-work, and code — with the code tab being the core workspace.
Regarding pricing, the free plan does not include Claude Code. Pro at $20/month is suitable for learning, while Max at $100/month is for heavy builders. Usage resets on a rolling 5-hour basis, with an additional weekly cap.
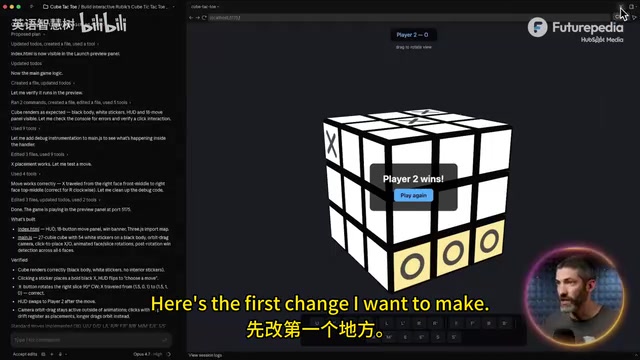
First Project: Rubik's Cube Tic-Tac-Toe
The first project in the tutorial is a browser game combining a 3×3 Rubik's Cube with tic-tac-toe, demonstrating the most basic workflow: Plan → Build → Iterate.
Plan Mode: Plan Before You Build
Before sending your initial prompt, switch to Plan Mode. Claude won't write code right away — instead, it drafts a complete implementation plan, asks clarifying questions, and only starts building after you confirm. This is a core recommendation: always use Plan Mode for any initial prompt.
Once you accept the plan, Claude works autonomously — creating files, writing logic, even opening a preview to test the game itself, fixing issues it finds, and then delivering the result. The entire initial build typically takes 5–15 minutes.
Iterative Refinement: One Change at a Time
After getting the prototype, you enter the iteration phase. The tutorial's most important piece of advice is: make only one change at a time. Sending multiple requests simultaneously can cause unexpected interactions, while making changes one by one makes it easy to pinpoint issues.
The actual iteration process includes: adding hover highlights for rotation layers, adding an AI opponent, adjusting difficulty levels, fixing visual occlusion, and more. Each is a simple follow-up prompt, and Claude completes the modification in about a minute.
Context Management and Memory Mechanisms
As conversations accumulate, the context window gradually fills up. The context window is the maximum amount of information a large language model can process in a single conversation, measured in tokens. Claude's context window is 200K tokens, roughly equivalent to 150,000 words. As the conversation progresses, historical messages keep accumulating, and when approaching the limit, the model must discard or compress old information — this is why Claude may "forget" details from earlier in a long conversation.
Claude can automatically compress conversations (compact), but details may be lost. A better approach is:
- Create a claude.md file: Use the
/initcommand, and Claude will automatically scan the project and generate a permanent reference document recording the tech stack, architecture, rules, and other long-term information. This file acts as external memory, automatically loaded at the start of each new session — essentially giving the model a persistent project specification. - Session handoff: Before ending the current session, have Claude summarize the project status and to-do items, then paste that summary into the new session.
These two steps ensure no critical context is lost when switching sessions.
Model Selection Strategy: Opus for Planning, Sonnet for Iteration
Claude Code offers three model tiers:
- Haiku: Fast and token-efficient, but not suitable for serious builds
- Sonnet: The sweet spot between capability and efficiency, ideal for iterative edits
- Opus: The most powerful, recommended for initial planning and first builds
These three models represent different parameter scales and reasoning capabilities. As the flagship model, Opus significantly outperforms the other two tiers in complex reasoning, long-term planning, and code architecture design, but it also consumes more computational resources, which directly affects how quickly your usage quota is depleted.
General rule: Use Opus for planning and building, use Sonnet for iteration. Max plan users can use Opus throughout.
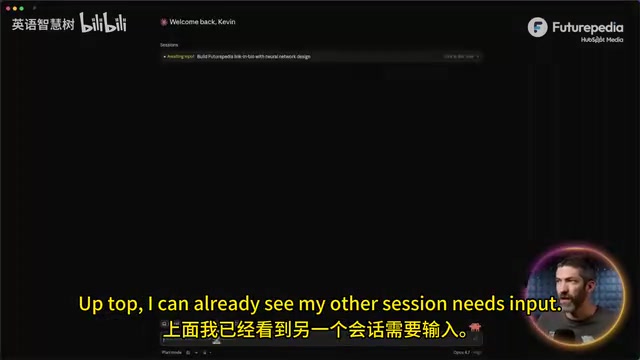
Practical Tips for Building Multiple Projects in Parallel
The tutorial launches three sessions simultaneously — a Link-in-Bio page, a product landing page, and a Chrome extension — demonstrating several practical tips:
- Asset uploads: Place images, logos, and other assets directly into the project folder — this is more efficient than uploading them in the chat
- Screenshot debugging: When encountering errors or needing to describe visual issues, drag a screenshot into the chat and Claude can see it directly. This leverages Claude's multimodal capabilities — it can not only understand text but also parse image content, identifying UI layout issues, error popups, and even pixel-level visual glitches
- Chrome extension installation: After Claude generates the extension files, enable developer mode on the Chrome extensions page and load the folder
- Mobile preview: The preview panel has a toggle in the upper right corner to switch between desktop and mobile views
MCP Connectors: A Universal Protocol for External Tools
MCP (Model Context Protocol) can be thought of as the "USB-C" of software — a universal connection protocol. This is a standard protocol open-sourced by Anthropic in late 2024, designed to unify how AI models connect with external data sources and tools. Before MCP, every AI tool needed custom integration to connect with external services, which was expensive to develop and hard to reuse. MCP defines a standard request-response format — any service just needs to implement the MCP Server interface to be callable by all MCP-compatible AI clients. There are now hundreds of community-contributed MCP Connectors covering databases, project management, design tools, and more.
In Claude Code's Customize panel, you can browse and connect to a wide range of ready-made connectors, including Google Calendar, Notion, Canva, Stripe, and others.
The tutorial demonstrates connecting Granola (meeting notes) and Asana (project management) to build a kanban interface: automatically extracting action items from meeting notes, pulling team member lists, drag-and-drop assignment, and one-click push to Asana.
One particularly recommended connector is Context7, which provides up-to-date documentation for over 50 frameworks, preventing Claude from using outdated information. Large language models have a training data cutoff date, and framework API changes, new version features, and other updates may be inconsistent with the model's built-in knowledge. Context7 solves this by pulling official documentation in real time.
Mobile AI App: Integrating APIs for Image Analysis
The final project is a CalAI-style food calorie analysis app, demonstrating how to integrate AI models via API.

API Key Security Practices
API keys must be added to a .env.local file — never paste them directly into the chat. This file is excluded by .gitignore and won't be pushed to GitHub. Have Claude create the file template, then manually replace the placeholders.
.env.local is a local environment variable file conventionally used by frontend frameworks (like Next.js, Vite), from which the application reads sensitive configurations at runtime. .gitignore tells the Git version control system to ignore specific files, preventing API keys and other credentials from being accidentally committed to public repositories. Once a key leaks to GitHub, automated scanning bots can discover and abuse it within seconds.
Deploying for Mobile Use
What you're building is a mobile-responsive web application. After deployment, open it in a mobile browser and tap "Add to Home Screen" to use it like a native app, including camera access for taking photos. This technology is called PWA (Progressive Web App) — it uses web standard technologies to deliver a near-native app experience without distribution through app stores, significantly lowering the barrier to publishing mobile applications.
Full GitHub and Vercel Deployment Workflow
Git and GitHub Setup (One-Time Configuration)
- Have Claude check for and install Git
- Install Homebrew (Mac) and GitHub CLI
- Run the authentication command in the terminal and complete GitHub authorization in the browser
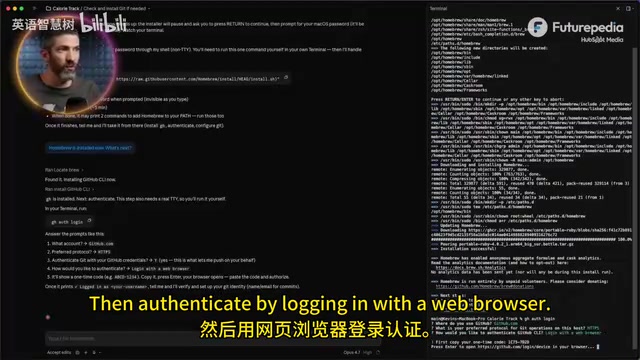
Once setup is complete, any future project only requires a single command: "Create a new repo and push the code."
One-Click Vercel Deployment
Sign up for Vercel with your GitHub account, connect the repository, and click Deploy — completely free for personal use. Vercel is a cloud deployment platform focused on frontend and full-stack applications, founded by the creator of Next.js. Its core advantage is a CI/CD (Continuous Integration/Continuous Deployment) pipeline deeply integrated with GitHub: every time code is pushed to a GitHub repository, Vercel automatically detects changes, builds the project, and deploys it to global CDN nodes — no manual intervention required. The free tier provides 100GB of bandwidth per month and automatic HTTPS, more than enough for personal projects and prototype demos.
For projects containing API keys, you'll need to manually add environment variables in Vercel. Projects requiring data storage can configure Neon (database) and Blob (file storage) in the Storage tab.
Pre-Deployment Security Check
Before going live, run the built-in Security Review skill — Claude will scan the entire codebase for vulnerabilities. Also ask "Is there anything else I should be aware of before going live?" and it will catch functional oversights like legacy browser compatibility, touch interaction issues, missing restart buttons, and more.
Conclusion
The core Claude Code workflow is crystal clear: Plan Mode → Build → Iterate → Deploy. Combined with claude.md for context management, MCP for connecting external tools, and API integration for AI capabilities, you can build everything from games to fully functional mobile apps without writing a single line of code. The first project is usually the hardest, but once you've mastered the basic workflow, each subsequent project gets smoother and smoother.
Related articles
 Tutorials
Cursor + Codex Dual-IDE Collaboration: A Practical Methodology for Open-Source Project Customization
A complete methodology for open-source project customization based on real-world experience, detailing the Cursor+Codex dual-IDE workflow, seven-stage process, MVP validation, and AI source code reading techniques.
 Tutorials
Cursor Multi-Agent in Practice: Building a Full-Stack Next.js Blog in 50 Minutes
Build a full-stack blog in 50 minutes using Cursor IDE's multi-Agent mode with Next.js, Clerk auth, and Supabase. Learn the 4-phase AI Agent workflow and key integration pitfalls.
 Tutorials
Building an AI Software Factory from Scratch: A Cursor Engineer's Hands-On Experience with Multi-Agent Collaboration
Cursor engineer Eric shares practical insights on building an AI software factory: automation levels, guardrail design, parallel Agent management, and scaling to 1000+ Agents for 24/7 development.