Claude Code Installation & Deployment Guide: From Environment Setup to Successful Launch
A step-by-step guide to installing and configuring Claude Code from environment setup to first successful run.
This guide walks developers through the complete process of installing Claude Code, Anthropic's AI programming assistant. It covers prerequisite environment setup (Node.js 20+ and Git), using NVM for version management, configuring network proxies for overseas API access, setting up API providers with tools like CCSwitch, and verifying a successful first run.
What is Claude Code?
Claude Code is an AI programming assistant developed by Anthropic, positioned as an AI programmer that can directly manipulate local files. Unlike traditional AI tools such as ChatGPT or DevChat, Claude Code's standout feature is its ability to directly read your codebase, edit files, and run commands.
When your project encounters an error, you no longer need to manually copy and paste error messages to ask AI for help. Instead, you can let Claude Code directly inspect the error, analyze the cause, modify the code, and re-run the project. Additionally, it integrates with mainstream IDEs like VS Code and IntelliJ IDEA, truly embedding itself into developers' daily workflows.
The Evolution of AI Programming Assistants
AI programming assistants have evolved through three stages: from code completion to intelligent conversation to autonomous programming. Early tools like GitHub Copilot primarily offered line-level code completion, while ChatGPT answered programming questions through dialogue but couldn't directly manipulate project files. Claude Code represents the third stage — Agentic Coding — where AI not only understands code logic but can execute complete development task chains like a real developer: reading code, locating issues, modifying files, and running tests. This paradigm is also known as "code agents," and Anthropic positions it as a core productivity node in the developer toolchain.
Pre-Installation Environment Setup
Checking Node.js and Git Environments
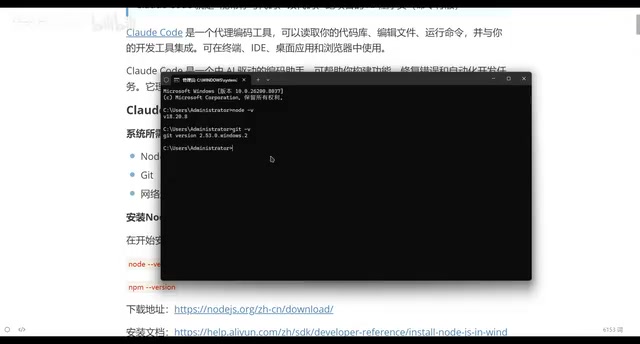
Before installing Claude Code, you need to ensure that Node.js and Git are already installed on your machine. Open a terminal (CMD) and run the following commands to check:
node -v
git --version
If you see version numbers in the output, your environment is ready. If not yet installed, simply download the installers from their respective official websites.
Node.js is a JavaScript runtime environment built on Chrome's V8 engine that enables JavaScript to run in server-side and command-line environments, not just in browsers. Claude Code depends on Node.js because it is essentially a command-line tool distributed via npm (Node Package Manager), with its underlying communication, file operations, and process management all relying on Node.js APIs. The requirement for version 20 or above is because Claude Code uses features introduced in Node.js 20, such as native ES Module support and the fetch API.
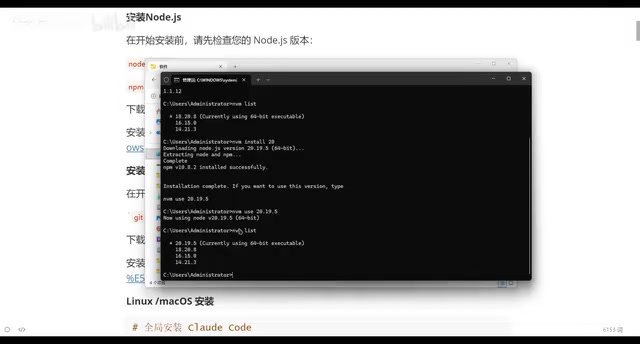
Using NVM to Manage Node.js Versions
It's recommended to use NVM (Node Version Manager) to manage Node.js versions, allowing you to easily switch between different versions. After installing NVM, common commands include:
nvm -v          # Check NVM version
nvm install 20  # Install Node.js 20.x
nvm use 20.19.5 # Switch to a specific version
nvm list        # View all installed versions
Important note: Claude Code requires Node.js version 20 or above. Using a lower version (such as 18.x) will result in an installation error. It's recommended to install version 20 or higher.
NVM achieves version isolation by maintaining separate installation directories for multiple Node.js versions under the user directory. When you execute the nvm use command, NVM modifies the system PATH environment variable to prioritize the specified Node.js version's path. This design is particularly suited for developers maintaining multiple projects simultaneously — legacy projects might depend on Node.js 16, while Claude Code requires Node.js 20, and NVM lets both coexist seamlessly. Windows users should note that nvm-windows is a separate project with a different implementation from NVM on Linux/macOS.
Claude Code Installation Steps in Detail
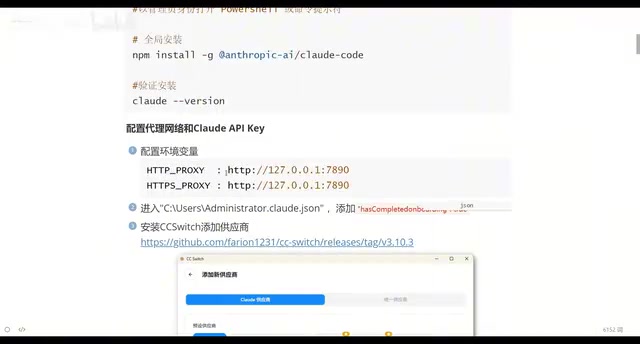
Running the Installation Command
Once your environment is ready, execute the official installation command in your terminal to complete the Claude Code installation. After installation, verify success with the following command:
claude --version
If you see a version number in the output, the installation was successful.
Resolving Network Connection Issues
When running Claude Code directly, you may encounter errors like "unable to connect to service" or "Bad Request." This is because Claude Code connects to Anthropic's overseas servers by default, and users in China need to configure a network proxy for normal operation.
Anthropic is the company behind the Claude model series, headquartered in San Francisco, USA. Its API servers are deployed overseas, and direct access from China faces DNS resolution failures or TCP connection timeouts. Configuring a proxy essentially routes Claude Code's HTTP/HTTPS requests through a local proxy server to overseas nodes. Common environment variables include HTTP_PROXY and HTTPS_PROXY, which are recognized and automatically used by Node.js networking libraries. This is also a universal solution for many development tools that rely on overseas APIs when used in China.
The configuration method involves creating proxy-related variables in your system environment variables and setting the corresponding proxy port. The specific port number needs to be adjusted based on your individual network setup.
Configuring API Access
Modifying the Configuration File
Claude Code's configuration file is located at .claude.json in your user directory (typically at C:\\Users\\your-username\\.claude.json). Open this file, add a comma after the existing content, start a new line, add the API-related configuration, and save.
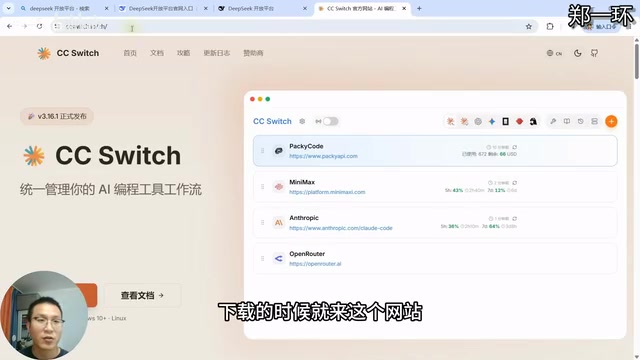
Using CCSwitch to Switch API Providers
For more flexible API provider management, you can install CCSwitch. After installation, clicking the plus button on the interface reveals a list of available providers.
Besides using Anthropic's official API directly, developers can access Claude models through third-party API relay services. These relay providers typically offer proxy services compatible with OpenAI or Anthropic interface formats, with advantages including: support for domestic payment methods (Alipay/WeChat), some providers offering domestic nodes to reduce latency, and lower pay-per-use thresholds. CCSwitch's core function is managing the Base URL and API Key configurations for these different providers, eliminating the need for developers to manually edit configuration files.
Using MiMax as an example, the workflow is as follows:
- Select the MiMax provider in CCSwitch
- Click to visit their website, register, and subscribe to a plan
- Copy the API Key from the API page
- Return to CCSwitch and paste the API Key into the corresponding input field
- Click add, then enable
Once the switch is successful, Claude Code can access AI services normally.
First Run and Feature Verification
With all configurations complete, launch Claude Code in your terminal:
claude
On first launch, you'll need to select an interface theme and confirm whether you trust the current folder. Once in the interactive interface, type "hello" to test. If you receive a normal response, the entire installation and configuration process is complete.
The "confirm whether you trust the current folder" prompt during first run is part of Claude Code's security sandbox design. Since Claude Code has the ability to read/write files and execute commands, running it without restrictions in any directory could lead to accidental file deletion or execution of dangerous commands. The trust mechanism ensures AI can only operate within directories explicitly authorized by the user. This is a common security strategy adopted by Agentic AI tools — maintaining human ultimate control while granting AI autonomy.
Summary and Recommendations
Although Claude Code's installation and deployment involves multiple steps, the overall process is not complicated. Here are the key takeaways:
- Clear environment requirements: Node.js 20+ and Git are mandatory prerequisites
- Network configuration is critical: Users in China must configure a proxy in advance
- API management tools available: CCSwitch simplifies the provider switching process
- NVM recommended for version management: Enables flexible switching between different Node.js versions
For programmers looking to boost development efficiency, Claude Code's ability to "directly manipulate local files" genuinely solves the pain point of traditional AI tools requiring constant copy-pasting. Once configured, it acts like a programming partner always on standby, ready to contribute directly within your project.
Related articles

AI Aggregator Platforms Tested: A Complete Guide to Using GPT 5.5 and Other Top Models for Free
A hands-on guide to using GPT 5.5, Gemini 3.1 Pro, and Grok 4.2 for free via AI aggregator platforms, covering cross-model context memory, account pool mechanisms, and key security risks.
Vibe Coding in Practice: A Junior Student Uses Cursor to Build a Multi-Agent System with 51 AI Officials Based on the Three Departments and Six Ministries Framework
A junior student uses Cursor and Vibe Coding to build a multi-agent system with 51 AI officials modeled on China's Three Departments and Six Ministries, featuring task distribution, approval workflows, and Token cost visualization.
How to Connect Codex to DeepSeek Models: Free Switching via CC Switch
Learn how to connect OpenAI Codex to DeepSeek models via CC Switch, enabling free switching between DeepSeek and GPT with complete setup and routing guide.