Claude Code with DeepSeek API Tutorial: 7 Steps to Build a Low-Cost AI Coding Assistant

A 7-step guide to connecting Claude Code with DeepSeek API via ccswitch for affordable AI coding.
This tutorial shows how to switch Claude Code's backend from the official API to the much cheaper DeepSeek API. By installing Node.js, Git, Claude Code, and the ccswitch configuration manager, then adding and activating a DeepSeek provider profile in ccswitch, you can achieve low-cost AI-assisted programming. Key reminders: the model name must exactly match the platform's model ID, and you must click activate after saving the configuration.
Why Switch Claude Code to DeepSeek?
Claude Code is a command-line AI coding tool from Anthropic that developers love for its excellent code generation capabilities. However, the official API pricing isn't friendly for individual developers and students. DeepSeek V4 Pro's API is priced far lower than Claude's official rates, yet its coding capabilities are comparable—making "Claude Code + DeepSeek API" an extremely cost-effective combination.
From a technical architecture perspective, Claude Code is a terminal-native AI coding assistant launched by Anthropic in 2025. It runs directly in the command line and can understand the context of an entire code repository, perform file edits, run commands, manage Git operations, and more. Unlike VS Code plugin-based Copilot, Claude Code operates in Agent mode, autonomously planning and executing multi-step tasks. DeepSeek is a large language model series from the DeepSeek company, and its V4 Pro version performs excellently in code generation benchmarks while being priced at roughly one-tenth of Claude 3.5 Sonnet. The two connect through the OpenAI-compatible API protocol, making this "frontend tool + third-party backend" combination possible.
Bilibili creator "极客魔导师" (Geek Wizard) shared a complete 7-step configuration workflow with hands-on demonstrations from environment setup to final verification. This article organizes that workflow into a structured tutorial to help you complete the configuration quickly.
Environment Preparation: Installing Node.js and Git
Step 1: Install Node.js
Claude Code relies on NPM for installation, so you first need to set up a Node.js environment (version 18.0 or above).
Node.js is a JavaScript runtime environment built on Chrome's V8 engine, and NPM (Node Package Manager) is its default package manager—also the world's largest open-source software registry. Claude Code is distributed via NPM because it's written in TypeScript/JavaScript, and NPM's global installation mechanism conveniently registers command-line tools as system commands. The LTS (Long Term Support) version receives 30 months of maintenance support, making it more suitable for production use than the Current version. The 18.0+ requirement exists because Claude Code depends on newer Node.js built-in features like ES Modules and the fetch API.
Steps:
- Visit the Node.js official website and select the LTS version
- Download the .msi installer for Windows
- Double-click to install with default settings
- Open PowerShell to verify: enter
node --versionandnpm --versionto confirm version numbers display correctly
Step 2: Install Git
Claude Code requires Git support to run on Windows. Visit the Git official website to download the 64-bit Windows installer, complete the installation with default options, then verify by entering git --version.
Claude Code needs Git for more than just version control. In Agent mode, Claude Code uses Git to create checkpoints—automatically creating commits before executing potentially risky code modifications so you can roll back with one click if results are unsatisfactory. Additionally, Claude Code parses the .git directory structure to understand project boundaries and file organization, and uses .gitignore to determine which files should be ignored. On Windows, Git also comes bundled with Git Bash and a suite of Unix tools (like grep and find) that Claude Code calls when performing searches and file operations.
Installing Claude Code
Step 3: Two Installation Methods
Method 1: NPM Global Install (Recommended)
Open PowerShell as administrator and enter:
npm install -g @anthropic-ai/claude-code
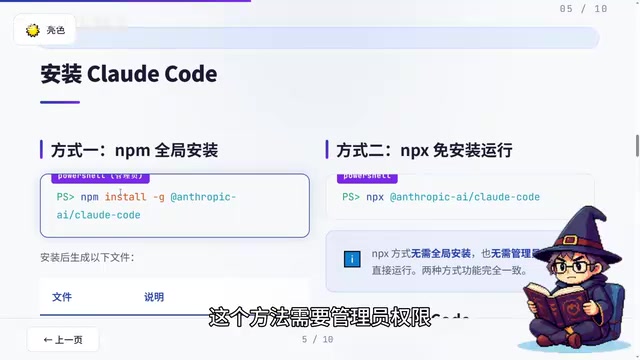
Global installation writes files to system directories, hence the need for administrator privileges. NPM global install (npm install -g) downloads packages to a system-level directory (typically %appdata%\npm on Windows) and creates symbolic links to executables, making them permanently available as system commands.
Method 2: NPX No-Install Run
npx @anthropic-ai/claude-code
No administrator privileges needed—suitable for temporary use. NPX (Node Package Execute) is a package executor built into NPM 5.2+. It temporarily downloads packages to a cache directory and doesn't retain global registration after execution. NPX's advantage is no admin privileges needed and always using the latest version; the downside is needing to re-resolve dependencies each launch, resulting in slower cold starts. For developers who frequently use Claude Code, global installation saves waiting time on each startup.
Common Claude Code Installation Errors and Solutions
Error 1: Command not recognized
90% of the time, simply closing and reopening PowerShell solves this—the reason is that environment variables haven't refreshed after installation. If restarting still doesn't work, manually add %appdata%\npm to your user Path variable.
Error 2: Script execution is disabled
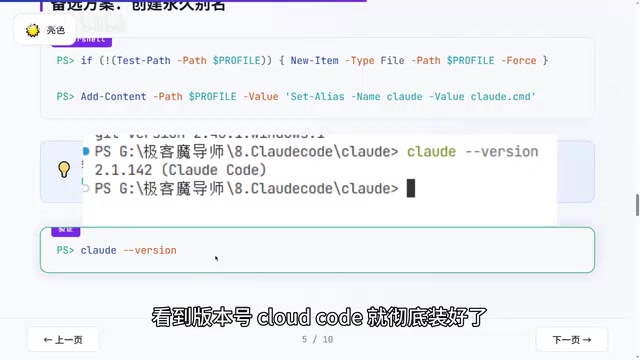
This is caused by PowerShell's security policy. Windows PowerShell defaults to a Restricted execution policy that prohibits running any script files (.ps1)—a security mechanism Microsoft designed to prevent malicious script execution. When NPM globally installed tools attempt to launch via .ps1 scripts, this restriction is triggered. The standard solution is running Set-ExecutionPolicy RemoteSigned to allow local scripts, but this requires admin privileges and reduces system security. The alias approach recommended in the tutorial is more elegant—directly calling the .cmd batch file bypasses PowerShell's script policy check, maintaining security while enabling normal tool usage. Specifically: first create a PowerShell profile, then add an alias pointing to cloud.cmd, and it works normally after restart.
Verify installation: enter cloud --version—seeing a version number means installation succeeded.
Installing the ccswitch API Management Tool
Step 4: Install ccswitch
ccswitch is an open-source desktop tool specifically designed to manage API configurations for AI coding command-line tools. With it, you don't need to manually edit configuration files—just a few clicks to switch backend models.
Under the hood, ccswitch's core function is modifying the environment variables and configuration files that Claude Code reads. Claude Code follows the OpenAI-compatible API calling convention, using ANTHROPIC_BASE_URL (or equivalent environment variables) to determine the API endpoint and ANTHROPIC_API_KEY for authentication credentials. ccswitch is essentially a configuration file manager that stores different providers' Base URLs, API Keys, model IDs, and other information as configuration profiles. When a profile is activated, it writes the corresponding values to Claude Code's configuration files (typically located in ~/.claude/) or sets system environment variables. This design means users don't need to understand the underlying configuration format and avoids syntax error risks from manually editing JSON/YAML files.
Go to ccswitch's GitHub Releases page, download the latest Windows installer (.msi or .exe), and install with all defaults. On first launch, you may see a "Windows can't verify the developer" prompt—click "More info" → "Run anyway." This is Windows' standard prompt for unsigned applications.
Configuring the DeepSeek API Provider (Core Step)
Step 5: Add DeepSeek Configuration in ccswitch
This is the most critical part of the entire tutorial:
- Open ccswitch and click the "+" icon in the upper right corner
- Find DeepSeek in the provider list and select it (choosing a preset provider auto-fills the API Base URL)
- Enter your DeepSeek API Key (must be obtained in advance from the DeepSeek Open Platform)
- Key point: The model name must be an actual available model ID from the platform, such as
deepseek-chat,deepseek-coder, etc.
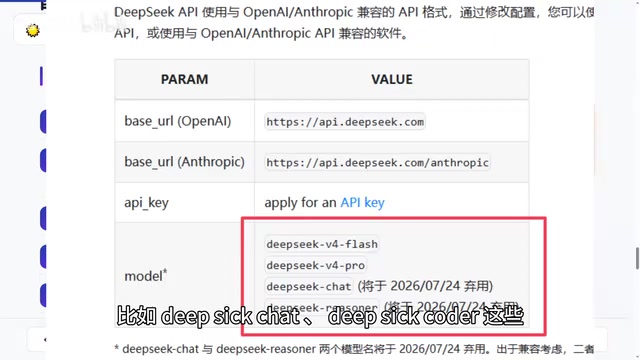
DeepSeek can serve as Claude Code's backend because it implements the OpenAI-compatible API protocol. This protocol has become the de facto standard for LLM APIs, defining request and response formats for endpoints like /v1/chat/completions. Any model service implementing this protocol can serve as an alternative backend, including DeepSeek, Qwen, Moonshot, and other Chinese models, as well as local models deployed through frameworks like Ollama and vLLM. The model ID (e.g., deepseek-chat) is the key identifier for API routing—the server uses it to determine which specific model to call, so it must exactly match the name listed in the platform documentation, including case sensitivity and hyphens.
Never make up model names—incorrect entries will cause API calls to fail immediately. If you need extended context support, refer to ccswitch's official documentation to add extension markers.
Regarding API Key security: The DeepSeek API Key is the sole credential for accessing the model service—if leaked, others can use your account balance to make API calls. When applying for a Key on the DeepSeek Open Platform (platform.deepseek.com), it's recommended to set call rate limits and monthly budget caps. The API uses per-token billing with separate pricing for input and output tokens. DeepSeek V4 Pro is priced at approximately ¥1/million input tokens and ¥2/million output tokens (check the official website for exact pricing), offering an order-of-magnitude cost advantage compared to Claude 3.5 Sonnet's $3/$15 per million tokens. For daily coding assistance scenarios, monthly consumption typically ranges from ¥10-50 RMB.
Step 6: Activate the Configuration (The Step Most Likely to Trip You Up)
Special emphasis: Saving the configuration ≠ Activating the configuration!
After saving, you must click the "Activate Current Configuration" button. Without clicking it, Claude Code won't use your newly configured DeepSeek backend. Only when you see the "Configuration activated" prompt is this step truly complete.
Verifying Configuration and Daily Usage Tips
Step 7: Verify DeepSeek Configuration Is Active
Enter cloud in PowerShell to launch Claude Code. Once in the interactive interface, ask directly: "Which company developed you? Please briefly introduce yourself."
If the response mentions DeepSeek, the switch was successful. Run a functional test as well—for example, ask it to write a Python function that calculates the Fibonacci sequence. If it returns code normally, everything is ready.
Multi-Configuration Switching Tips
If you've configured multiple APIs simultaneously (e.g., DeepSeek and Claude official), switching only requires selecting the target configuration in ccswitch and clicking "Activate Current Configuration"—no terminal restart needed. Switching back to the Claude official API works the same way: select, activate, then restart Claude Code. This multi-configuration management flexibility means you can choose different backends based on task complexity—use DeepSeek for simple code completion and daily Q&A to save costs, and switch back to Claude official for complex architectural design tasks requiring superior reasoning capabilities.
Quick Reference Troubleshooting Table
| Problem | Solution |
|---|---|
| Command not recognized | Restart PowerShell or check Path variable |
| Script execution disabled | Configure alias pointing to cloud.cmd |
| Configuration not taking effect | Confirm you clicked "Activate Current Configuration" |
| Model not found error | Check if model ID matches the platform |
| API call failed | Check if API Key is correct and balance is sufficient |
| Slow response | DeepSeek may queue during peak hours; try off-peak usage or switch to another compatible provider |
| Insufficient context length | Refer to ccswitch documentation to configure extended context markers |
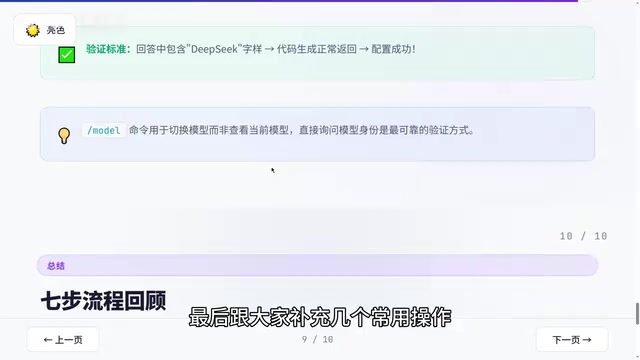
Summary: Two Key Points to Avoid Pitfalls
The core idea of this entire solution is using the ccswitch tool to switch Claude Code's backend from the official API to DeepSeek API, dramatically reducing costs while maintaining strong coding capabilities. Remember two key points: Don't enter the wrong model name, and Don't forget to click activate after saving. Master these two points and you'll have virtually no issues.
For developers on a budget who still want to experience an AI coding assistant, this is currently one of the most cost-effective solutions available. It's worth noting that this solution is highly extensible—as the Chinese LLM ecosystem rapidly develops, any future model supporting the OpenAI-compatible protocol can be integrated the same way, ensuring your toolchain investment won't become obsolete due to model iterations.
Related articles
 Tutorials
Cursor + Codex Dual-IDE Collaboration: A Practical Methodology for Open-Source Project Customization
A complete methodology for open-source project customization based on real-world experience, detailing the Cursor+Codex dual-IDE workflow, seven-stage process, MVP validation, and AI source code reading techniques.
 Tutorials
Cursor Multi-Agent in Practice: Building a Full-Stack Next.js Blog in 50 Minutes
Build a full-stack blog in 50 minutes using Cursor IDE's multi-Agent mode with Next.js, Clerk auth, and Supabase. Learn the 4-phase AI Agent workflow and key integration pitfalls.
 Tutorials
Building an AI Software Factory from Scratch: A Cursor Engineer's Hands-On Experience with Multi-Agent Collaboration
Cursor engineer Eric shares practical insights on building an AI software factory: automation levels, guardrail design, parallel Agent management, and scaling to 1000+ Agents for 24/7 development.