Claude Code Installation & Configuration Pitfall Guide: From Environment Setup to Running Your First Command
Claude Code Installation & Configurati…
Complete guide to installing and configuring Claude Code, covering environment setup, proxy, and API keys.
This article systematically walks through the complete process of getting Claude Code up and running. Key steps include installing Node.js 20+ LTS, configuring Git Bash environment variables, globally installing Claude Code via npm, setting up proxies in .claude/settings.json to bypass regional restrictions, and completing API key authorization. The article highlights common pitfalls such as Node.js not inheriting system proxy settings and the necessity of adding Git Bash to environment variables.
Claude Code is an AI programming command-line tool from Anthropic. With its powerful code comprehension and generation capabilities, it's becoming a productivity powerhouse for more and more developers. However, between installation and actually running your first command, there are quite a few pitfalls lurking — wrong Node version, unconfigured network proxy, API key issues — any misstep can leave you stuck for hours.
Based on a hands-on tutorial from a Bilibili creator, this article systematically walks through the complete Claude Code installation and configuration process, clarifying the key considerations at each step to help you avoid detours.
Environment Preparation: Installing Node.js and Git
Setting Up Node.js
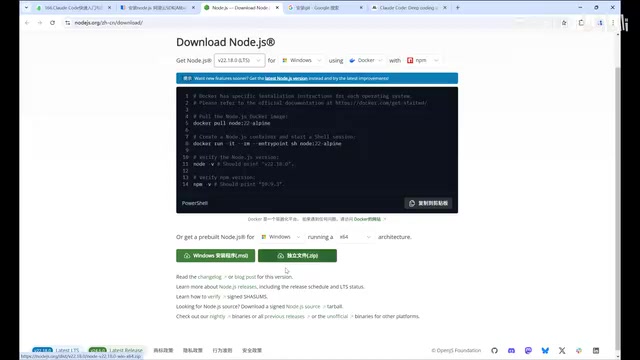
Claude Code runs on Node.js, so the first step is installing the correct version. Node.js is a JavaScript runtime environment built on Chrome's V8 engine that allows JavaScript code to run on servers or local command lines outside the browser. Node.js uses an event-driven, non-blocking I/O model, making it naturally suited for building CLI (Command Line Interface) tools — and Claude Code is exactly such a CLI application written in Node.js.
Here are the key points:
- Version requirement: Install an LTS (Long-Term Support) version 20 or above. Node.js follows a strict even/odd versioning strategy: even-numbered versions (e.g., 18, 20, 22) enter the LTS channel and receive up to 30 months of official maintenance and security patches; odd-numbered versions belong to the Current channel and serve only as testing grounds for new features with no stability guarantees. Claude Code depends on newer features like ES Module support and the native fetch API, hence the version 20+ requirement.
- Installation method: Windows users can choose the MSI installer (auto-configures environment variables) or the zip archive (requires manual configuration); Mac users download the PKG package; Linux users download the TAR package.
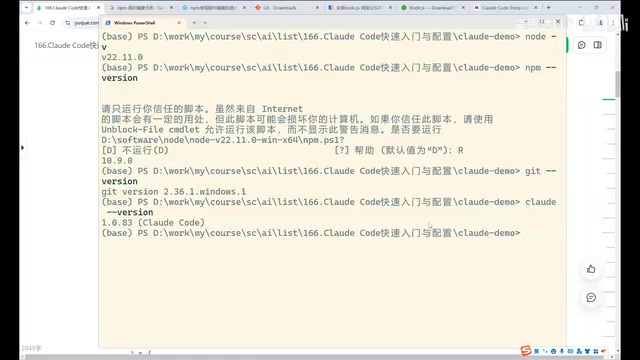
- Verify installation: Run
node -vandnpm -v— if you see version numbers, you're good to go. npm (Node Package Manager) is the package manager bundled with Node.js, responsible for downloading and managing JavaScript packages from the npm Registry. Claude Code is installed through npm.
In practice, version 22.11 has been verified to work properly, and versions 20+ generally have no issues. If npm downloads are slow, consider configuring a domestic mirror registry (such as the Taobao npm mirror) to significantly improve download speeds. The setup is simple: run npm config set registry https://registry.npmmirror.com to switch the default download source to a domestic node.
Configuring Git Bash
Installing Git isn't just about version control — Claude Code needs a Bash terminal environment to execute tasks, and Git Bash on Windows provides a mini terminal that emulates Linux commands.
Git Bash is a terminal emulator included with the Git for Windows installer. It's based on the MSYS2 (Minimal SYS2) project and provides a lightweight POSIX-compatible layer on Windows. POSIX is a set of standard interface specifications for Unix operating systems, natively supported by Linux and macOS, but incompatible with Windows CMD and PowerShell. When Claude Code performs code generation, file operations, project scaffolding, and other tasks, it calls numerous Unix-style shell commands under the hood (such as mkdir -p, chmod, grep, etc.) that cannot run directly in native Windows terminals. Git Bash, through its built-in bash.exe interpreter and a set of ported GNU core utilities, enables these commands to work on Windows.
After installing Git, run git version to confirm the installation. The more critical step is adding the Git Bash path to your system environment variables. Here's how: locate the bash.exe file in your Git installation directory (typically at C:\Program Files\Git\bin\) and add it to the system PATH variable. Adding bash.exe to the system PATH essentially allows Claude Code to find and invoke this Bash interpreter from any working directory, rather than being limited to use within the Git Bash window. If you skip this step, Claude Code will likely throw errors when generating projects or executing operations.
Installing and Verifying Claude Code
With the environment ready, installing Claude Code itself requires just one npm command:
- Linux/Mac:
sudo npm install -g @anthropic-ai/claude-code - Windows:
npm install -g @anthropic-ai/claude-code(no sudo needed)
The -g (global) flag in npm installs the package to the system-level global directory (typically /usr/local/lib/node_modules on Linux/Mac, %AppData%/npm on Windows) rather than the current project's node_modules folder. Globally installed packages register executables in the system PATH, making them callable like system commands from any location.
Claude Code is essentially a "local CLI + cloud model" architecture: after the user types a natural language instruction in the terminal, Claude Code packages the instruction along with the current project's code context and sends it to Anthropic's API. The cloud-based Claude large language model returns code modification suggestions, which Claude Code then parses and applies to the local file system. This architecture enables deep access to local codebases while leveraging powerful cloud-based reasoning capabilities — the mainstream technical paradigm for current AI programming assistants.
The installation package is small, so the download is usually quick. After installation, run claude --version to verify — seeing a version number means the installation was successful. You can also use claude --help to view all available commands and parameters.
Network Proxy Configuration: Solving Regional Restrictions
This is the most common pitfall for users in China. Due to network restrictions, running the claude command directly may produce an "unsupported region" error.
To understand the root cause: when Claude Code sends requests to the Anthropic API, data packets go through DNS resolution, TCP connection establishment, TLS handshake, and other network steps. Anthropic's API servers determine the user's region based on the request's source IP address and return a 403 or regional restriction error for regions where the service isn't available.
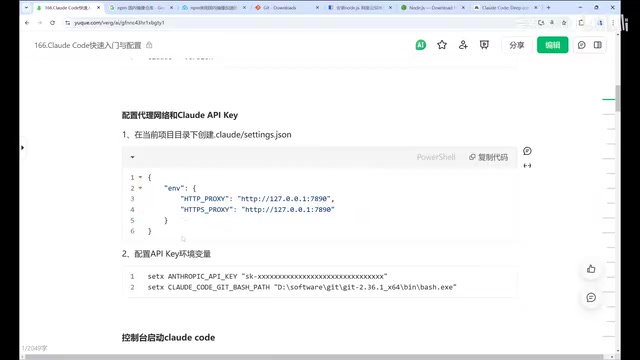
The solution is to configure an HTTP/HTTPS proxy:
- Create a
.claudefolder in your project root directory - Create a
settings.jsonfile in that folder - Add proxy configuration to route HTTP and HTTPS requests through your local proxy service
An HTTP proxy works by inserting an intermediary node between the client and the target server: Claude Code sends requests to the proxy server, which then forwards them to the Anthropic API using its own IP address, thereby bypassing IP-based geolocation detection. The proxy address in the configuration typically points to a locally running proxy client (e.g., 127.0.0.1:7890), which then forwards traffic to overseas nodes through an encrypted tunnel.
It's worth noting that system-level proxies and application-level proxies are two independent configuration layers — even if the operating system has a global proxy set, Node.js processes do not automatically inherit system proxy settings by default. Therefore, you need to explicitly declare the proxy in Claude Code's configuration file. If you've confirmed that your command-line window routes through a proxy (you can test connectivity with curl -I https://api.anthropic.com), or if you're working directly on an overseas server, you can skip this step. However, given that network conditions can be inconsistent, it's recommended to configure the proxy from the start to avoid repeated troubleshooting later.
API Keys and Login Authorization
Choosing Between Two Payment Models
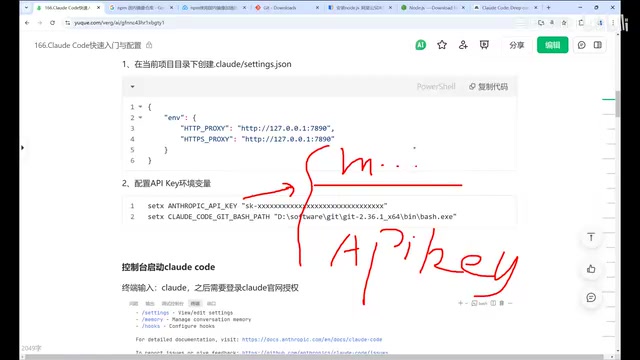
Using Claude Code requires an API key. Anthropic offers two payment methods:
- Subscription (monthly payment): Ideal for heavy users, with a fixed monthly fee and virtually unlimited usage. Subscription plans (such as Claude Pro/Max) essentially bundle API call quotas into a fixed monthly fee. Users obtain tokens through an OAuth authorization flow without manually managing keys.
- Pay-as-you-go (API top-up): Ideal for occasional users — you pay only for what you use. Pay-as-you-go requires manually creating an API Key in the Anthropic Console and pre-loading funds, with charges based on actual token consumption (input tokens + output tokens). Here, a token is the basic unit of text processing for large language models — one English word typically corresponds to 1-2 tokens, and one Chinese character typically corresponds to 1-3 tokens.
Anthropic's API uses a Bearer Token authentication mechanism: each API request must include a key string in the format x-api-key: sk-ant-... in the HTTP header, which the server uses to identify the caller and handle billing.
There's also an alternative approach — using domestic third-party proxy services (commonly called "wrapper" services). These services typically implement an API Gateway that receives user requests, forwards them to Anthropic using their own official API Keys, and returns the responses to users. These services provide their own API Keys, potentially at better prices, and some even offer trial credits. However, when using third-party services, in addition to configuring the API Key, you also need to set the API Base URL to point to the third party's endpoint — redirecting requests from the official api.anthropic.com to the third party's server address.
Note that this model means your code context and conversation content will pass through third-party servers, posing certain data security risks. You should evaluate the service provider's trustworthiness and data handling policies before choosing this option.
Login Authorization Flow
Running the claude command for the first time launches a guided setup:
- Choose interface theme: Light or dark mode
- Login authorization: Redirects to the Claude website for account authorization
- Obtain key: After successful authorization, the system automatically retrieves the token and writes it to the local configuration file (in the
~/.claudedirectory)
Claude Code's configuration system follows the common "environment variables first, config files as fallback" design pattern. The environment variable ANTHROPIC_API_KEY is an OS-level key-value pair that can be set via export (Linux/Mac) or set (Windows) commands, or written into .bashrc, .zshrc, and other shell configuration files for persistence. When Claude Code starts, it checks in order of priority: command-line arguments > environment variables > config files in the ~/.claude directory > config files in the project-level .claude directory. The ~/.claude directory, located in the user's home directory, stores global-level authentication tokens and user preferences; the project-level .claude directory stores project-specific settings like proxy configuration and model selection. This layered configuration mechanism allows developers to use different API Keys or proxy strategies across different projects.
If using a third-party API Key, configure the key as an environment variable (ANTHROPIC_API_KEY) beforehand, then select "Use current environment variable Key" in the authorization options.
When you see the Welcome to Claude Code welcome screen displaying your current workspace path, all configuration is complete and you're ready to start using it.
Configuration Summary and Pitfall Checklist
Looking back at the entire installation and configuration process, the following table summarizes the most error-prone steps and their solutions:
| Common Issue | Typical Symptoms | Solution |
|---|---|---|
| Node version too low | Errors during installation or runtime | Upgrade to LTS version 20+ |
| Git Bash not configured | Terminal errors when executing tasks | Add bash.exe path to system environment variables |
| Network regional restriction | "Unsupported region" message | Configure proxy in .claude/settings.json |
| Slow npm downloads | Installation hangs for extended periods | Configure npm domestic mirror registry |
| API key not configured | Cannot complete login authorization | Complete official top-up/authorization or configure third-party key |
| System proxy not working | Regional error persists despite global proxy | Node.js doesn't inherit system proxy automatically; declare explicitly in config file |
This tutorial series will continue to cover advanced topics including Claude Code's core mode switching, Claude MD global memory configuration, session management, resource monitoring, and batch tasks. Proper base configuration is the prerequisite for using Claude Code efficiently. We recommend following the steps in this article to verify each one, ensuring your environment is fully ready before moving on to hands-on work.
Key Takeaways
- Claude Code runs on Node.js and requires Node.js LTS version 20+, along with a configured Git Bash terminal environment
- Users in China need to create a
.claude/settings.jsonfile in the project directory to configure HTTP/HTTPS proxies to resolve regional restrictions - API keys can be obtained through three methods: official subscription, pay-as-you-go, or third-party proxy services — choose based on your usage frequency
- First-time setup requires a three-step guided flow: theme selection, website login authorization, and key retrieval
- The Git Bash path must be added to environment variables, or Claude Code will throw errors when executing tasks
- Node.js processes do not automatically inherit system proxy settings — proxy addresses must be explicitly declared in Claude Code's configuration file
Related articles
 Tutorials
Cursor + Codex Dual-IDE Collaboration: A Practical Methodology for Open-Source Project Customization
A complete methodology for open-source project customization based on real-world experience, detailing the Cursor+Codex dual-IDE workflow, seven-stage process, MVP validation, and AI source code reading techniques.
 Tutorials
Cursor Multi-Agent in Practice: Building a Full-Stack Next.js Blog in 50 Minutes
Build a full-stack blog in 50 minutes using Cursor IDE's multi-Agent mode with Next.js, Clerk auth, and Supabase. Learn the 4-phase AI Agent workflow and key integration pitfalls.
 Tutorials
Building an AI Software Factory from Scratch: A Cursor Engineer's Hands-On Experience with Multi-Agent Collaboration
Cursor engineer Eric shares practical insights on building an AI software factory: automation levels, guardrail design, parallel Agent management, and scaling to 1000+ Agents for 24/7 development.