Claude Code in Practice: Building a YouTube Comment Analysis SaaS for $3 — Full Walkthrough
Claude Code in Practice: Building a Yo…
Build a complete SaaS app with Claude Code in 5 minutes for just $3 — no coding required.
Content creator Mike used Claude Code to build a YouTube comment analysis tool from scratch with zero programming experience, spending only $3.06. Key steps included pairing Cursor editor for visual development, writing a CLAUDE.md project guidance file, using the Opus model for high-quality initial prototyping before switching to Sonnet for cost-effective debugging, and leveraging screenshot-driven UI design. This case demonstrates how AI coding tools can compress MVP development from weeks down to minutes.
The No-Code Era of SaaS Development: What Can $3 Get You?
Building a fully functional SaaS application in just 5 minutes without writing a single line of code — it sounds like a marketing gimmick, but a recent hands-on case study from content creator Mike (active on Bilibili and YouTube) proves it's entirely feasible. He used Claude Code to build a YouTube comment analysis tool from scratch, requiring virtually no programming background, at a total cost of just $3.06.
This article provides a complete breakdown of his build process, from environment setup to a working product, helping you understand why Claude Code is considered the most powerful MVP development tool available today. MVP (Minimum Viable Product) is a core concept in lean startup methodology, systematically articulated by Eric Ries in The Lean Startup — build a product version with minimal resources that includes only core functionality, get it to market as quickly as possible to gather real user feedback, then iterate based on that feedback. In traditional software development, an MVP might take weeks to months to build. AI coding tools like Claude Code compress that timeline to hours or even minutes, enabling multiple "Build-Measure-Learn" feedback loops within a single day.
Environment Setup: Three Steps to a Claude Code Dev Environment
Installing Node.js and Claude Code
Setting up the development environment is straightforward. The first step is installing Node.js — the official website provides versions for all operating systems. Mac users can install it directly, while Windows users need to run it through WSL (Windows Subsystem for Linux). WSL is a Linux compatibility layer built into Windows 10 and later, allowing users to run Linux command-line tools and applications without installing a virtual machine. Since Claude Code depends on a Unix-style terminal environment, Windows users must run it through WSL. WSL 2 is based on a real Linux kernel with near-native Linux performance and has become the standard setup for modern development on Windows — installation requires just a single command in PowerShell.
After installing Node.js, a single terminal command installs Claude Code. On first launch, the system asks which account type you'd like to use — you can choose a Claude AI subscription account ($20/month or $100/month for the Max plan), or use Anthropic Console's pay-as-you-go model. Mike recommends using an existing Claude subscription if you have one to avoid unexpected bills; the Max plan offers 5 to 20 times the usage, making it ideal for users who frequently build projects.
Key Tip: Visualize Claude Code with Cursor
Claude Code is fundamentally a terminal tool, and pure command-line operation can be intimidating for many people. Mike shared a practical tip: pair it with the Cursor editor to make the entire development process visual.
Cursor is an AI-native code editor built on the VS Code architecture, with deep integration of multiple AI models. It retains VS Code's entire ecosystem (extensions, keyboard shortcuts, UI layout) while adding AI chat, code auto-completion, and context-aware capabilities. Running Claude Code inside Cursor's built-in terminal essentially combines a command-line AI tool with a graphical IDE, letting users enjoy Claude Code's automated build capabilities while understanding project structure through the file tree, syntax highlighting, and live preview.
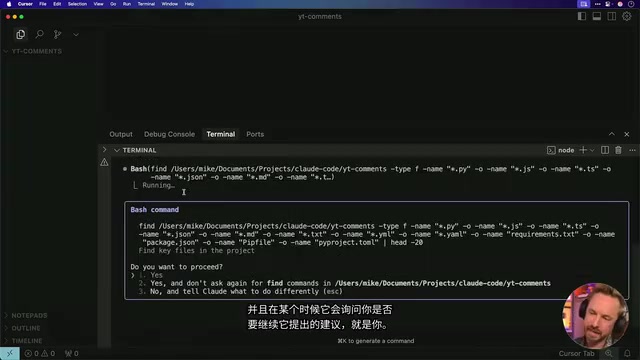
The specific workflow is to open the project folder in Cursor, then run Claude Code in Cursor's built-in terminal. This way, you can see all file creation and modification in real time through the graphical interface, and you can also edit code directly — even if you don't understand code, you can at least clearly see what's happening at every step.
Project Configuration: CLAUDE.md Is the Real Key to Success
Writing the Project Guidance File
After launching Claude Code by typing claude in the terminal, the first step is running the /init command to initialize the project. Claude Code automatically creates a .claude hidden folder and a CLAUDE.md file. This Markdown file is crucial — it serves as the "instruction manual" for Claude Code to understand your project.
CLAUDE.md is Claude Code's unique project context mechanism, similar to system prompts in other AI coding tools, but persistently stored as a file in the project root directory. Every time Claude Code executes a task, it automatically reads this file as background knowledge, ensuring generated code stays consistent with the project's tech stack, design style, and business logic. As the project evolves, Claude Code proactively updates this file, forming a continuously improving "project memory." This mechanism effectively mitigates the common problem of large language models drifting from context during long conversations.
Mike included the following key information in his CLAUDE.md:
- Project definition: YouTube comment analyzer
- UI requirements: Clean interface focused on actionable insights
- Design style: YouTube red-and-white color scheme
- Performance requirements: Prioritize fast loading, display progress indicators
- User experience: Clear language without jargon, mobile-responsive design
Choosing the Right Model
Another critical configuration is model selection. Using the /config command, Mike switched from the default Claude Sonnet to Claude 4 Opus. While Opus is more expensive, it's essential for the build quality of the initial prototype.
Opus and Sonnet are different tiers within the Anthropic Claude model family. Opus is the flagship model with the strongest reasoning capabilities, code generation quality, and complex instruction-following ability, but at significantly higher token costs per call. Sonnet strikes a balance between performance and cost, performing excellently on most everyday tasks with faster response times. Mike's strategy: use Opus to generate a high-quality MVP, then switch back to Sonnet for debugging and minor adjustments to save costs. This tiered approach to model usage has been widely validated in practice as the best way to balance quality and cost.
One-Click Build: From a Single Prompt to a Running SaaS
One Prompt to Handle Everything
Mike pasted his carefully prepared prompt into Claude Code. The core requirements included: analyze YouTube video comments, extract sentiment trends, summarize popular topics, compile common questions and pain points, generate specific actionable video ideas, and present everything in a clear, readable format.
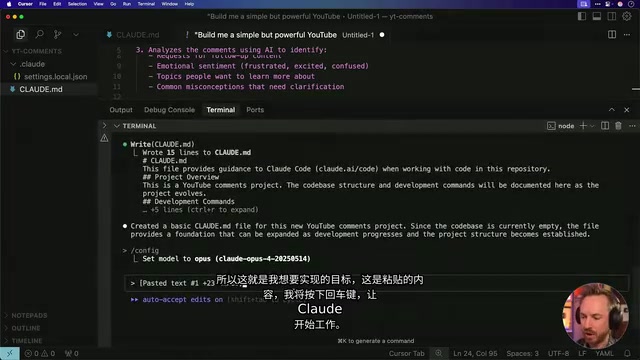
Claude 4 Opus immediately got to work, automatically completing the following tasks:
- Created a to-do checklist, checking off items as they were completed
- Generated a complete project package, including all dependency configurations
- Wrote a README file with detailed instructions on setting up API keys and starting the service
- Updated CLAUDE.md with specific architecture information to ensure future development stays on track
This last point deserves special attention — Claude Code continuously references the CLAUDE.md file, meaning as the project grows, it won't "hallucinate" code that's inconsistent with the project. "Hallucination" is a well-known problem in the large language model space, referring to models generating content that appears plausible but is actually incorrect or inconsistent with the context. In code generation scenarios, hallucinations might manifest as calling non-existent APIs, referencing wrong variable names, or generating code that conflicts with the project architecture. The continuous reference mechanism of CLAUDE.md is specifically designed to minimize this problem.
Configuring API Keys and Launching
After the build was complete, just a few steps were needed to run it:
- Run
npm installto install dependencies - Copy
.env.exampleto.envand fill in the YouTube Data API and OpenAI API keys - Run
npm startto start the server
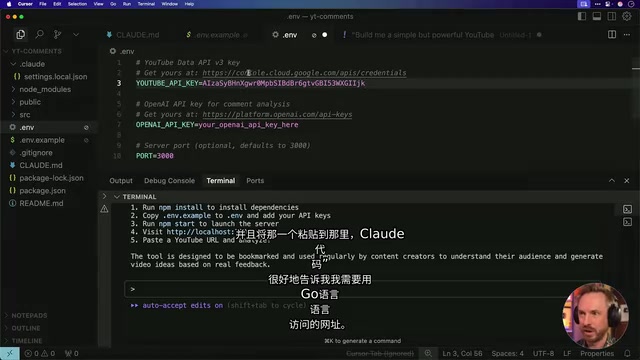
Once the server launched at localhost:3000, a complete YouTube comment analyzer appeared on screen — with the headline "Transform Audience Feedback Into Your Next Viral Video."
Real-World Results: Comment Analysis Capabilities That Exceeded Expectations
Feature Showcase
Mike tested the tool using one of his own VO3 tutorial videos. After resolving a YouTube Data API v3 activation issue (which required manual enablement in Google Cloud Console) and an OpenAI API JSON format compatibility problem, the analyzer ran successfully.
YouTube Data API v3 is Google's official interface that allows developers to programmatically access YouTube's public data, including video information, comment lists, and channel statistics. Using this API requires creating a project in Google Cloud Console, enabling the API service, and generating an API key. The free quota is 10,000 quota units per day, with each comment list request consuming approximately 1 unit — typically sufficient for small to medium-scale analysis projects. Note that this API can only access public comments and is subject to YouTube's community guidelines and rate limits.
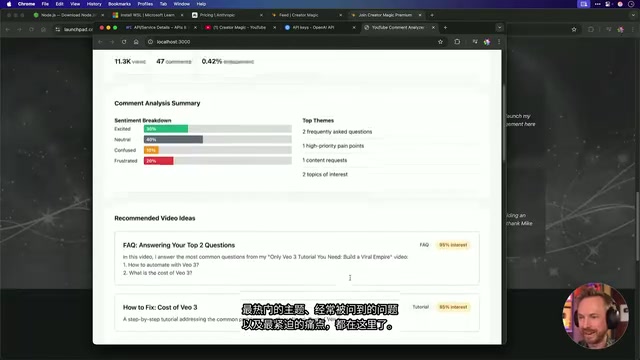
The analysis results covered multiple dimensions:
- Basic metrics: 11.3K views, 47 comments, 0.42% engagement rate
- Sentiment analysis: Positive/negative/neutral sentiment distribution across comments
- Popular topic extraction: Automatically summarized high-frequency topics from comments
- Common questions summary: e.g., "How to automate with VO3," "How much does VO3 cost"
- High-priority pain points: Ranked issues that viewers cared about most
- Video idea suggestions: Specific topic proposals generated from comment data
- Export functionality: One-click export of the complete analysis report in Markdown format
Sentiment Analysis is a classic task in Natural Language Processing (NLP) that uses algorithms to determine the emotional tendency expressed in text. In this tool, OpenAI's model handles the core sentiment analysis work, classifying each comment as positive, negative, or neutral, then performing aggregate statistics to help creators quickly gauge their audience's overall attitude.
Screenshot-Driven UI Design: Drag an Image to Redesign the Interface
Mike wasn't entirely satisfied with the default UI and wanted it to look more like YouTube Studio. His approach was remarkably direct — he took a screenshot of the YouTube Studio interface, dragged it into Claude Code, and said "make the UI look like this."
Claude Code recognized the dark theme, layout style, and design elements in the screenshot, then automatically modified all the CSS styles. After refreshing the page, the application instantly transformed into a YouTube Studio-style dark interface, complete with the YouTube logo. This screenshot-driven UI design approach dramatically lowers the barrier for design communication — you don't need to know CSS, or even know how to describe design requirements; a single screenshot is enough. This relies on the visual understanding capabilities of multimodal large language models, which can parse color values, spacing ratios, component layouts, and visual hierarchy from images, then translate that visual information into concrete CSS code and HTML structure.
Cost Breakdown and Key Takeaways
A Complete SaaS for $3.06
After the entire build process, Claude Code provided a session cost summary: the total was just $3.06. This included using the Opus model to generate the initial prototype, the Sonnet model to debug API issues, and the screenshot-driven UI overhaul.
Mike also mentioned that he used a similar approach to build another project called "Pimp My Thumb" (a thumbnail optimization tool), which has already integrated Stripe payments and a Supabase database, evolving from an MVP into a real SaaS product that can charge users — the entire process took just a few days, rather than the weeks or months traditional development would require. Stripe is a globally leading online payment infrastructure provider, offering SaaS products subscription management, one-time payments, invoice generation, and other complete monetization capabilities; Supabase is an open-source Firebase alternative that provides PostgreSQL databases, user authentication, real-time subscriptions, and file storage as backend services. This combination has become the standard tech stack for indie developers and small teams building SaaS products, as both offer generous free tiers and extremely low barriers to entry.
Four Core Lessons
From this case study, several practical lessons are worth noting:
- Upfront prompt quality determines success or failure: Investing time in writing a good initial prompt and CLAUDE.md is far more efficient than making repeated changes later. This aligns with the classic software engineering principle that "bugs caught during requirements analysis are the cheapest to fix" — in AI-assisted development, the prompt is your requirements document, and every minute of upfront thinking saves multiples of debugging time later.
- Be flexible with model strategy: Use a high-end model (Opus) for initial builds and a standard model (Sonnet) for debugging iterations, balancing quality and cost.
- Cursor + Claude Code is the golden combination: The visual interface lets even non-programmers maintain full control.
- Screenshots can replace design specs: Using reference screenshots to drive UI design eliminates the need for tedious requirement descriptions.
Claude Code is redefining the answer to "who can build software." For entrepreneurs with ideas but lacking programming skills, this may be the fastest path from zero to one available today.
Related articles
 Tutorials
Cursor + Codex Dual-IDE Collaboration: A Practical Methodology for Open-Source Project Customization
A complete methodology for open-source project customization based on real-world experience, detailing the Cursor+Codex dual-IDE workflow, seven-stage process, MVP validation, and AI source code reading techniques.
 Tutorials
Cursor Multi-Agent in Practice: Building a Full-Stack Next.js Blog in 50 Minutes
Build a full-stack blog in 50 minutes using Cursor IDE's multi-Agent mode with Next.js, Clerk auth, and Supabase. Learn the 4-phase AI Agent workflow and key integration pitfalls.
 Tutorials
Building an AI Software Factory from Scratch: A Cursor Engineer's Hands-On Experience with Multi-Agent Collaboration
Cursor engineer Eric shares practical insights on building an AI software factory: automation levels, guardrail design, parallel Agent management, and scaling to 1000+ Agents for 24/7 development.