Codex API Proxy Configuration Tutorial: From Token Creation to Chat Recovery
Codex API Proxy Configuration Tutorial…
A complete tutorial on connecting API proxy tokens to Codex using the CC Switch tool.
This article provides a detailed guide on connecting an API proxy to Codex for accessing models like GPT-5.5. The core process involves three steps: creating an API token in the proxy's admin dashboard, importing the token into Codex via the CC Switch tool, and using the recovery tool to restore chat history lost during the account switch. The article also offers proxy selection tips and a troubleshooting checklist for failed configurations.
Introduction
With the release of new models like GPT-5.5, more and more developers and AI enthusiasts want to access these cutting-edge models through API proxy services. Codex, as a popular AI coding and conversation tool, supports connecting to third-party services via custom APIs. However, many users encounter difficulties during the actual configuration process and aren't sure how to properly connect a proxy's API to Codex.
This article breaks down the entire process step by step, from tool preparation to completing the configuration, helping you quickly get started with Codex's API proxy integration.
Technical Principles of API Proxy Services
An API Proxy (or API Relay) is a service model that forwards requests by setting up a proxy layer between users and the original service. The core principle is: the proxy service provider holds official API access credentials and aggregates requests from multiple users, forwarding them to original service providers like OpenAI, then returning the responses to users. The advantage of this architecture is lowering the access barrier for individual users while spreading costs through bulk purchasing. For developers, proxy services typically provide API interface formats that are fully compatible with the official ones — you only need to modify the Base URL and API Key to switch seamlessly without changing any business code. It's precisely this compatibility design that allows tools like Codex to directly call proxy resources through simple configuration changes.
Preparation Before Configuration
Download and Install the CC Switch Tool
Before starting the configuration, you need to prepare a key tool — CC Switch. It's a utility specifically designed for managing and switching API tokens, significantly simplifying the API configuration process for Codex.
You can usually download this tool directly from the proxy service provider's official website homepage. After downloading and installing, make sure the tool runs properly before moving to the next step.
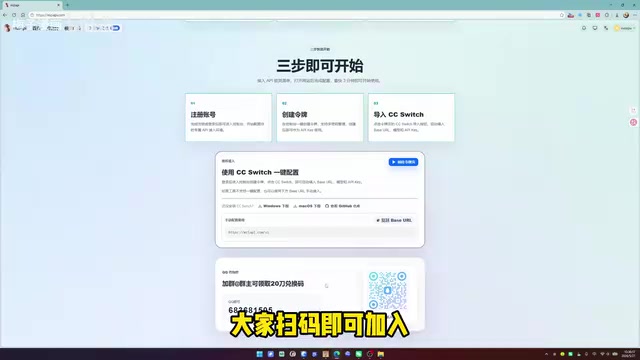
Obtain API Credits
Most proxy service providers offer a certain amount of free trial credits. In the case of the service covered in this tutorial, new users can receive $20 in free conversation credits by joining the community group, which is more than enough for initial testing.
Tip: Use the free credits first to verify that your configuration is correct, then decide whether to subscribe to a paid plan once everything is confirmed working.
API Token Security Mechanisms and Creation Steps
An API token is essentially an encrypted string used for identity verification and permission control. Unlike account passwords, tokens typically have the following security features: they can be revoked at any time without affecting the main account's security, spending limits can be set to prevent overuse, and they support isolation by business scenario grouping. Because of these features, it's recommended to create independent tokens for different projects or tools — if a token is leaked, you simply delete that token without affecting the entire account. The CC Switch tool essentially injects the token's API address and key information into Codex's configuration file, replacing the default official endpoint.
Step 1: Create an API Token
Token creation is the core step of the entire configuration. Here's how:
- Navigate to the token management page: Open the proxy service's admin dashboard and find the token management section
- Add a new token: Click the "Add Token" button in the upper left corner
- Fill in basic information:
- Name: Enter any name that's easy to identify
- Token group: Select a group of your choice
- Leave other options at their defaults — no additional changes needed
- Submit: Click the "Submit" button to complete token creation
Step 2: Import the Token into CC Switch
After the token is successfully created, you'll see a CC Switch button on the interface — this is the quick import entry point:
- Click the CC Switch button
- Click "Open" in the popup window
- Click the "Import" button
- After successful import, you can view the imported API address and key information in CC Switch
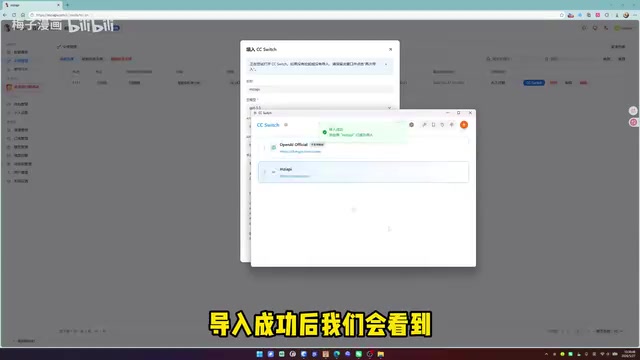
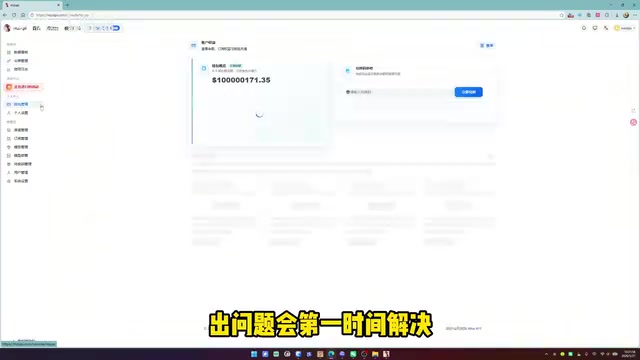
It's worth noting that some proxy services also support viewing detailed credit usage directly within CC Switch, making it convenient to monitor your balance at any time.
Verifying the Configuration in Codex
After completing the API import, open Codex to check if the configuration has taken effect. At this point, you may encounter a common issue: previous chat history disappears due to the account switch.
This doesn't mean the configuration failed — it's a normal phenomenon caused by the account switch. Don't worry; we'll use a recovery tool to retrieve your previous conversation data next.

Chat History Recovery Method
Using the Codex Recovery Tool to Retrieve Conversations
To recover your previous chat history, you need to use the Codex Recovery Tool. Follow these steps:
- Open the Codex Recovery Tool
- Click the "Recover Conversations" button
- If prompted that "Codex is running," you need to close Codex first
- After closing Codex, click the recovery button again
- Wait for the "Recovery Complete" notification
- Reopen Codex and confirm that your chat history has been restored
Note: The recovery operation must be performed while Codex is completely closed; otherwise, it will fail due to file lock conflicts.
After completing these steps, your Codex has been successfully connected to the API proxy and you can use models like GPT-5.5 normally.
Usage Tips and Troubleshooting
How to Choose a Stable API Proxy
When choosing a proxy service, stability is the most important consideration. Focus on the following:
- Responsive service providers: Issues can be resolved promptly
- Platforms offering free trials: Try before you pay to reduce the cost of trial and error
- Services with active communities: Easy to discuss issues and get the latest information
Cost Planning Suggestions
Most proxy services currently offer flexible payment plans, including weekly and monthly passes. For light users, take advantage of free credits first; for heavy users, monthly plans typically offer better value. Some platforms also run referral reward programs where you can earn extra credits by inviting friends to register.
Configuration Failure Troubleshooting Checklist
If things aren't working after configuration, check the following one by one:
- Whether the API address and key were correctly imported in CC Switch
- Whether your network connection is normal and whether you need to enable a proxy
- Whether your token has sufficient credits (viewable in CC Switch)
- Whether your Codex version is up to date
Conclusion
The overall process of connecting an API proxy to Codex isn't complicated. The core steps can be summarized in three parts: Create a token → Import via CC Switch → Recover chat history. Once you've mastered this method, you can flexibly call various models like GPT-5.5 within Codex, significantly boosting your efficiency in AI-assisted development and creation. If you encounter issues during configuration, refer to the troubleshooting checklist above to eliminate problems one by one.
Key Takeaways
- The CC Switch tool enables quick import of API proxy tokens into Codex, simplifying the configuration process
- Token creation only requires filling in a name and group; everything else can stay at default settings
- Chat history disappears after switching API accounts; use the Codex Recovery Tool with Codex closed to restore it
- After configuration, you can view API credit usage directly within CC Switch
- When choosing a proxy service, prioritize stability and support responsiveness; test with free credits first
Related articles
 Tutorials
Cursor + Codex Dual-IDE Collaboration: A Practical Methodology for Open-Source Project Customization
A complete methodology for open-source project customization based on real-world experience, detailing the Cursor+Codex dual-IDE workflow, seven-stage process, MVP validation, and AI source code reading techniques.
 Tutorials
Cursor Multi-Agent in Practice: Building a Full-Stack Next.js Blog in 50 Minutes
Build a full-stack blog in 50 minutes using Cursor IDE's multi-Agent mode with Next.js, Clerk auth, and Supabase. Learn the 4-phase AI Agent workflow and key integration pitfalls.
 Tutorials
Building an AI Software Factory from Scratch: A Cursor Engineer's Hands-On Experience with Multi-Agent Collaboration
Cursor engineer Eric shares practical insights on building an AI software factory: automation levels, guardrail design, parallel Agent management, and scaling to 1000+ Agents for 24/7 development.