Complete Guide to Building Claude MCP Services: From Local Development to Remote Deployment
Complete Guide to Building Claude MCP …
MCP protocol standardizes how AI calls external tools — full walkthrough from local dev to remote deployment
MCP (Model Context Protocol) is an open-source standard by Anthropic that simplifies AI-to-tool integration from M×N to M+N complexity. This article covers the four-step process for building local MCP servers with FastMCP (environment setup, code development, CLI registration, tool invocation), explains STDIO and Streamable HTTP communication modes, and details Docker containerized deployment to cloud servers. Major cloud providers like Alibaba Cloud and Tencent Cloud are already actively adopting MCP services.
What is an MCP Service?
MCP (Model Context Protocol) is a standard protocol that enables AI models to call external tools and services. The protocol was officially open-sourced by Anthropic in November 2024, with its design inspired by the Language Server Protocol (LSP) — the same protocol that allows editors like VS Code to support hundreds of programming languages through a unified interface. MCP aims to solve the same fragmentation problem in the AI space: previously, every AI application needed custom integration code for each external tool, creating an M×N complexity explosion. MCP standardizes this relationship to M+N, allowing any MCP-compatible AI client to call any MCP-compatible server without redundant development. Through MCP, AI assistants like Claude can directly interact with local or remote services, greatly expanding AI's capability boundaries.
Several mature MCP services are currently available:
- Playwright: Provides browser automation capabilities for AI, enabling automated testing, web browsing, and data scraping
- Figma: Directly calls Figma design files to generate code, achieving seamless design-to-development workflows
- GitHub: AI interacts directly with the GitHub platform for code management operations
Beyond using existing MCP services, we can also build our own MCP servers. This article provides a detailed walkthrough of the complete process from local setup to remote deployment.
Building an MCP Server Locally
Building a local MCP server involves four steps: environment setup, MCP server development, Claude CLI configuration, and tool invocation.
Step 1: Environment Setup
The development environment uses VS Code, with the following preparations:
- Install Python and related extensions (Python, Python Environment)
- Create a Python virtual environment via the command palette: open the command palette, select "Python Create Environment", and choose venv mode
- Install MCP and CLI dependencies using pip:
pip install mcp cli
If installation is slow, you can use the UV tool to speed things up. The entire installation process takes approximately 2-3 minutes.
Step 2: Write the MCP Server Code
Create a Python script that uses the FastMCP framework to define the MCP server and tool methods. FastMCP is a high-level wrapper around the MCP Python SDK, borrowing FastAPI's design philosophy — using Python decorators to declaratively transform ordinary functions into externally callable interfaces. The @mcp.tool() decorator automatically parses function signatures, parameter type annotations, and docstrings at runtime to generate MCP-compliant Tool Schemas. AI models rely on these Schemas to understand tool capabilities and parameter requirements. This design eliminates the need for developers to manually write JSON Schemas, significantly lowering the barrier to MCP service development:
from fastmcp import FastMCP
import time

# Create MCP server
mcp = FastMCP("MyTools")

# Get current time
@mcp.tool()
def get_current_time():
    return time.strftime("%Y-%m-%d %H:%M:%S")

# Calculate the sum of two numbers
@mcp.tool()
def add(a: int, b: int):
    return a + b

# Get product price
@mcp.tool()
def get_product_price(product_id: int):
    prices = {100: 10, 101: 15, 102: 20}
    return prices.get(product_id, "Not found")

if __name__ == "__main__":
    mcp.run()
This code defines three tool methods: getting the current time, calculating the sum of two numbers, and querying product prices. The @mcp.tool() decorator registers ordinary functions as MCP tools, keeping the code structure clean and intuitive.
Step 3: Register the MCP Service in Claude CLI
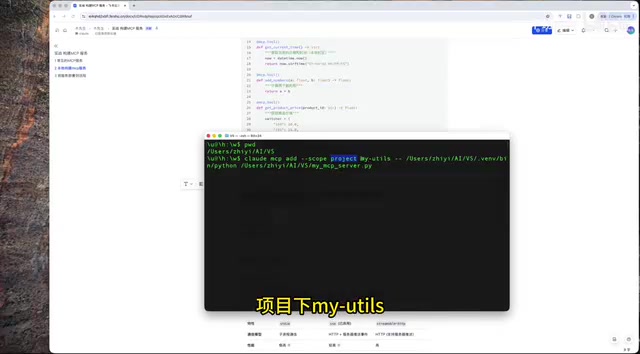
Open the terminal, navigate to the same working directory as VS Code, and execute the registration command:
claude mcp add --scope project MyTools python script.py
Command parameter explanation:
claude mcp add: Add an MCP service--scope project: Scope limited to the current projectMyTools: Name of the MCP service- Followed by the Python runtime and script path
After successful registration, VS Code automatically generates an mcp.json configuration file — no manual handling required.
Step 4: Invoke MCP Tools
Launch Claude CLI and use the /mcp command to check the status of connected MCP services.
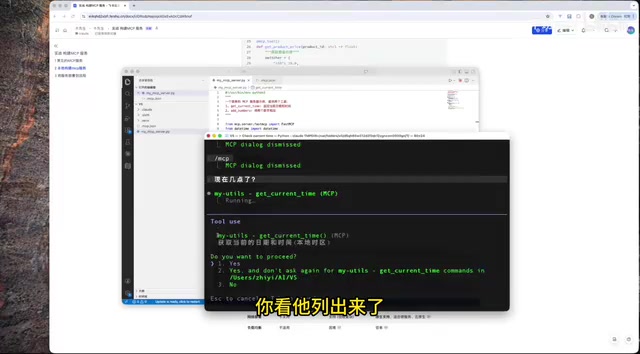
There are two ways to invoke MCP services:
Implicit invocation: Ask Claude directly, and the Agent will automatically determine and call the appropriate MCP tool. This capability relies on the underlying Function Calling technology of large language models — during inference, the model receives Schema descriptions of all registered MCP tools and decides whether to call a tool, which tool to call, and how to fill in parameters based on user intent. Mainstream models like Claude and GPT-4 have been specifically trained for Function Calling capabilities, enabling them to accurately identify questions with implicit tool-calling intent (like "What time is it?"), generate call parameters conforming to JSON Schema specifications, and then the MCP client handles the actual execution.
Explicit invocation: Explicitly specify a particular method from a particular MCP service. For example, "Please use the add method from the MyTools service to calculate 3+5" — Claude will directly call the specified tool function.
MCP Communication Modes Explained
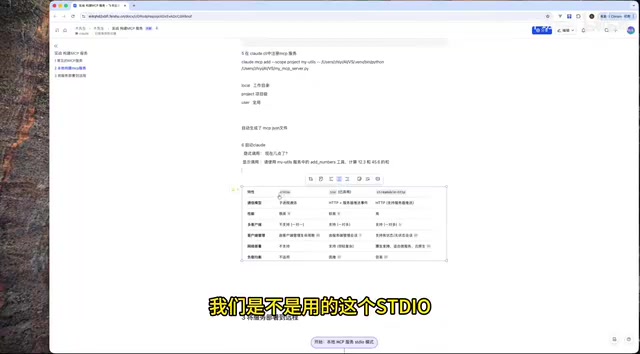
Local MCP services use the STDIO (Standard Input/Output) mode. STDIO is the most fundamental inter-process communication mechanism in Unix systems. The MCP client launches the MCP server as a child process, and both parties exchange JSON-RPC formatted messages through standard input/output streams. This approach has extremely low latency and requires no network configuration, but is inherently limited to single-machine environments, making it suitable for local development and debugging scenarios.
Remote MCP services use the Streamable HTTP mode, based on HTTP/1.1 or HTTP/2 protocols, supporting Server-Sent Events (SSE) that allow servers to proactively push intermediate states of long-running tasks to clients. This is particularly suitable for AI tool invocation scenarios that require streaming results. Both modes are clearly defined in the MCP specification, and developers can flexibly switch between them based on deployment environments, making it suitable for production deployments.
Deploying MCP Services to Remote Servers
In practice, we typically need to deploy MCP services to the public internet for remote access by teams or users.
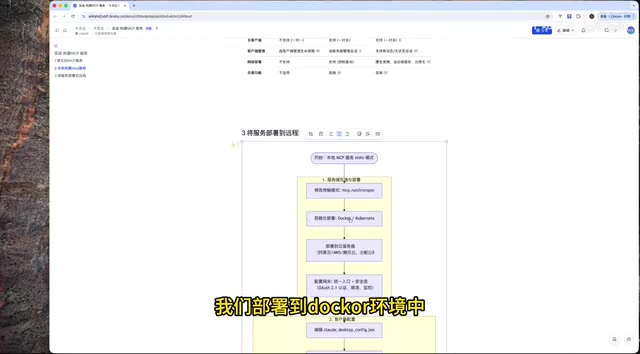
Server-Side Modifications and Deployment
- Modify the transport mode: Change the MCP service's communication mode from STDIO to Streamable HTTP
- Containerized deployment: Package the code as a Docker image and deploy it to a Docker environment. Docker containerization solves environment consistency issues in MCP service deployment — MCP servers often depend on specific Python runtime versions, third-party libraries, and system tools. Containers package these dependencies into immutable images, ensuring identical behavior across development, testing, and production environments. On cloud servers, containers natively support horizontal scaling. When MCP service request volume increases, orchestration tools like Kubernetes can quickly launch multiple container instances with load balancers distributing requests to ensure high availability.
- Cloud server deployment: Deploy containers to servers with public IPs on platforms like Alibaba Cloud or Tencent Cloud
- Gateway configuration: Configure network gateways to ensure external access to the MCP service
Client Configuration
Edit the local claude_config.json file and add the remote server configuration (including the remote URL address) to invoke remote MCP services directly from your local machine.
MCP Adoption by Major Tech Companies
Several major tech companies are actively advancing MCP service implementations:
- Alibaba Cloud Bailian Platform: Has integrated over 60 services through MCP, covering multiple business scenarios
- Tencent Cloud: Also supports extensive MCP service integration
In the future, whether in news, shopping and payments, or government services, enterprises will need to implement their own MCP services, exposing existing business capabilities to AI in a standardized manner.
Summary
MCP services provide a standardized solution for AI interaction with external systems. From local development to remote deployment, the entire process is clear and straightforward: develop tools locally using the FastMCP framework, register and test through Claude CLI, and finally deploy to cloud servers via Docker containerization. With increasing adoption by major tech companies, MCP is becoming critical infrastructure for AI application development.
Key Takeaways
- MCP services enable AI to call external tools and services through two communication modes: STDIO (local) and Streamable HTTP (remote)
- Building a local MCP server requires just four steps: environment setup, code development, CLI registration, and tool invocation — FastMCP framework enables rapid implementation
- Remote deployment requires changing the transport mode to Streamable HTTP and deploying via Docker containerization to cloud servers
- MCP service invocation supports both implicit (AI auto-determines based on Function Calling technology) and explicit (specifying service and method) approaches
- Major companies like Alibaba Cloud and Tencent Cloud have already deployed MCP services, integrating over 60 service capabilities
Related articles
 Tutorials
Cursor + Codex Dual-IDE Collaboration: A Practical Methodology for Open-Source Project Customization
A complete methodology for open-source project customization based on real-world experience, detailing the Cursor+Codex dual-IDE workflow, seven-stage process, MVP validation, and AI source code reading techniques.
 Tutorials
Cursor Multi-Agent in Practice: Building a Full-Stack Next.js Blog in 50 Minutes
Build a full-stack blog in 50 minutes using Cursor IDE's multi-Agent mode with Next.js, Clerk auth, and Supabase. Learn the 4-phase AI Agent workflow and key integration pitfalls.
 Tutorials
Building an AI Software Factory from Scratch: A Cursor Engineer's Hands-On Experience with Multi-Agent Collaboration
Cursor engineer Eric shares practical insights on building an AI software factory: automation levels, guardrail design, parallel Agent management, and scaling to 1000+ Agents for 24/7 development.