Complete Guide to Codex Installation, Registration & Usage: From Download to VS Code Integration
Complete Guide to Codex Installation, …
Complete guide to OpenAI Codex: from installation and registration to hands-on AI coding
This article provides a comprehensive walkthrough of the OpenAI Codex client. Having evolved from an early code completion API into an Agent-capable AI programming tool that can operate on local file systems and execute multi-step tasks, Codex represents the cutting edge of AI coding assistants. The guide covers download and installation, solving overseas phone verification via virtual number services (~$7.99), choosing among three subscription tiers, and hands-on demos of VS Code integration including file search and automatic web application generation.
OpenAI's Codex client is becoming a productivity powerhouse for an increasing number of developers. Codex is an AI system built on GPT-series large language models, specifically fine-tuned for code-related tasks. Its origins trace back to 2021 when the Codex API served as the underlying engine for GitHub Copilot. Unlike general-purpose language models, Codex was trained on massive amounts of open-source code from GitHub, covering dozens of programming languages including Python, JavaScript, TypeScript, and Go. After 2024, OpenAI deeply integrated Codex capabilities into the ChatGPT ecosystem, launching a client version with Agent capabilities that goes far beyond code completion—it can execute multi-step tasks and operate on the local file system, evolving toward becoming an "AI programmer." This article walks you through the entire Codex onboarding process, from download and installation to account registration and real-world programming use, helping you quickly get started with this AI coding assistant.
Downloading and Installing the Codex Client
The first step is to visit the official Codex website and download the installer for your operating system. Using the Windows version as an example, simply double-click the installer after downloading to begin installation. The entire process is straightforward—just click "Next" through each step.
After installation, Codex requires a ChatGPT account to log in. It's recommended to use a ChatGPT account linked to a Google email address.
Overseas Phone Number Registration and Verification
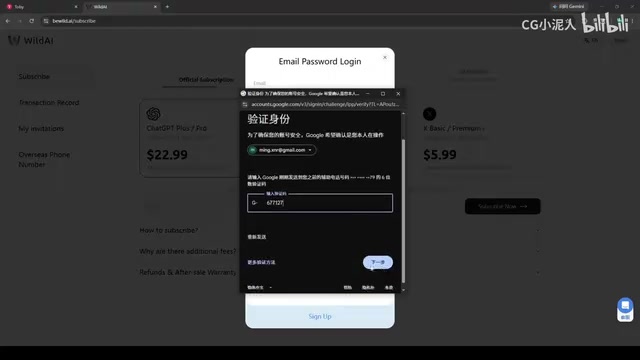
During the login process, SMS verification via phone number is required. This is the main hurdle for users in China, as an overseas phone number is needed to receive the verification code. Third-party virtual phone number services can help solve this problem.
Virtual Phone Number services work by leveraging VoIP (Voice over Internet Protocol) technology to rent real carrier number resources to users via the cloud. Service providers typically purchase SIM cards or number ranges in bulk from carriers in the US, UK, Canada, and other countries. Users can receive SMS verification codes through a web interface or API after purchasing. There are several risks to be aware of: virtual numbers may be shared among multiple users, posing account security concerns; some platforms have established virtual number blacklists that may cause verification failures; additionally, you should review the provider's privacy policy to ensure SMS content isn't being logged. It's recommended to use virtual numbers only for initial verification and promptly bind a more reliable verification method in your account security settings afterward.
Here are the specific steps:
- Visit the virtual number service website and register/log in using a Google email
- Complete Google account verification by entering the verification code sent to your email
- Purchase a virtual number plan — approximately $7.99 USD (about 62.61 HKD), with WeChat Pay supported
- Obtain the virtual phone number, copy it and paste it into the Codex verification page
- Receive the SMS verification code — check and copy the code from the virtual number platform to complete login
After completing these steps, you'll successfully enter the Codex client.
Codex Client Basic Settings and Subscription Plans
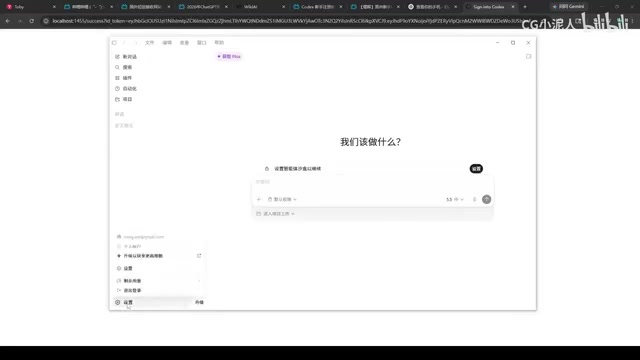
Once logged in, you can view configuration details and remaining usage on the settings page. The free tier provides a certain usage quota, with the weekly usage percentage displayed in real time.
Codex currently offers three subscription tiers:
- Free tier: Suitable for first-time experience and light usage
- $20/month plan: Meets daily coding needs for individual developers
- $100/month plan: Designed for heavy usage and team collaboration scenarios
Choose the plan that matches your usage frequency. You can also view information about the current AI model being used in the settings.
Hands-On Demo: Codex File Search Capability
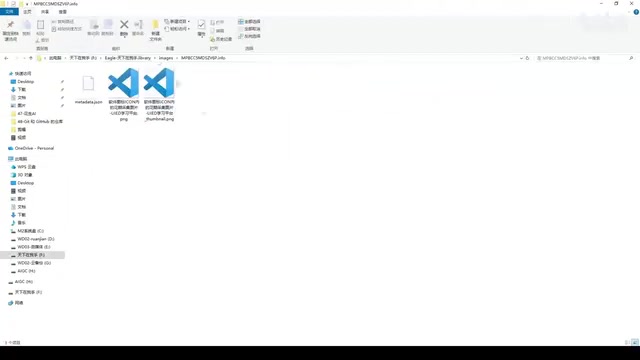
To test Codex's basic capabilities, let's start with a file search example. Drag an image into the Codex chat box and ask it to find where the image is stored on your computer.
After approximately 42 seconds of analysis, Codex accurately located the complete file path. Copying the returned path and verifying it in File Explorer confirmed that the target image indeed exists at that location—the result was spot-on.
This test demonstrates Codex's ability to perceive and operate on the local file system—one of the core characteristics of next-generation Agent-mode AI tools. Unlike earlier AI assistants that could only generate code snippets within a chat box, Agent-mode Codex can proactively invoke system interfaces and traverse directory structures, making it extremely useful for finding files and organizing project structures during daily development.
Integrating Codex in VS Code
Beyond the standalone client, Codex also offers a VS Code plugin that lets you invoke AI coding capabilities directly within the editor.
VS Code (Visual Studio Code) is an open-source code editor developed by Microsoft. Thanks to its lightweight architecture and powerful plugin extension system, it has become one of the most widely used IDEs among developers worldwide. The VS Code marketplace currently hosts over 50,000 extensions, with AI coding assistants being the fastest-growing category in recent years. In terms of integration modes, AI coding plugins fall into three main categories: inline completion mode (like GitHub Copilot) provides real-time code suggestions as users type; chat panel mode offers ChatGPT-like Q&A interaction in the sidebar; Agent mode (like Codex, Cursor) can proactively read/write files, execute terminal commands, and refactor code across files. Codex uses the third mode, which is the technical foundation enabling it to go from requirements analysis to code generation in one seamless flow.
Plugin Installation
In VS Code's extension search bar, type "Codex" and install the top-ranked official plugin. Since you've already completed login verification in the client, the plugin will automatically link your account—no need to log in again.
After installation, follow the guided prompts on the right side, clicking "Next" step by step to complete the plugin's initial configuration.
Hands-On: Building a Web-Based Expense Tracker with Codex
To demonstrate Codex's practical coding capabilities in VS Code, let's have it create a simple web-based expense tracker.
After receiving the instruction, Codex automatically performs requirements analysis and code writing. This end-to-end code generation process involves several key steps: first, requirements understanding, where the model maps the vague description "create an expense tracker" to specific functional modules and technology choices; second, code planning, deciding on file structure and which HTML/CSS/JS features to use; finally, code synthesis and self-validation, ensuring the generated code is syntactically correct and logically consistent. It's worth noting that simple single-page applications are relatively easy for AI, but complex system engineering involving database design and multi-service coordination still requires deep developer involvement and review.
After processing for some time, the complete web code was generated. Opening the generated HTML file reveals a fully functional expense tracking page with basic features including entry input and amount recording.

Testing by entering an amount of "56" for a transaction, the functionality works correctly without any issues. From a single natural language requirement to runnable code, Codex demonstrates solid end-to-end code generation capabilities.
Usage Tips and Summary
For users in China who want to try Codex, here are some practical tips:
- Account preparation: Have a Google email and ChatGPT account ready in advance, and ensure your network environment can access the services normally
- Verification solution: Virtual number services are a viable solution for overseas phone verification at an acceptable cost, but it's recommended to bind a more secure verification method after initial verification
- Plan selection: Start with the free tier to fully experience the tool, then consider upgrading to a paid plan once you've confirmed it meets your needs
- Use cases: The VS Code plugin's Agent mode is better suited for daily coding and development, while the standalone client works well for file operations and independent tasks
As an AI programming tool from OpenAI, Codex demonstrates strong practical utility in code generation and file operations. Its evolution from an early code completion API to an Agent tool with local file system awareness and multi-step task execution capabilities represents an important direction in AI coding assistant development. Although the registration process presents some barriers for users in China, following the steps in this article should allow you to complete the process smoothly. As AI programming tools continue to iterate, Codex is poised to become an indispensable member of every developer's toolkit.
Related articles
 Tutorials
Cursor + Codex Dual-IDE Collaboration: A Practical Methodology for Open-Source Project Customization
A complete methodology for open-source project customization based on real-world experience, detailing the Cursor+Codex dual-IDE workflow, seven-stage process, MVP validation, and AI source code reading techniques.
 Tutorials
Cursor Multi-Agent in Practice: Building a Full-Stack Next.js Blog in 50 Minutes
Build a full-stack blog in 50 minutes using Cursor IDE's multi-Agent mode with Next.js, Clerk auth, and Supabase. Learn the 4-phase AI Agent workflow and key integration pitfalls.
 Tutorials
Building an AI Software Factory from Scratch: A Cursor Engineer's Hands-On Experience with Multi-Agent Collaboration
Cursor engineer Eric shares practical insights on building an AI software factory: automation levels, guardrail design, parallel Agent management, and scaling to 1000+ Agents for 24/7 development.