Complete Guide to Connecting Codex with DeepSeek: Stable Setup in China Without a VPN
Complete Guide to Connecting Codex wit…
Deploy Codex CLI in China without a VPN using WSL, MoBridge relay, and DeepSeek API.
This article covers the best approach for deploying OpenAI Codex CLI in China: setting up a Linux environment via WSL, installing Go and Codex CLI, then using the MoBridge local relay proxy to forward requests to the DeepSeek API — achieving a zero-VPN, low-cost, ban-free AI programming assistant deployment. It also covers advanced techniques like auto-installing Skills and generating web chat interfaces, along with a comparison of Codex vs. OpenCloud for code generation tasks.
Introduction: Why Choose Codex Over Claude Code
OpenAI's open-source Codex CLI is a powerful terminal-based AI programming assistant. Compared to OpenCloud (which we covered previously and leans more toward a personal assistant role), Codex excels at code generation and development tasks. Another popular option, Claude Code, is notorious for account bans according to community feedback — the risk is especially high for users in China.
Additionally, the Codex desktop version requires a foreign account registration and a paid subscription, which isn't cost-effective for developers and students in China. That's why installing Codex via the command line and connecting it to the DeepSeek API has become the most economical and stable approach — no VPN required, fast deployment, and ready to go in just a few minutes.
Environment Setup: Installing WSL and Go
Base Environment: WSL (Windows Subsystem for Linux)
WSL (Windows Subsystem for Linux) is a compatibility layer built into Windows 10/11 that allows users to run Linux binaries natively within Windows. WSL 2 uses a real Linux kernel (via a lightweight virtual machine) compared to WSL 1, offering significantly improved file I/O performance and better support for container technologies like Docker. For developers, WSL's greatest value lies in bridging the gap between the Windows and Linux ecosystems — you can manage files through the Windows GUI while enjoying the full power of Linux command-line toolchains. It's the go-to solution for developers in China who want to set up a Linux development environment without switching operating systems.
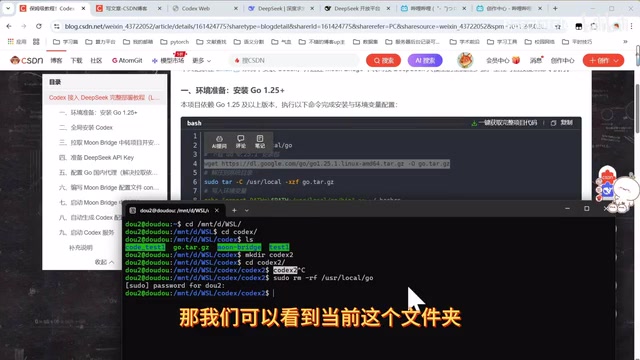
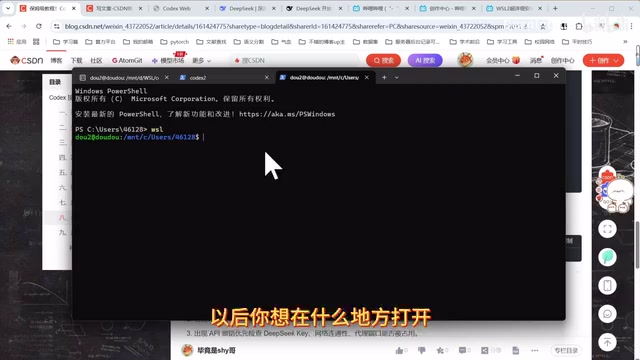
The entire installation is based on the WSL environment. If you haven't installed WSL yet, you'll need to set it up first. Once installed, open a Linux terminal and switch to a locally accessible directory:
cd /mnt/d/          # Switch to D drive
mkdir codex_tutorial  # Create a working directory
cd codex_tutorial
The advantage of this approach is that downloaded files can be viewed and managed directly in Windows File Explorer. /mnt/d/ corresponds to the Windows D drive path.
Installing Go 1.25+
Codex depends on the Go language environment and requires version 1.25 or above. Follow these steps in order:
- Download the Go installation package (from a domestic mirror — no VPN needed, very fast)
- Extract the installation package
- Set up environment variables
After installation, run go version to verify. If the version number displays correctly, the installation was successful.
Installing Codex CLI
Since the WSL environment was previously configured with an npm domestic mirror, installing Codex via npm is extremely fast:
npm install -g @openai/codex
In our testing, the installation completed in about 15 seconds — impressively fast.
Core Configuration: Connecting Codex to the DeepSeek API
Why You Need the MoBridge Relay Proxy
Both Codex and Claude Code cannot directly use their native APIs from within China. To enable Codex to call DeepSeek's models, we need to set up a local relay proxy service.
The core principle behind local relay proxies like MoBridge is to start a local HTTP service that converts requests conforming to the OpenAI API specification and forwards them to the target AI provider's endpoint (e.g., DeepSeek). Since domestic AI platforms like DeepSeek have API servers deployed in China or have domestic access nodes, the local proxy only needs to handle protocol adaptation (mapping OpenAI-format request bodies to DeepSeek format), allowing tools that only support the OpenAI interface (like Codex CLI) to seamlessly call domestic models. This architecture is also known as an "API compatibility layer" and is an extremely common solution in China's AI tool ecosystem. Here we use the MoBridge solution, which is simple to deploy and offers good stability.
Installing the MoBridge Relay Service
Clone the MoBridge project from the Git repository, then install it directly:
git clone <MoBridge repository URL>
cd mobridge
# Follow the installation instructions
The entire process requires no VPN and installs quickly.
Obtaining a DeepSeek API Key
Go to the DeepSeek Open Platform, register an account, and create a new API Key on the API management page. The process is straightforward and takes just a few steps.
Configuring the Proxy File
Create a configuration file in the MoBridge directory using the vim editor:
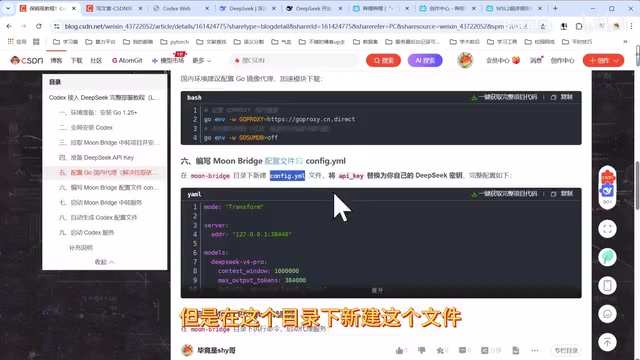
The configuration file requires:
- DeepSeek API Key: Replace with the key you created
- Model selection: Choose either
deepseek-chat(Pro) ordeepseek-chat-flash(Flash)
DeepSeek Model Selection Guide
DeepSeek is a large language model series developed by DeepSeek (the company), with coding capabilities that rank among the best internationally across multiple benchmarks. DeepSeek-V3 (corresponding to the chat interface) uses a Mixture of Experts (MoE) architecture, significantly reducing inference costs while maintaining high performance. The Flash version is a distilled model optimized for low-latency scenarios, trading some complex reasoning capability for faster response times and lower per-token pricing. For code generation tasks, the Pro version has clear advantages in handling multi-file dependencies, complex algorithm implementations, and code refactoring, while the Flash version offers excellent value for lightweight tasks like code completion and comment generation.
| Model | Strengths | Best For |
|---|---|---|
| DeepSeek Pro | Powerful performance, higher code quality | Complex project development, large-scale code refactoring |
| DeepSeek Flash | Lower cost, faster responses | Everyday code modifications, simple development tasks |
If your budget allows, we recommend using the Pro model — its performance is significantly better than Flash. If you're just making simple code changes, Flash is perfectly adequate.
Starting the Relay Service and Running Codex
After configuration is complete, start the MoBridge relay service. Once you see the confirmation that it's running normally, open a new terminal window to continue with the remaining steps.
Follow the tutorial and copy the configuration commands line by line (5 lines total) to complete the final Codex configuration. Then switch to your project directory and simply run:
codex
Once you see the model loading information, Codex has successfully connected to DeepSeek and is ready to use. From now on, to use it in any directory, just make sure the relay service is running and type codex to enter the interactive interface.
Advanced Tips: Extending Codex's AI Programming Capabilities
Let Codex Auto-Install Skills
The Skills mechanism in OpenAI Codex CLI is essentially a set of predefined prompt templates and tool-calling configurations, similar to pre-installing domain-specific "operation manuals" for an AI Agent. Each Skill contains system prompts, commonly used tool-calling chains, and output format specifications tailored to specific tasks (such as research literature processing, frontend development, or data analysis). By installing Skills, Codex can more accurately understand intent, select appropriate toolchains, and generate domain-compliant code for corresponding tasks. In essence, it improves the model's performance in vertical scenarios through structured context injection.
Many people don't know how to fully leverage Codex's capabilities after installation. A very practical tip is to let Codex install Skills on its own.
Simply enter instructions like:
- "Help me install some research-related skills"
- "Help me install some code generation skills"
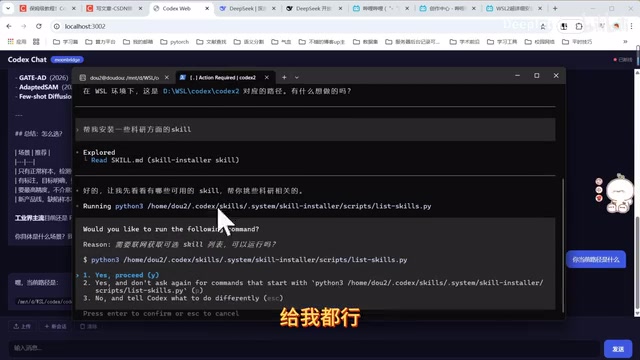
Codex will automatically check the official repository for available Skills, filter out relevant ones, and complete the installation. This "let AI configure AI" approach significantly lowers the barrier to entry.
Build a Web Chat Interface with Codex
If you're not comfortable with pure command-line interaction, you can have Codex generate a browser-based chat interface. With a simple prompt like:
"Build me a complete local web chat application with a frontend interface and Node backend that I can use for chatting through the browser"
Codex will automatically generate a complete web application. You can then add follow-up requirements, such as a file upload button, PDF parsing functionality, and more.
Codex vs. OpenCloud: A Hands-On Comparison
Using the same simple instruction — "Generate a webpage with particle effects" — we tested both Codex and OpenCloud:
- Codex's output: More visually impressive, higher code quality
- OpenCloud's output: Relatively basic, leaning more toward a general assistant than a code specialist
The conclusion is clear: In the code development domain, Codex is significantly superior, while OpenCloud is better suited as a general-purpose personal assistant.
Summary: The Best Approach for Deploying Codex in China
This tutorial provides a complete walkthrough for deploying Codex CLI in China using the WSL + MoBridge relay + DeepSeek API approach. The core advantages of this solution are:
- Zero VPN costs: All resources used are accessible from within China
- Cost-effective: Only DeepSeek API fees required, no overseas subscriptions needed
- Stable and reliable: No risk of account bans
- Fast deployment: Can be completed in about ten minutes with practice
For developers who are comfortable with the command line, this solution is especially well-suited for scenarios without a desktop environment, such as Linux servers or corporate intranets. If you run into any issues, just ask Codex itself — it can not only write code but also help you configure environments, install tools, and troubleshoot errors.
Related articles
 Tutorials
Cursor + Codex Dual-IDE Collaboration: A Practical Methodology for Open-Source Project Customization
A complete methodology for open-source project customization based on real-world experience, detailing the Cursor+Codex dual-IDE workflow, seven-stage process, MVP validation, and AI source code reading techniques.
 Tutorials
Cursor Multi-Agent in Practice: Building a Full-Stack Next.js Blog in 50 Minutes
Build a full-stack blog in 50 minutes using Cursor IDE's multi-Agent mode with Next.js, Clerk auth, and Supabase. Learn the 4-phase AI Agent workflow and key integration pitfalls.
 Tutorials
Building an AI Software Factory from Scratch: A Cursor Engineer's Hands-On Experience with Multi-Agent Collaboration
Cursor engineer Eric shares practical insights on building an AI software factory: automation levels, guardrail design, parallel Agent management, and scaling to 1000+ Agents for 24/7 development.