Complete Guide to Installing and Configuring Claude Code in China: From Environment Setup to Successful Launch

A complete guide to installing and configuring Claude Code for developers in China.
This guide walks developers in China through the full process of setting up Claude Code, Anthropic's command-line AI coding assistant. It covers Node.js and Git environment preparation, npm installation, network proxy configuration to bypass regional restrictions, API key acquisition via official or third-party services, and login authorization — plus a troubleshooting reference for common issues.
For developers looking to experience AI-powered programming, Claude Code is one of the most noteworthy command-line coding tools available today. Developed by Anthropic, it's positioned as an AI programming assistant that runs directly in your terminal, capable of understanding project context, generating code, executing commands, and performing file operations — unlike traditional IDE plugins, it's entirely command-line based, aligning more closely with developers' native workflows. However, users in China often encounter various obstacles during installation and configuration — network issues, environment setup, API key acquisition, and more. Based on a detailed hands-on tutorial by a Bilibili creator, this article compiles a clear installation and configuration guide to help you get Claude Code up and running quickly.
Environment Preparation: The Node.js, Git, and npm Trio
Claude Code depends on three foundational components: Node.js, Git, and npm. These three form the cornerstone of the entire toolchain — missing any one of them will prevent subsequent steps from proceeding.
Key Points for Node.js Installation
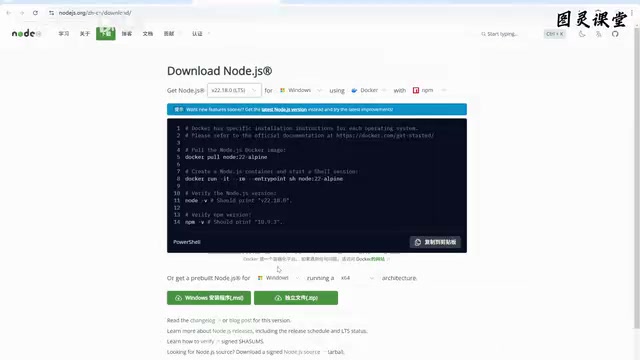
Claude Code runs on the Node.js environment, making it the first component you need to install. Node.js is a JavaScript runtime environment built on Chrome's V8 engine that allows JavaScript code to execute on the server side or in the local command line, independent of a browser. Claude Code is essentially a command-line tool package published on the npm registry, leveraging Node.js's asynchronous I/O capabilities and rich ecosystem to interact with AI models, perform file system operations, and execute terminal commands. npm (Node Package Manager), the default package manager for Node.js and the world's largest open-source software registry hosting over 2 million JavaScript packages, serves as the direct channel for installing Claude Code.
Here are some key recommendations for version selection:
- Use the LTS version (Long-Term Support) for better stability and ongoing official maintenance. LTS versions typically receive a 30-month official maintenance cycle, including security patches and critical bug fixes — essential for development tools that depend on a stable runtime environment
- Version 20 or higher, as Claude Code is a relatively new tool and older versions may have compatibility issues. Node.js 20 introduced multiple performance improvements and new API features, including more complete ES module support and an improved permissions model
- Windows users should download the MSI installer, which automatically configures environment variables; downloading the Zip package requires manual configuration
- Mac users should choose the PKG package, and Linux users should select the corresponding archive
After installation, run the following two commands in your terminal to verify:
node --version
npm --version
If both commands output version numbers correctly, your Node.js environment is properly set up.
Git Environment Configuration
Installing Git isn't just about version control. Claude Code needs the terminal environment provided by Git Bash when executing tasks — on Windows, it emulates a mini terminal capable of running Linux commands.
Specifically, Git Bash is a terminal emulator bundled with the Git for Windows installer, based on the MSYS2 (Minimal SYS2) project, providing a Unix-like shell environment on Windows. This means developers can use native Linux/Unix commands like ls, grep, cat, sed, and more on Windows. As an AI coding assistant, Claude Code calls numerous shell commands under the hood when generating code, creating files, and performing directory operations. While Windows' native CMD and PowerShell are powerful, their command syntax differs significantly from Unix systems. Git Bash bridges this gap, allowing Claude Code to use a unified command set across different operating systems.
After installing Git, verify with:
git --version
Here's an easily overlooked detail: After installing Git, you need to add the Git Bash path to your environment variables. Specifically, locate the bash.exe file path in your Git installation directory (typically at C:\Program Files\Git\bin\bash.exe). Environment Variables are OS-level key-value configurations, where the PATH variable determines whether the system can find executable files from any directory. If you skip this step, the system won't be able to locate the bash interpreter when Claude Code tries to generate projects or perform file operations, likely resulting in errors. Windows users can configure this through "System Properties → Advanced → Environment Variables," while Mac/Linux users typically set this in shell configuration files like .bashrc or .zshrc.
Installing Claude Code via npm
Once the environment is ready, installing Claude Code itself is actually the simplest step. It can be done with a single npm command:
- Linux/Mac: Prefix the command with
sudoto elevate permissions (sudois the superuser privilege escalation command in Unix/Linux systems; global npm package installation requires writing to system-level directories, hence the need for admin privileges) - Windows: Execute directly without additional permissions
If download speeds are slow, you can first configure npm to use a domestic mirror repository, switching from the default international source (registry.npmjs.org) to a domestic one (such as the Taobao mirror at registry.npmmirror.com) for noticeably faster downloads. A mirror repository is essentially a domestically synchronized copy of the official npm registry, typically syncing with the official source every few minutes. The package contents are identical — only the physical servers are located in China, dramatically reducing network latency. Of course, if you already have a VPN setup, you can skip this step.
After installation, run claude --version to confirm the version number, and claude --help to view all available command parameters.
Network Proxy Configuration: A Must for Users in China
This is the most critical and error-prone part of the entire configuration process. Due to network restrictions, users in China will most likely encounter regional restriction errors when running Claude Code directly — Claude Code needs to establish HTTPS connections with Anthropic's API servers to send and receive data, and these servers are deployed overseas, meaning direct access may be blocked or experience extremely high latency.
Proxy Configuration Approach
The solution is to create a configuration file in your project directory that routes HTTP requests through your VPN service:
- Create a
.claudefolder in your project root directory - Create a
settings.jsonfile inside it - Configure HTTP and HTTPS proxy addresses pointing to your local proxy service port (typically in the format
http://127.0.0.1:port, where the port number depends on your proxy client settings — common ones include 7890, 1080, etc.)
Note that besides setting the proxy in Claude Code's configuration file, you can also set global network proxies for all command-line programs through the system environment variables HTTP_PROXY and HTTPS_PROXY. Each approach has its pros and cons: the configuration file method only affects Claude Code itself, making it more precise; the environment variable method applies to all terminal programs, requiring only a one-time setup.
If your terminal window already has a global proxy configured, or if you're operating on an overseas server, you can skip this step. However, the tutorial author specifically mentioned that network conditions can be inconsistent, so it's recommended to set up the proxy from the start to avoid disconnections mid-task.

API Key Acquisition: Two Available Paths
Once network issues are resolved, the next step is configuring your API key. An API Key is an authentication mechanism — essentially a unique string generated by the service provider to identify the caller and track billing. Anthropic's API keys typically start with the prefix sk-ant-. There are two paths to choose from:
Direct Official Connection
Using Anthropic's official service directly, there are two payment models:
- Subscription-based: Fixed monthly fee (e.g., Claude Pro subscription at $20/month, Max subscription at $100 or $200/month), suitable for heavy users with no significant call limits within the subscription quota
- Pay-as-you-go: Top up through the Anthropic Console and pay based on actual API usage, suitable for occasional users. Billing is based on the number of input and output tokens — tokens are the basic units that large language models use to process text, with roughly 1-2 tokens per English word and approximately 1-2 tokens per Chinese character
When using the official service, launching Claude Code for the first time will guide you to the official website to complete authorization. This process follows the OAuth 2.0 protocol — an industry-standard authorization framework that redirects through the browser so users can confirm authorization on Anthropic's website, then passes the generated access token back to the local client. This approach is more secure than directly pasting an API Key, as users never need to handle the key in plaintext. After successful authorization, the system automatically obtains the token and writes it to a local configuration file (.claude.json in the user's home directory), eliminating the need for repeated operations until the token expires or is revoked.
Third-Party Proxy Services
If you'd rather not interface directly with the official service, you can opt for domestic third-party proxy ("wrapper") services. They work by having you call the third party's API, which then proxies the call to Anthropic's official interface. From a technical perspective, this is essentially a Reverse Proxy architecture — the third party deploys servers overseas, receives API requests from domestic users, forwards the requests to Anthropic's official API endpoints, and returns the responses back to the user along the same path.
When using third-party services, in addition to configuring the API Key, you also need to configure an API Base URL, redirecting requests from Anthropic's official address (e.g., api.anthropic.com) to the third party's service endpoint. Specific configuration methods are usually documented on the third-party platform. This can be done by setting the ANTHROPIC_BASE_URL environment variable or specifying it in the configuration file.
The tutorial author offers a pragmatic suggestion: third-party services primarily solve network issues and aren't necessarily cheaper. If you just want to address the network access pain point, they're worth considering; but if you're cost-sensitive, carefully compare pricing across providers. Additionally, be aware of potential security risks: all your conversation content and code passes through third-party servers, creating the possibility of data leaks; the stability and response latency of third-party services also can't match a direct official connection. When choosing a third-party service, prioritize platforms with good reputations and transparent privacy policies.
Login Authorization and Verification
With all configuration complete, run the claude command in your project directory to enter an initialization wizard:
- Choose interface theme: Light or dark — purely personal preference
- Login authorization: Redirect to the Claude website to complete account authorization, or choose to use an API Key configured via environment variables. If choosing the environment variable method, you need to pre-set the
ANTHROPIC_API_KEYenvironment variable, which Claude Code will automatically read for authentication - Authorization success: The console displays "success" and key information is written to local configuration
Finally, when you see the "Welcome to Claude Code" welcome screen displaying your current working directory, the entire installation and configuration process is complete. At this point, Claude Code can already perceive your current project's file structure, and you can start describing programming tasks to it in natural language.
Quick Troubleshooting Reference
| Symptom | Possible Cause | Solution |
|---|---|---|
| Regional restriction error | Network proxy not configured | Create .claude/settings.json with proxy settings in your project, or set HTTP_PROXY/HTTPS_PROXY environment variables |
| Command execution error: bash not found | Git Bash path not configured | Add the bash.exe path to your system PATH environment variable |
| Extremely slow npm installation | Using default international mirror | Run npm config set registry https://registry.npmmirror.com to configure a domestic mirror |
| Authorization page won't load | Unstable network | Check proxy configuration or switch network environments |
| Token expired, re-authorization needed | OAuth token validity period has ended | Re-run the claude command to trigger the authorization flow |
This is just the first chapter of the Claude Code tutorial series — getting started and configuration. Subsequent topics will cover core mode switching (such as the differences between auto mode and interactive mode), Claude MD global memory (providing project-level persistent context for the AI via the .claude/CLAUDE.md file), session management, resource monitoring, and other advanced topics. But the hardest part is getting started — once you've successfully cleared the environment configuration hurdle, the hands-on operations that follow will come naturally.
Related articles

A Gen-Z Woman Making $1.5M/Month: Deconstructing the Growth Methodology Behind AI Apps
Gen-Z indie dev Nicole built 4 hit AI apps earning $1.5M/mo. Deep dive into her industrialized UGC engine, traffic testing system, and minimalist tech stack.
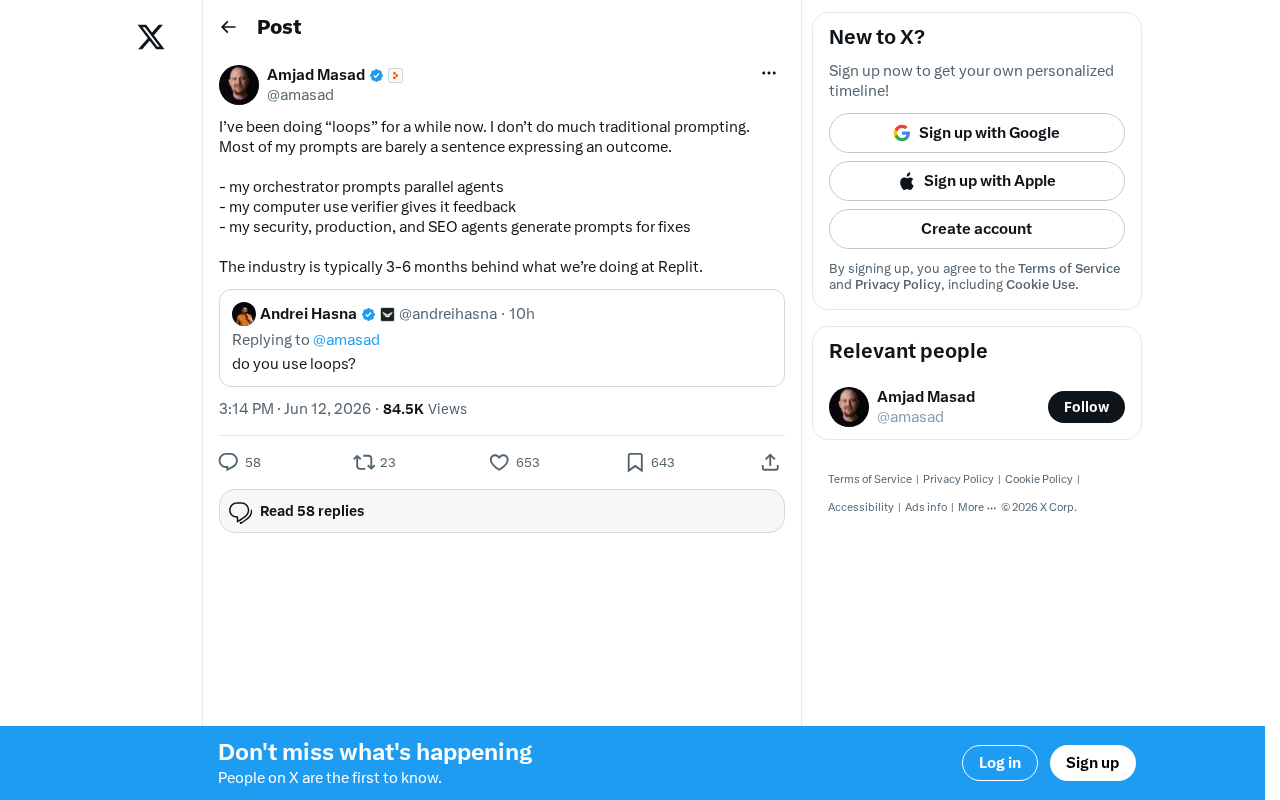
Replit's AI Loops Workflow Explained: Multi-Agent Collaboration Replaces Prompt Engineering
Deep dive into Replit's AI Loops workflow: how orchestrators, parallel agents, and Computer Use Verifiers build automated closed-loop systems through multi-agent collaboration.
Claude Code + Skills: A Practical Guide to AI-Powered Test Case Generation
Learn how to use Claude Code + Skills to auto-generate enterprise-grade test cases. Covers AI Agent vs LLM differences, the four core capabilities, and the complete workflow from requirements to test cases.