Building an AI Behavior Tree from Scratch: Python Window Capture Module Development Log
Building an AI Behavior Tree from Scra…
Building a reusable Python window capture module for an AI behavior tree game automation project.
Bilibili creator "逃少" builds a game automation project driven by AI behavior trees from scratch, focusing this episode on the Capture (window capture) module. The project uses a modular architecture (Capture, Vision, Control, State Manage), refactoring an initial standalone script into an object-oriented Python class, resolving issues like recursive calls and indentation errors, ultimately delivering a reusable real-time window capture solution for other modules.
Project Background: Driving Game Automation with AI Behavior Trees
This is a live development stream from Bilibili content creator "逃少" (Taoshao), documenting his journey of building a game automation project based on AI behavior trees from scratch. The core task for this episode is completing the most fundamental yet crucial module in the project—the Window Capture module.
Behavior Trees are a decision-making model originating from the game AI field, first widely adopted in AAA games like Halo 2. They organize AI decision logic through a tree structure, where each node represents a behavior or conditional check, executing from the root node downward layer by layer. Compared to traditional Finite State Machines (FSM), behavior trees offer better readability, extensibility, and modularity. A typical behavior tree contains Selector nodes (choose one successful child to execute), Sequence nodes (execute all children in order until one fails), Condition nodes, and Action nodes. In game automation scenarios, behavior trees allow AI to dynamically select execution paths based on the current screen state—for example, decision chains like "enemy detected → attack" or "health low → use potion."
The overall project architecture contains four core files: Capture, Vision, Control, and State Manage. This episode focuses on the Capture module, with the goal of implementing real-time screen capture of the target game window, providing data input for subsequent AI visual recognition and behavior decisions.
Development Environment Setup: Common Issues During Configuration
The first step was setting up the environment. The creator installed Git version control, Testlab testing framework, and Docker container environment in sequence. Along the way, he encountered many typical developer daily issues: software defaulting to the C drive requiring manual relocation, Docker containers being accidentally deleted and needing reconfiguration, and package dependencies needing to be sorted out one by one.
Docker is a containerization technology that packages applications and all their dependencies into a standardized container for execution. The main advantages of using Docker in AI/automation projects include: environment consistency (avoiding the "it works on my machine" problem), dependency isolation (different projects' Python versions and package versions don't interfere with each other), and rapid deployment and reproduction. For AI projects that require installing numerous Python packages with version sensitivity, Docker can solidify the entire runtime environment into an image that team members or your future self can restore with a single command.
You might not have noticed, but when installing Testlab, the creator specifically created independent folders to manage installation paths and used image loading to accelerate the installation process. While this environment configuration work seems tedious, for an AI project that needs long-term maintenance, standardized environment management is essential groundwork.
Additionally, the project required installing OCR text recognition, DXCM, and other Python packages—these are all dependencies for the subsequent vision recognition module. DXCM is likely a Python wrapper for DirectX screenshot capabilities, used to solve the problem where traditional GDI screenshot methods cannot capture GPU hardware-accelerated rendered frames. The creator completed batch installation through terminal pip commands.
Project Structure Design: Modular Layered Architecture
With the environment ready, the creator set up the project's basic directory structure and wrote README documentation. The project adopts a modular design with core modules including:
- Capture: Window capture, responsible for obtaining real-time frames from the target window
- Vision: Visual recognition, performing screen analysis based on AI
- Control: Controller, executing specific operation commands
- State Manage: State management, maintaining the behavior tree's state transitions
The benefit of this layered architecture is that each module has clear responsibilities, can be tested independently, and facilitates future feature expansion. From a software engineering perspective, this design follows the Single Responsibility Principle (SRP) and Dependency Inversion Principle (DIP)—upper-level modules (like State Manage) don't directly depend on low-level implementation details but interact through module interfaces, ensuring that internal refactoring of any module won't affect the normal operation of others.
Capture Module Development: From Script to Reusable Python Class
Initial Implementation and Problem Discovery
The creator initially had a working capture script that could select a window via dragging and successfully capture the screen, exiting with the Q key. However, this initial version had a critical problem—it was a standalone program that couldn't be reused by other modules.
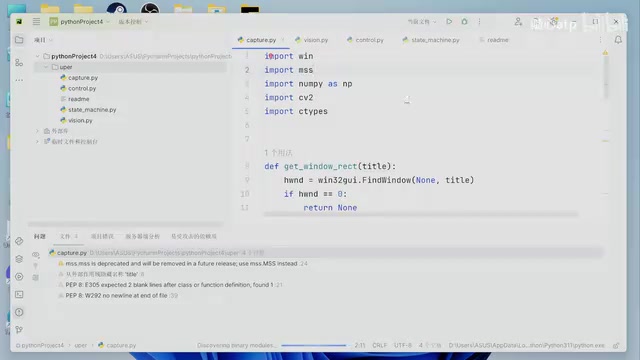
In the actual behavior tree architecture, other modules need to import the capture functionality via import capture to obtain real-time frame states. This means Capture cannot be a self-running script but must be encapsulated as an instantiable Class.
From a technical perspective, window capture on Windows has multiple implementation approaches: GDI (Graphics Device Interface) screenshots have good compatibility but lower performance; BitBlt block transfer is a more traditional approach; DXGI Desktop Duplication is based on DirectX's desktop duplication API with excellent performance and can obtain frame data directly from the GPU; Windows Graphics Capture API is Microsoft's newer modern capture interface. The choice depends on the target game's rendering method and performance requirements.
Refactoring to Object-Oriented Design
This is the most core and technically substantial part of this episode. The creator refactored the capture logic into a Python class:
class Capture:
    def __init__(self, title):
        # Initialize window, pass in window title
        self.title = title
        # Call reset to get window coordinates
        self.brands = self.get_windows(title)
During the refactoring process, the creator encountered several typical Python OOP issues:
-
Understanding the
__init__method: The role of theselfparameter is to pass the instance itself as an object—this is a fundamental mechanism of Python classes. The creator spent some time during the stream understanding this concept—"passing yourself in as an object." In Python's design philosophy, this embodies the principle of "Explicit is better than implicit"—unlike the implicitthispointer in Java/C++, Python requires developers to explicitly declare instance references, making the code's data flow clearer and more traceable. -
Indentation issues: Python is extremely sensitive to indentation, and the code failed to run multiple times during development due to indentation errors. The creator lamented "indentation problems every day"—this is indeed a common pain point for Python developers. Python uses indentation rather than curly braces to define code blocks, meaning mixing tabs and spaces or inconsistent indentation levels will cause
IndentationError. It's recommended to set your editor to automatically convert tabs to 4 spaces and enable whitespace visualization. -
Recursive call trap: On the first run, a recursive call bug appeared—the
__init__method cannot call itself internally, otherwise it causes infinite recursion. This is because each call to__init__attempts to create a new instance context, and if initialization triggers initialization again, it forms an infinite loop, eventually hitting Python's recursion depth limit (default 1000 levels) and throwing aRecursionError. -
Module import conventions: The creator consulted Python's import conventions (PEP 8) and learned that imports of standard libraries, third-party libraries, and custom modules should be organized in layers, separated by blank lines between groups. This convention helps quickly identify a project's external dependencies and facilitates automated management using tools like isort.
Final Usage Pattern
After refactoring, other modules can use Capture as follows:
from capture import Capture

# Create capture object, pass in target window name
cap = Capture("逃跑吧少年")
# Get window coordinates
position = cap.get()
This design allows the Capture module to be flexibly called by Vision, Control, and other modules, obtaining real-time frame data from the target window with each call. From a design patterns perspective, this is essentially a simple encapsulation pattern—hiding complex Windows API calls and window lookup logic inside the class while exposing only a clean interface.
Testing and Milestone Results
The creator wrote test documentation to verify the Capture module. Test results showed that the module could successfully capture the target game window's screen, including game screens running on mobile devices (mapped to PC windows through emulators or screen mirroring tools).
However, the development process also exposed an issue: capture fails when the target window is minimized or sent to the background. This is because GDI-based screenshot methods depend on the window's visible area—when a window isn't visible, the system doesn't maintain a valid Device Context for it. This means subsequent development may need to consider using lower-level screenshot methods (such as DXGI Desktop Duplication or PrintWindow API with WDA flags) to overcome this limitation and achieve true background capture.
Technical Reflections and Future Outlook
Although only the Capture module was completed this episode, it reveals the overall approach of the AI behavior tree project:
- Behavior tree architecture: Driving AI decision processes through state management, with each node corresponding to a specific behavior. The behavior tree execution engine traverses from the root node at a fixed frequency (usually synchronized with the game's frame rate), determining execution paths based on each condition node's return value (success/failure/running).
- Vision-driven approach: Using OCR and image recognition instead of traditional memory reading, making it more universal. OCR reads text information on the game interface (such as health values, skill cooldowns, quest prompts), while template matching and deep learning object detection (like YOLO) identify dynamic game objects. The advantage of this approach is that it doesn't require reverse-engineering game memory structures and is less likely to trigger anti-cheat system detection.
- Modular design: Each functional module is developed and tested independently, ultimately assembled through the main entry point (main file).
Starting from a simple window capture and working toward a fully autonomous AI behavior tree—the development process of this project itself serves as an excellent learning case. Looking forward to the creator's subsequent development streams on the Vision and Control modules.
Key Takeaways
- The project adopts a modular architecture with four core modules: Capture, Vision, Control, and State Manage
- The Capture module was refactored from a standalone script to an object-oriented Python class, enabling reusable window capture functionality
- Development resolved typical Python programming issues including recursive calls, indentation errors, and module import conventions
- The capture failure when windows are minimized revealed the need for lower-level screenshot solutions in future development
- The entire AI behavior tree project is vision-driven at its core, achieving game automation through OCR and image recognition
Related articles
 Tutorials
Cursor + Codex Dual-IDE Collaboration: A Practical Methodology for Open-Source Project Customization
A complete methodology for open-source project customization based on real-world experience, detailing the Cursor+Codex dual-IDE workflow, seven-stage process, MVP validation, and AI source code reading techniques.
 Tutorials
Cursor Multi-Agent in Practice: Building a Full-Stack Next.js Blog in 50 Minutes
Build a full-stack blog in 50 minutes using Cursor IDE's multi-Agent mode with Next.js, Clerk auth, and Supabase. Learn the 4-phase AI Agent workflow and key integration pitfalls.
 Tutorials
Building an AI Software Factory from Scratch: A Cursor Engineer's Hands-On Experience with Multi-Agent Collaboration
Cursor engineer Eric shares practical insights on building an AI software factory: automation levels, guardrail design, parallel Agent management, and scaling to 1000+ Agents for 24/7 development.