Coze Workflow for Auto-Generating Emotional Short Videos: A Zero-Code Tutorial
Coze Workflow for Auto-Generating Emot…
Automate emotional short video production with Coze workflows — input a topic, get a video in 20 seconds.
This article introduces an automated emotional short video production pipeline built on the Coze workflow platform. The process flows from inputting a topic keyword → LLM script generation → script cleaning → text-to-speech voiceover → data organization → packaging as a CapCut draft. No coding is required — just provide a topic, background video, and background music, and a complete short video with voiceover, subtitles, and animations is generated in about 20 seconds, perfect for batch daily content operations.
Introduction: Daily Video Uploads Without Writing a Single Line of Code
Emotional short videos have always been a traffic magnet on social platforms, but posting daily content is a real challenge for creators — you need to write scripts, record voiceovers, edit footage, and add subtitles. What if I told you that by simply entering a topic keyword, you could automatically generate a complete emotional short video in just 20 seconds? Sounds tempting, right?
This article provides a detailed breakdown of an automated emotional short video production pipeline built on the Coze workflow platform. The entire process requires zero coding, with only two or three core nodes. Even complete beginners can follow along and build it step by step.
Overall Coze Workflow Architecture
The core logic of this workflow is crystal clear: Input topic → Generate script → Clean script → Text-to-speech → Data processing → Package as CapCut draft. The entire process doesn't rely on any third-party computing resources — it only consumes Coze platform credits, and the credit consumption is minimal since the main computational cost is only in the voiceover step.
You only need to provide three inputs:
- Topic keyword (e.g., "secret crush," "can't let go")
- Background video (can be sourced from CapCut's asset library)
- Background music (can be exported from CapCut's music library)
Once the workflow finishes running, it outputs a draft ID. Paste this into the CapCut Assistant to create a draft, then preview and fine-tune the video directly in CapCut.
Detailed Setup Steps
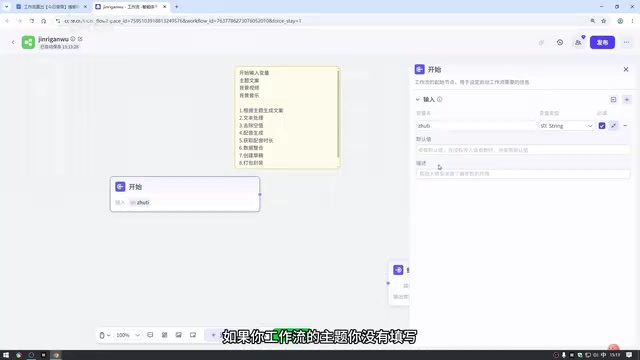
Step 1: Create the Workflow and Configure the Start Node
Visit coze.cn in your browser, navigate to the Coze programming page, and create a new workflow in the resource library (note: the name can only use English letters or pinyin).
The start node requires three input variables:
| Variable Name | Variable Type | Description |
|---|---|---|
| Topic | String | Required, used to generate the script |
| Background Video | File-Video | Upload a video file |
| Background Music | File-Audio | Upload an audio file |
A practical tip: Background assets can be sourced directly from CapCut's official asset library and music library — simply add the asset to the timeline and export it separately.
Step 2: Use an LLM Node to Generate Emotional Scripts
Add an LLM node and select Doubao 2.0 mini as the model. It's recommended to increase the maximum reply length in the settings to prevent errors caused by overly long outputs. You can also disable deep thinking, since generating emotional scripts isn't complex — disabling it significantly speeds up execution.
The system prompt should include: role definition, fixed opening format, subtitle rules, pacing requirements, and output format. The user prompt should reference the topic variable.
Important note: When referencing variables, if the variable name in your prompt doesn't change color, the reference has failed. You need to click the variable name and switch it to the actual input variable name. This is a key checkpoint for troubleshooting workflow errors.
Step 3: Script Cleaning (Text Processing + Remove Empty Values)
The script output from the LLM typically contains numerous line breaks and blank lines, requiring two cleaning steps:
- Text processing node: Use the built-in text processing plugin, select the "string split" function, choose newline as the delimiter, and split the script into line-by-line data.
- Remove empty values node: Search for "common code blocks" in the plugin library, find the "remove empty data from array list" plugin, and eliminate the blank lines produced by the split.

Step 4: Text-to-Speech for Automatic Voiceover
Search for "text-to-speech" in the plugin library and use Coze's official TTS plugin. Here's a critical operation: since the input script is in array format but the plugin accepts single text entries by default, you need to switch the plugin to batch processing mode.
There are two ways to switch:
- Option 1: Switch to "batch processing" mode directly within the plugin node (recommended, cleaner)
- Option 2: Add a batch processing/loop node externally and place the TTS inside it
Both options work on the same principle. For the voice, select a Chinese voice from the presets. Speech rate is recommended at 1.15–1.2 for better pacing suited to emotional content.
Step 5: Get Voiceover Duration and Data Organization
After voiceover generation is complete, use the CapCut Assistant plugin's "get audio duration" function to retrieve the duration of each voiceover segment. This duration data will be used for subtitle timeline alignment.
Next comes the most complex part of the entire workflow — a code node for data organization. Don't worry though — the code is pre-written; just copy and paste it from the documentation.
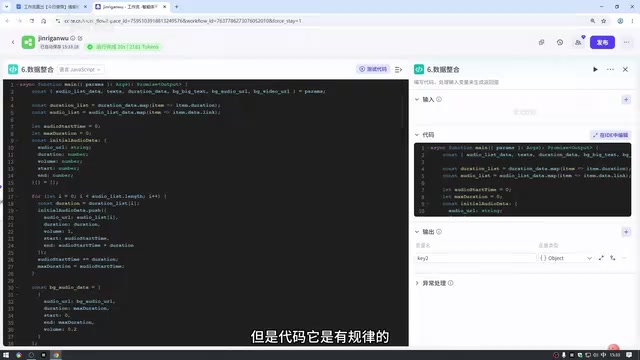
The code node requires 6 input variables: topic, background video, background music, cleaned script, voiceover data, and audio duration. Variable names must match exactly with those in the code (including case sensitivity), or errors will occur.
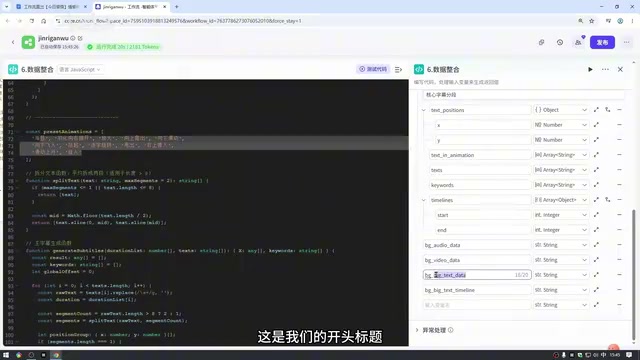
The output also has 6 variables, including:
- Main audio concatenation track data
- Core subtitle segment data (including position, animation, highlighted words, timeline)
- Audio and video data
- Opening title and its timeline
Time-saving tip: If the output variable configuration feels complex, you can feed the code to an AI and ask it to tell you how the output variables should be defined.
Step 6: Create CapCut Draft and Package
Add the CapCut Assistant's "create draft" node and set the draft dimensions to 1080×1920 (portrait mode).
The final packaging step originally involved over a dozen nodes, but the tutorial author has encapsulated them into a single workflow node. Users only need to:
- Download the packaged zip file (do not unzip)
- Import the zip file in the Coze resource library
- Enter the imported node and click publish
- Return to the main workflow and add this workflow node
The encapsulated packaging node only requires 5 input variables: audio, video, draft ID, audio data, and core subtitle object.
Finally, connect the end node, and the entire workflow is complete.
Results and Usage
Click "test run," upload the background video and music, enter a topic keyword, and a complete video is generated in approximately 20 seconds. After the run completes:
- Copy the draft ID from the end node output (make sure not to include quotation marks)
- Open the CapCut Assistant, paste the ID, and click "Create Draft"
- Open the draft in CapCut to preview and fine-tune
The generated video includes automatic voiceover, segmented subtitles, highlighted keywords in red, and random animation effects — essentially ready to publish. If you're not satisfied with the script, you can manually edit it in CapCut.
Notes and Common Issues
- Plugin consistency: Try to use plugins from the same developer within a single workflow; mixing plugins may cause errors
- Free tier limitations: The Coze free tier doesn't support zip file imports — you'll need the personal advanced plan
- Variable name matching: Variable names in the code node must match exactly in case sensitivity — this is the most common cause of errors
- Flexible adjustments: Speech rate, voice selection, and script style can all be iteratively optimized based on actual results
Conclusion
The core value of this Coze workflow lies in standardizing and automating the emotional short video production process. Once set up, you only need to input a topic keyword daily to quickly produce a complete video with voiceover, subtitles, and animations — truly achieving stress-free daily uploads. For creators looking to operate emotional content accounts at scale, this is an efficiency tool well worth trying.
Related articles
 Tutorials
Cursor + Codex Dual-IDE Collaboration: A Practical Methodology for Open-Source Project Customization
A complete methodology for open-source project customization based on real-world experience, detailing the Cursor+Codex dual-IDE workflow, seven-stage process, MVP validation, and AI source code reading techniques.
 Tutorials
Cursor Multi-Agent in Practice: Building a Full-Stack Next.js Blog in 50 Minutes
Build a full-stack blog in 50 minutes using Cursor IDE's multi-Agent mode with Next.js, Clerk auth, and Supabase. Learn the 4-phase AI Agent workflow and key integration pitfalls.
 Tutorials
Building an AI Software Factory from Scratch: A Cursor Engineer's Hands-On Experience with Multi-Agent Collaboration
Cursor engineer Eric shares practical insights on building an AI software factory: automation levels, guardrail design, parallel Agent management, and scaling to 1000+ Agents for 24/7 development.