Cursor AI in Practice: Building a Proxy IP Switching Browser in 10 Minutes
Cursor AI in Practice: Building a Prox…
A hands-on guide to building a proxy IP switching browser with Cursor AI in just 10 minutes.
This article documents the complete process of using Cursor AI programming assistant combined with the FBro browser automation framework to rapidly develop a proxy IP switching browser. Built on .NET Framework 4.8, the project leverages MCP services and prompt design to have AI automatically generate complete code—including browser initialization, event handling, and proxy management UI—in approximately 10 minutes, supporting HTTP, HTTPS, and SOCKS5 proxy protocol switching, demonstrating the highly efficient and practical value of AI-assisted desktop application development.
Overview
Cursor is an AI-native code editor deeply customized from VS Code, developed by Anysphere. It deeply integrates Large Language Models (LLMs) into the coding workflow, supporting code completion, natural language code generation, error fixing, and more. Its core advantage lies in Agent mode—where AI can autonomously plan tasks, invoke tools, and iteratively fix errors, achieving true "automated programming." This article documents the complete process of using Cursor AI programming assistant, combined with FBro (a Chromium-based browser automation framework), to rapidly develop a proxy IP switching browser. With AI-assisted programming, the entire project went from zero to runnable in approximately 10 minutes, demonstrating the practical value of AI programming in desktop application development.
Project Environment Setup
Creating a Visual Studio Project
First, create a new project in Visual Studio named "Proxy Switching Browser," selecting .NET Framework 4.8 as the target framework. .NET Framework 4.8 is the final version of Microsoft's .NET Framework series (released in 2019) and remains a mature, stable choice for Windows desktop application development. The main reason for choosing 4.8 over .NET 6/8 is that CefSharp/CEF-based frameworks have better compatibility with older .NET versions, and the WinForms/WPF ecosystem is more complete on Framework, avoiding compatibility issues from cross-platform migration. After project creation, set it as the startup project.
Next, install FBro's core dependency packages through the NuGet Package Manager. Search for "FBPro," select the Commune package, specifying version 4.20.394.0 (stable). FBro is a .NET browser automation framework built on the Chromium engine, with its underlying dependency on CefSharp (C# bindings for the Chromium Embedded Framework). CEF allows developers to embed a complete Chromium browser engine into desktop applications, supporting modern web standards, JavaScript execution, cookie management, and full browser capabilities. Compared to the traditional WebBrowser control (based on the IE engine), CEF-based solutions render consistently with Chrome and support advanced network control capabilities like proxies and request interception, making it the mainstream technology choice for building browser automation tools. This package provides the browser engine's foundational functionality, including page rendering, proxy settings, and other core capabilities.
Configuring the Cursor Development Environment
Open a new Cursor editor window and drag the project folder into it. Before starting to code, complete several key configurations:
- Check MCP Configuration: In the settings (top-right corner), search for MCP and confirm all MCP services are active
- Add Rules File: Get the rules template from the Cursor Help Center, search for "Rules" in the editor and add rules, pasting the rule code from the webpage
MCP (Model Context Protocol) is an open protocol proposed by Anthropic in 2024, designed to standardize interactions between AI models and external tools/data sources. Through MCP, AI assistants can invoke local or remote services (such as file systems, databases, API interfaces), greatly expanding AI's capability boundaries. After configuring MCP services in Cursor, the AI can directly call proxy IP management interfaces, read project configuration files, and more—upgrading it from a pure code generation tool to an intelligent agent capable of perceiving and operating external systems. Note that this project doesn't require the Google Developer MCP tool; only the proxy IP-related MCP interface is needed.
The Complete AI Code Writing Process
Prompt Design Strategy
For prompt design, the author adopted an interesting strategy—no specific UI rules were defined for the AI, allowing it to exercise creative freedom. This means interface layout, control selection, and other decisions were all made autonomously by the AI.
Of course, if you have specific UI requirements, you can add corresponding constraints to the prompt. For example:
- For multi-window mode, specify "create a multi-tab browser where each tab uses a different proxy IP"
- For a specific layout style, describe the exact interface arrangement
AI Code Generation and Debugging
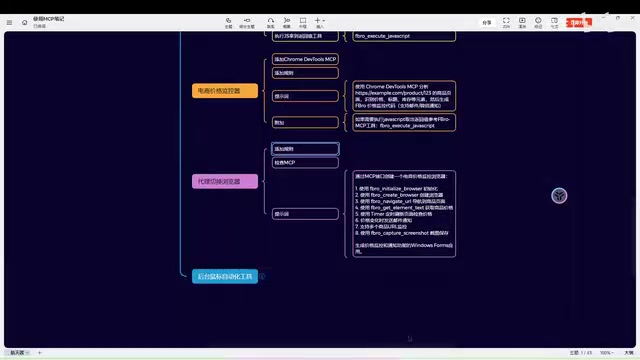
After receiving the prompt, Cursor began automatically generating code. The AI's writing logic was very clear, building the project in the following order:
- Initialization Module: Complete browser engine initialization configuration
- Custom Browser Events: Handle various browser callback events
- Custom Initialization Events: Custom logic executed at browser startup
- Window Event Handling: Including window resizing, navigation, refresh, back, forward, etc.
- Proxy IP List Management: Maintain a list of available proxy IPs
- Proxy Switching Window UI: Provide the user interaction interface
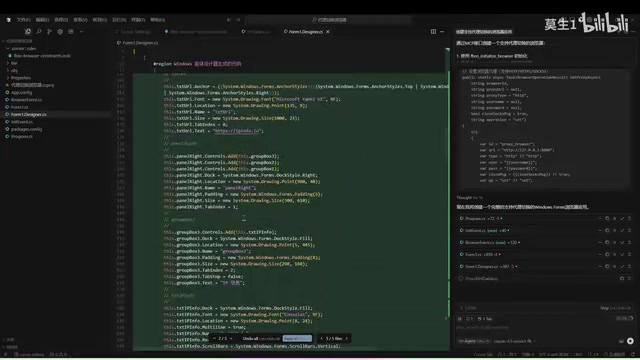
The entire code generation process took approximately 9 minutes, with the AI also automatically checking for compilation errors and performing fixes. During the first compilation, a missing reference error appeared. After feeding the error message back to Cursor, the AI quickly located and fixed the issue in the custom proxy window.
Functional Testing and Verification
Proxy IP Switching Test
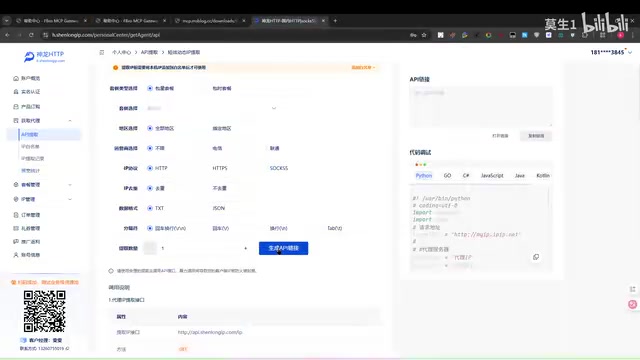
After the project ran successfully, the actual testing phase began. During testing, pay attention to correct port configuration—confirm that the local proxy service port number (7897 in this example) matches the settings in the code.
The testing workflow was as follows:
- HTTP Proxy Test: Add an HTTP-type proxy, set the proxy address, and the browser automatically navigates to an IP detection page to confirm the IP has been successfully switched
- HTTPS Proxy Test: Copy an HTTPS proxy address for configuration, verifying the IP changes again
- SOCKS5 Proxy Test: Generate a SOCKS5 proxy and configure it; the IP successfully switches to a different region
HTTP, HTTPS, and SOCKS5 are three mainstream proxy protocols, each with suitable use cases. HTTP proxies work at the application layer, only supporting HTTP traffic—simple to configure but unencrypted. HTTPS proxies (i.e., HTTP CONNECT tunnels) establish encrypted tunnels through the CONNECT method, supporting HTTPS website access. SOCKS5 is the most versatile proxy protocol, working at the session layer, supporting TCP/UDP traffic without restricting upper-layer protocol types, and natively supporting username/password authentication—making it the preferred choice for web scraping and privacy protection scenarios. In browser proxy switching scenarios, SOCKS5 has the strongest compatibility, but some websites detect proxy characteristics, requiring comprehensive evaluation combined with IP quality.
Test results showed that the proxy switching function worked correctly, with the IP address switching from the initial location to different regions (such as Tangshan, Hebei), verifying the effectiveness of the proxy settings.
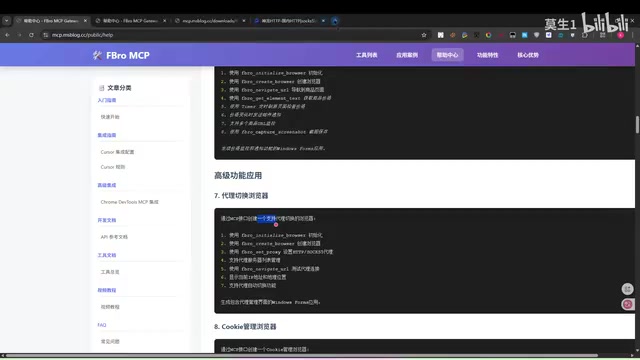
Handling Authenticated Proxies
For proxies requiring username/password authorization (such as some SOCKS5 proxies), authentication information needs to be additionally added in the code. The AI-generated code includes logic for clearing proxies and obtaining the IP controller. For scenarios requiring authentication, you can refer to the authorization code configuration method from previous tutorials.
Extension Ideas and Advanced Usage
Based on the current single-window proxy switching browser, further extensions are possible:
- Multi-tab Multi-proxy: Each browser tab uses a different proxy IP, enabling multi-identity browsing within the same interface
- Proxy Pool Management: Integrate a proxy IP pool with automatic rotation and availability detection
- Latency Optimization: Automatically select the optimal route based on proxy node latency (e.g., Hong Kong nodes typically have the lowest latency)
- Batch Operations: Support batch creation of browser instances, each bound to a different proxy
Summary
Through Cursor AI-assisted programming, we completed a browser application with proxy switching functionality in under 10 minutes. Throughout the process, developers only needed to provide clear requirement descriptions and necessary configuration information, and the AI automatically handled code architecture design, UI drawing, and feature implementation. This development model significantly lowers the barrier to desktop application development—even developers unfamiliar with the FBro framework can quickly produce usable applications.
Key Takeaways
- Used Cursor AI to complete full development of a proxy switching browser in approximately 10 minutes
- Project built on .NET Framework 4.8 and FBro (Commune 4.20.394.0) framework
- AI automatically generated complete code structure including initialization module, browser events, and proxy management UI
- Switching tests verified successfully for HTTP, HTTPS, and SOCKS5 proxy protocols
- Can be extended to multi-window multi-proxy batch operation mode by modifying prompts
Related articles
 Tutorials
Cursor + Codex Dual-IDE Collaboration: A Practical Methodology for Open-Source Project Customization
A complete methodology for open-source project customization based on real-world experience, detailing the Cursor+Codex dual-IDE workflow, seven-stage process, MVP validation, and AI source code reading techniques.
 Tutorials
Cursor Multi-Agent in Practice: Building a Full-Stack Next.js Blog in 50 Minutes
Build a full-stack blog in 50 minutes using Cursor IDE's multi-Agent mode with Next.js, Clerk auth, and Supabase. Learn the 4-phase AI Agent workflow and key integration pitfalls.
 Tutorials
Building an AI Software Factory from Scratch: A Cursor Engineer's Hands-On Experience with Multi-Agent Collaboration
Cursor engineer Eric shares practical insights on building an AI software factory: automation levels, guardrail design, parallel Agent management, and scaling to 1000+ Agents for 24/7 development.