Cursor Beginner's Guide: Four AI Modes & Hands-On Project Demo

A beginner's guide to Cursor AI covering installation, four AI modes, and a hands-on project demo.
This article introduces Cursor, an AI programming tool, covering its installation, interface layout, four AI modes (Agent, Plan, Debug, Ask) and their use cases. Through a hands-on demo building a student information management system, it showcases the complete workflow from technical consultation to code generation and execution, helping beginners get started quickly.
Introduction
Cursor is one of the most powerful AI programming tools available today, capable of helping developers—and even complete beginners—automatically generate code through natural language descriptions. Built on the VS Code open-source editor with deep customizations by Anysphere, Cursor integrates top-tier large language model (LLM) capabilities including GPT-4 and Claude. Unlike code completion tools such as GitHub Copilot, Cursor doesn't just complete code snippets—it understands your entire project context and can generate and refactor code across multiple files. This "full-project awareness" elevates it from a simple code assistant to an AI programming collaboration partner.
This article systematically covers Cursor's installation, interface overview, core modes, and hands-on workflow to help you quickly get started with this revolutionary programming tool.
Downloading and Installing Cursor
Downloading and installing Cursor is straightforward. Open your browser, search for "Cursor official website," and you'll find the download link on the homepage. Click to download the installer for your operating system. Cursor supports Windows, macOS, and Linux, with a moderately-sized installer that downloads quickly.
Note that Cursor requires an account to use. It's recommended to register an account while downloading the installer so you can log in immediately after installation. Cursor offers a free tier (with a limited AI call quota) and a Pro paid version—new users can start with the free quota to experience the core features.
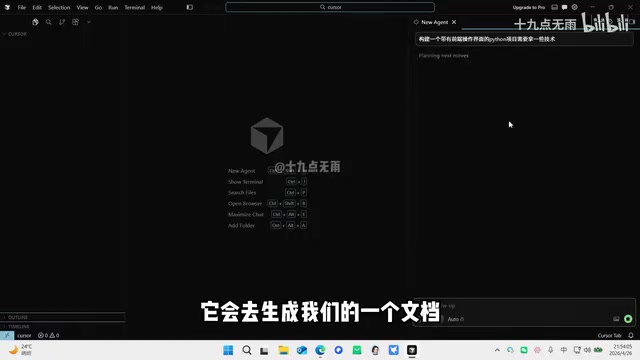
After installation and login, open Cursor and you'll see the initial interface. Select "Open Project" to open your project folder, or create a new empty folder as your project directory to get started.
Cursor Interface Layout Explained
Cursor's interface is divided into three core modules:

Left Panel: Directory Structure
The left panel displays the directory structure of your current project folder, including all files and subfolders. When AI generates new files, this panel updates in real time. Similar to VS Code's Explorer panel, it supports drag-and-drop, renaming, creating new files, and other standard operations.
Center: Code Editor
The center area is for viewing and editing code. When AI modifies code, the changes are highlighted with special colors (typically green for additions and red for deletions), making it easy to identify what the AI has changed. This diff-style display borrows from Git version control's code review mechanism, allowing users to clearly review every modification.
Right Panel: AI Interaction Area
The right side is Cursor's most essential area—the AI chat window. Users interact with the AI here by entering requirement descriptions, and the AI outputs responses and executes code generation operations. The chat window supports context memory, meaning the AI remembers the conversation history within the same session, enabling continuous iterative development.
Cursor's Four AI Modes Explained
Cursor provides four different AI working modes, each suited for specific scenarios:
Agent Mode: Fully Autonomous Collaboration
Agent mode hands the project entirely over to the AI. The AI will automatically plan, write, and debug code—ideal for scenarios where you need to build complete features from scratch.
Behind Agent mode is the application of AI Agent architecture. An AI Agent is a system capable of autonomously perceiving its environment, formulating plans, executing actions, and adjusting strategies based on feedback. In Cursor, the Agent decomposes user requirements into multiple subtasks, automatically deciding which files to create, what code to write, how to organize the project structure, and can even run terminal commands to verify results. This is fundamentally different from traditional "question-and-answer" AI interaction—it possesses multi-step reasoning and autonomous decision-making capabilities, working like an experienced developer independently completing complex tasks.
Plan Mode: Plan First, Execute Later
Plan mode emphasizes "plan first, execute later." The AI first outputs detailed execution steps and waits for user confirmation before executing them one by one. This is ideal for users who want more control over their projects. The advantage is that users can review the AI's overall approach before execution, adjusting or rejecting unreasonable steps to prevent the AI from going off-track and causing extensive rework.
Debug Mode: Focused on Error Fixing
Debug mode focuses exclusively on code error analysis and fixing without adding extra features. When your code has bugs, switch to this mode to let the AI help locate and resolve issues. The AI analyzes error logs, traces code execution paths, identifies root causes, and provides fix suggestions. For common syntax errors, logic errors, and type errors, Debug mode typically delivers accurate fix recommendations quickly.
Ask Mode: Technical Q&A Consultation
Ask mode functions like a regular AI Q&A tool—used for consulting on technical questions and getting advice without modifying any files. It's perfect for technical research before coding, such as learning how to use a framework, comparing different technical approaches, or asking the AI to explain unfamiliar code logic.
Hands-On Demo: Building a Student Information Management System with Cursor
Step 1: Technical Consultation
First, switch to Ask mode and ask the AI: "What technologies are needed to build a Python project with a frontend interface?" The AI will provide detailed tech stack recommendations, including frontend frameworks (e.g., Vue.js, React), backend frameworks (e.g., Flask, Django, FastAPI), databases (e.g., SQLite, MySQL), and analyze the use cases and trade-offs of each option.
Step 2: Generate Project Code
After deciding on the technical approach, switch to Agent mode and enter the instruction: "Based on the current technology, generate a simple student information management system."
After pressing Enter, the AI will begin automatically generating project files. Confirmation windows will pop up during the process:
- Run: Confirm the current single operation
- Accept All: Confirm all operations in the current step
- If you disagree with a modification, you can click to skip it
Step 3: Confirm Code Changes
AI-generated code highlights modified areas with colors. For each file, you can choose:
- Keep: Save the AI's modifications
- Click the adjacent button: Reject the modification
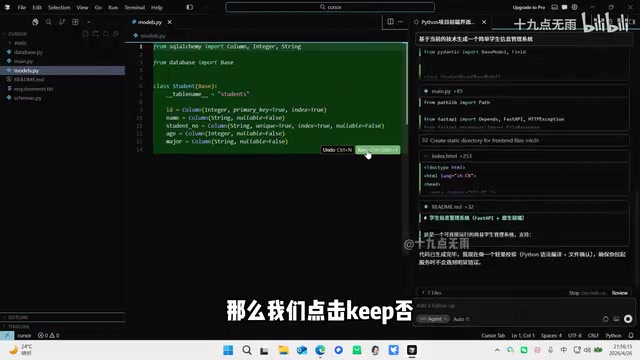
If there are many files and you don't want to confirm each one individually, click the summary button to view all changes, then use "Keep All" to accept all modifications at once.
Step 4: Install Dependencies and Launch the Project
After code generation is complete, ask the AI to start the project. During startup, dependency packages need to be installed—the AI will automatically show a confirmation window, and clicking confirm triggers automatic installation.
Modern software projects typically rely on numerous third-party libraries. Python projects manage dependencies through pip and requirements.txt files, while Node.js projects use npm and package.json. If package version conflicts are detected—where different dependencies in the project require different versions of the same underlying library, making it impossible to satisfy all requirements simultaneously—the AI will automatically analyze the conflict and devise a solution, such as upgrading or downgrading specific package versions or finding compatible alternatives. This significantly lowers the barrier for environment configuration, allowing even newcomers unfamiliar with package management to successfully set up projects.
Step 5: View the Results
After successful startup, the AI provides an access link (typically a localhost address with a port number). Opening the link reveals the complete student information management system page, supporting full CRUD functionality for adding, editing, and deleting student records.
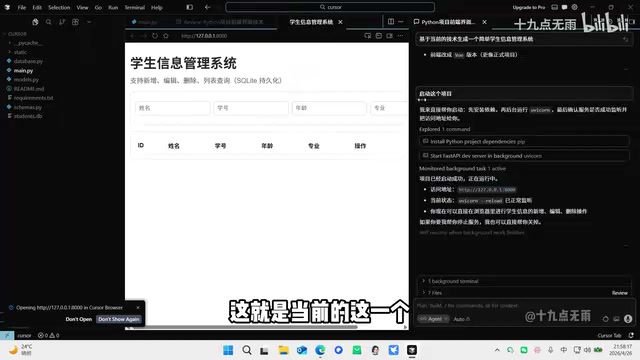
CRUD stands for Create, Read, Update, and Delete—the four basic data operations that form the core functional pattern of virtually all information management systems. In web development, these four operations correspond to HTTP protocol's POST, GET, PUT/PATCH, and DELETE request methods respectively. The frontend handles user interaction, the backend API processes business logic, and the database handles persistent data storage—all three working together to form a complete application system.
In testing, after entering student name "Xiaohong," student ID "001," age "18," and major "Computer Science," then clicking add, the information correctly appears in the list, and both edit and delete functions work properly.
Tips for Using Cursor
- Beginners should start with Ask mode: Understand the technical approach first, then let the AI generate code. This way, even if you don't know programming, you'll have basic judgment about what the AI produces.
- Make good use of Plan mode: For complex projects, have the AI plan before executing to avoid generating code that doesn't meet expectations. Plan mode is especially suitable for medium-to-large projects involving multiple modules that require architectural design considerations.
- Pay attention to the confirmation mechanism: Cursor never force-modifies files—all changes require user confirmation. This is an excellent safety mechanism. It's recommended to quickly review the AI's changes before confirming to ensure no unnecessary modifications are introduced.
- Use Debug mode for troubleshooting: Don't panic when errors occur—switch to Debug mode and let the AI analyze the problem. You can directly copy error messages from the terminal to the AI, which can quickly pinpoint the issue.
- Manage conversation context wisely: When conversations become too long, the AI may "forget" earlier requirement details. For large projects, consider starting new conversations in phases, focusing on one specific feature module at a time.
Conclusion
Through flexible switching between four AI modes, Cursor covers the entire development workflow from technical consultation and project planning to code generation and debugging. Even complete beginners can quickly generate fully functional, runnable projects through natural language descriptions. For experienced developers, it serves as a powerful productivity multiplier—delegating repetitive coding tasks to the AI so developers can focus on higher-value work like architecture design and business logic.
As AI programming tools rapidly evolve, Cursor represents an important trend in software development's evolution from "hand-writing code" to "human-AI collaboration." Mastering these tools will become one of the core competitive advantages for future developers.
Key Takeaways
- Cursor offers four AI modes—Agent, Plan, Debug, and Ask—covering the complete workflow from consultation to development
- Agent mode is based on AI Agent architecture, enabling fully automated code generation where even beginners can build complete projects through natural language
- All AI modifications require user confirmation, supporting individual review or one-click acceptance to ensure code safety and control
- Built-in dependency installation and version conflict detection automates project environment configuration
- The hands-on demo builds a student information management system from scratch with full CRUD functionality (Create, Read, Update, Delete)
Related articles
 Tutorials
Cursor + Codex Dual-IDE Collaboration: A Practical Methodology for Open-Source Project Customization
A complete methodology for open-source project customization based on real-world experience, detailing the Cursor+Codex dual-IDE workflow, seven-stage process, MVP validation, and AI source code reading techniques.
 Tutorials
Cursor Multi-Agent in Practice: Building a Full-Stack Next.js Blog in 50 Minutes
Build a full-stack blog in 50 minutes using Cursor IDE's multi-Agent mode with Next.js, Clerk auth, and Supabase. Learn the 4-phase AI Agent workflow and key integration pitfalls.
 Tutorials
Building an AI Software Factory from Scratch: A Cursor Engineer's Hands-On Experience with Multi-Agent Collaboration
Cursor engineer Eric shares practical insights on building an AI software factory: automation levels, guardrail design, parallel Agent management, and scaling to 1000+ Agents for 24/7 development.