Cursor Installation & Setup Guide: AI-Powered Python Project Development Demo
A step-by-step guide to installing Cursor and using its AI modes to build a Python project from scratch.
This article covers the installation, configuration, and core features of the AI programming tool Cursor. Built on VSCode, Cursor offers four AI interaction modes—Agent, Plan, Debug, and Ask—covering everything from technical consultation to fully automated development. Through a hands-on example of a Python student information management system, the article demonstrates how to generate a complete full-stack project from natural language in just minutes, showcasing practical capabilities like automatic dependency conflict resolution and code change confirmation.
Introduction
Cursor is one of the most powerful AI programming tools available today. It deeply integrates traditional code editing with AI capabilities, automatically generating complete project code from natural language descriptions. Notably, Cursor is built on the popular VSCode open-source framework, meaning developers familiar with VSCode can get started with virtually zero learning curve while enjoying entirely new AI-powered capabilities.
The evolution of AI programming tools has gone through three stages: early intelligent code completion represented by Tabnine, then conversational code generation represented by GitHub Copilot, and now full-process autonomous development agents (Agentic Coding) represented by Cursor. Cursor stands at the forefront of this evolution, representing the latest paradigm in AI-assisted programming. This article will walk you through Cursor's installation and configuration step by step, then demonstrate how to quickly build a Python student information management system through a practical example.

Download and Installation
Downloading and installing Cursor is straightforward—just follow these steps:
- Open your browser, search for "Cursor official website" and navigate to the official site
- Find the download button on the homepage and click to download the installer for your operating system
- While downloading, it's recommended to register a Cursor account simultaneously
- After installation, log in to your account to start using it
Note that you must be logged in to use Cursor's AI features, so registering in advance saves time. Cursor currently offers a free tier (with monthly usage limits) and a Pro paid plan. The free version is sufficient for daily learning and small projects.
Interface Layout and Core Features
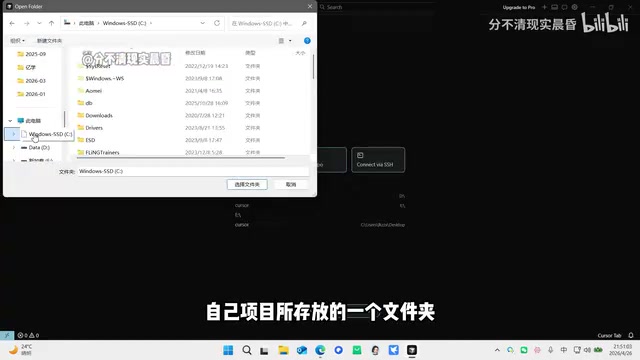
After installing and logging in, open Cursor and you'll see a welcome screen. Select "Open Project" to open your project folder (or create a new empty folder as your project directory).
Once in the main interface, the workspace is divided into three major sections:
Left Panel: Directory Structure
Displays all files and subdirectories under the current project folder, allowing you to view and manage the project structure at any time.
Center: Code Editor
Used for displaying and editing code content, functioning identically to a traditional IDE editor. Since Cursor inherits VSCode's complete plugin ecosystem, you can continue using familiar themes, keyboard shortcuts, and extensions. When Cursor modifies code, it highlights changes with colors (similar to Git diff visualization), and you can choose to "Keep" the modifications or reject them. This design keeps every AI operation transparent and controllable.
Right Panel: AI Interaction Panel
This is Cursor's most essential area, used for conversing with AI, issuing instructions, and generating code. Under the hood, it calls top-tier large language models (LLMs) like GPT-4 and Claude, with specialized optimization for code generation scenarios.
Four AI Modes Explained
Cursor's AI interaction panel offers four working modes suited for different development scenarios:
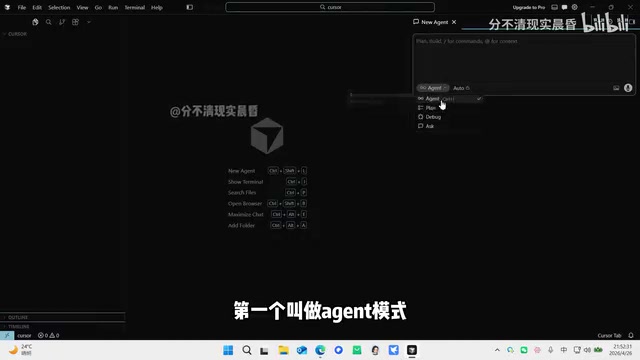
Agent Mode
A full-process autonomous collaboration mode that hands the entire project over to AI. The AI will automatically plan, write code, and create files—ideal for building complete projects from scratch. This is Cursor's most powerful mode, capable of completing complex tasks in one go.
The power of Agent mode lies in its underlying AI Agent architecture. Unlike ordinary Q&A-style AI, the model in Agent mode can not only generate text but also proactively invoke tools—reading and writing the file system, executing terminal commands, installing dependency packages—and self-correcting based on the results of each step, forming a complete loop of "perceive → plan → execute → feedback." It's precisely this closed-loop capability that enables it to handle complex engineering tasks spanning multiple files and steps, rather than merely generating isolated code snippets.
Plan Mode
The AI first outputs detailed execution steps and a planning proposal, then waits for your confirmation before proceeding step by step. This is suitable for scenarios where you want more control over the generation process, allowing you to fully understand the AI's plan before execution. For users with development experience, Plan mode is the best choice for reviewing AI decision logic and avoiding "black box operations."
Debug Mode
Specifically designed to analyze and fix errors in code without performing additional feature development. When your code has bugs, switch to this mode to let AI help you quickly diagnose and resolve issues. Debug mode prioritizes analyzing stack traces and log output to precisely locate the root cause, rather than performing large-scale code rewrites.
Ask Mode
A pure Q&A mode, similar to using ChatGPT—the AI only answers questions and won't proactively execute code modifications. Suitable for technical consultation, solution discussions, and learning phases. For programming beginners, it's recommended to use Ask mode as a "technical advisor" to clarify technical direction before getting hands-on.
Hands-On: Building a Student Information Management System with Cursor
Below is a complete example demonstrating how to build a Python project with a frontend interface from scratch using Cursor.
Step 1: Technical Consultation
Switch to Ask mode and input the question: "What technologies are needed to build a Python project with a frontend interface?" The AI will provide detailed technology stack recommendations.
For this type of project, a typical technology combination is: Flask (a lightweight Python web framework suitable for small to medium projects) or Django (a full-featured full-stack framework suitable for large applications) as the backend; HTML/CSS/JavaScript for building frontend pages; and SQLite as the local development database (no additional installation needed—Python has built-in support). Flask is usually the first choice for introductory projects due to its gentle learning curve and concise code. Understanding this background knowledge helps you evaluate whether the AI's technology choices are reasonable after code generation.
Step 2: Generate Project Code
Switch to Agent mode and input the instruction: "Based on the current technology, generate a simple student information management system," then press Enter.
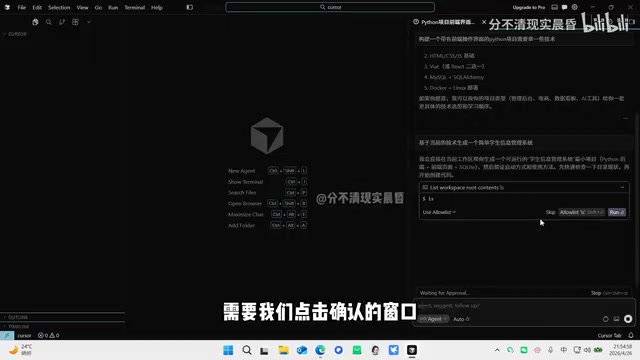
Once the AI starts working, a confirmation window will pop up with two options:
- Run: Confirm only the current step
- Run All: Confirm all operations in the current sub-step
After clicking Run, you can see new files gradually appearing in the left directory structure as the AI automatically creates the project structure and writes code.
Step 3: Confirm Code Changes
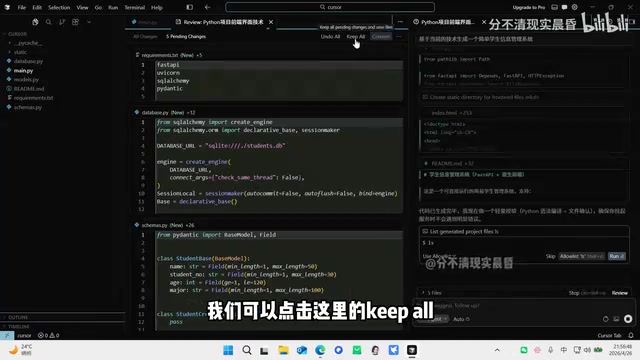
After generation is complete, modified portions of the code are highlighted with colors (green for additions, red for deletions—consistent with Git's diff view logic). You can click "Keep" to confirm file by file, or click the summary button to view all changes and then use "Keep All" to confirm all modifications at once.
Step 4: Launch the Project
After code generation is complete, let the AI launch the project. During startup:
- The AI will automatically detect and install required Python dependency packages (by reading requirements.txt and executing pip install)
- It automatically checks for version conflicts between packages
- If conflicts are found, it will automatically devise and execute a fix plan
Dependency version conflicts (commonly known as "Dependency Hell") are a classic pain point in Python project development—different libraries may have incompatible version requirements for the same underlying library, and manual troubleshooting is often time-consuming. Cursor can automatically parse pip's error output, identify the specific conflicting packages and version ranges, and intelligently adjust dependency version combinations. This capability is especially friendly for beginners.
After successful startup, the AI will provide a local access link (typically http://127.0.0.1:5000). Click it to open the student information management system in your browser.
Final Result
Upon opening the page, you'll see a complete student information management system interface supporting the following features:
- Add student information (name, student ID, age, major)
- View student list
- Edit existing student information
- Delete student records
The entire process from inputting requirements to running the project takes only a few minutes, without manually writing any code.
Summary and Recommendations
As a representative AI programming tool, Cursor dramatically lowers the barrier to software development:
- Beginner-friendly: Simply describe your requirements in natural language, and AI generates a complete, runnable project
- Controllable workflow: Four modes cover different scenarios, flexibly switching from consultation to fully automated development
- Safety mechanisms: All code changes require user confirmation and won't forcibly overwrite existing content
- Automated operations: Tedious tasks like dependency installation and version conflict detection are handled automatically
For beginners, it's recommended to first use Ask mode to understand the technical approach, then use Agent mode to generate code. For experienced developers, Plan mode and Debug mode can significantly improve daily development efficiency. Keep in mind that AI-generated code isn't always perfect—developing the habit of reading and understanding generated code will help you quickly locate and fix issues when they arise. Whether you're a programming novice or a seasoned engineer, Cursor is worth trying.
Related articles
 Tutorials
Cursor + Codex Dual-IDE Collaboration: A Practical Methodology for Open-Source Project Customization
A complete methodology for open-source project customization based on real-world experience, detailing the Cursor+Codex dual-IDE workflow, seven-stage process, MVP validation, and AI source code reading techniques.
 Tutorials
Cursor Multi-Agent in Practice: Building a Full-Stack Next.js Blog in 50 Minutes
Build a full-stack blog in 50 minutes using Cursor IDE's multi-Agent mode with Next.js, Clerk auth, and Supabase. Learn the 4-phase AI Agent workflow and key integration pitfalls.
 Tutorials
Building an AI Software Factory from Scratch: A Cursor Engineer's Hands-On Experience with Multi-Agent Collaboration
Cursor engineer Eric shares practical insights on building an AI software factory: automation levels, guardrail design, parallel Agent management, and scaling to 1000+ Agents for 24/7 development.