Domain + Cloudflare Unlimited Email Tutorial: One Domain, Unlimited Verification Codes

Use a domain + Cloudflare email routing to create unlimited email addresses for verification codes
This article introduces a low-cost solution for unlimited email addresses: purchase a cheap domain ($1-2/year), host it on Cloudflare, and leverage the free Email Routing Catch-All feature to forward all emails sent to that domain to your real inbox. Ideal for registering multiple accounts on AI services and development tools, though it only supports receiving — not sending — emails.
Introduction
When registering for overseas AI model services (like Claude, ChatGPT) or development IDEs (like Cursor, Windsurf), you often run into the limitation of one account per email address. If you need multiple accounts to access free quotas, an "unlimited email" solution becomes extremely practical.
This article provides a detailed guide on how to register a domain + use Cloudflare's email routing feature to generate unlimited email addresses from a single domain. The entire process is extremely low-cost (domain fees as low as $1-2/year), and once configured, it works indefinitely.
Core Principle of Unlimited Email
The principle behind unlimited email is actually quite simple: once you own a domain, all emails sent to anything@yourdomain can be forwarded to your real email (like Gmail) through Cloudflare's Catch-All rule.
This means you can make up any email prefix when registering for various services, and all verification codes will be forwarded to the same inbox. No need to create individual email accounts — one domain covers all your registration needs.
Comparison with Other Unlimited Email Solutions
The domain + Cloudflare approach isn't the only way to achieve a "multi-email" effect. Gmail offers a "plus alias" feature (e.g., yourname+tag@gmail.com), but many services now detect and block plus addresses. Temporary email services (like Guerrilla Mail, 10MinuteMail) are free to use but generate random addresses, can't be retained long-term, and are increasingly blacklisted by platforms. Apple's "Hide My Email" feature requires an iCloud+ subscription. In comparison, the custom domain approach offers these advantages: fully customizable addresses, won't be flagged as temporary emails, long-term stability and control, and centralized email management. The only downside is the one-time setup and a small annual fee.
Step 1: Register and Purchase a Domain
First, you need to purchase a domain from a domain registrar (such as Tencent Cloud, Namecheap, or Cloudflare Registrar).
- Log into your registrar's console and find "Domain Registration"
- Search for your desired domain — budget-friendly TLDs like
.cn,.xyz, or.topare recommended - Check the available domain list, noting that first-year and renewal prices may differ
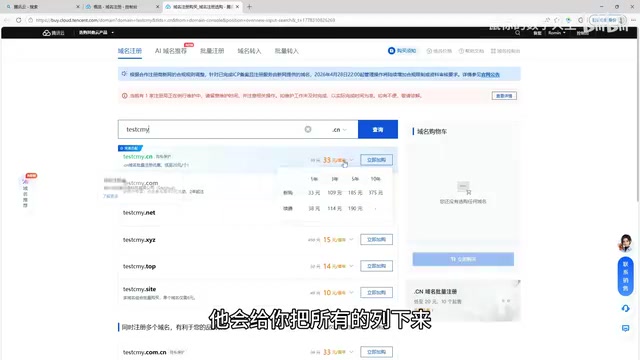
Price-wise, budget TLDs typically cost around $1-2/year for the first year, offering excellent value. Choose a short, memorable domain — you don't need to worry much about the domain's meaning since it's primarily used as an email suffix.
Why Choose a Budget TLD
.cn is China's country code top-level domain (ccTLD) managed by CNNIC. Compared to .com (around $8-12/year) or .net and other generic top-level domains (gTLDs), budget TLDs like .cn, .xyz, or .top typically have lower registration and renewal costs. However, note that .cn domains require identity verification and are subject to Chinese domain management policies. If you're concerned about identity verification requirements, you can opt for international TLDs like .xyz or .top, which are similarly affordable but may not require identity verification. Cloudflare Registrar itself also offers domains at cost price with no markup.
Tip: Some registrars require identity verification for domain purchases — simply follow the platform's prompts to complete it.
Step 2: Host Your Domain on Cloudflare
Add Your Domain to Cloudflare
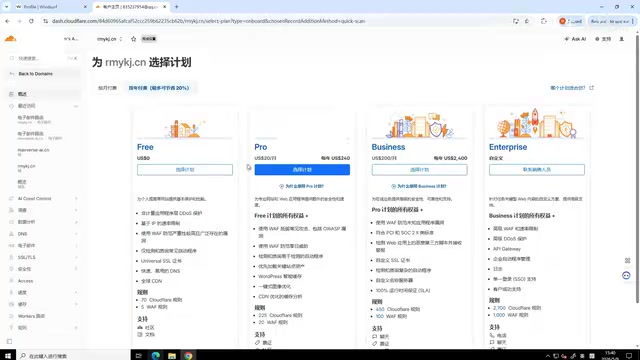
After purchasing your domain, you need to host it on Cloudflare:
- Visit cloudflare.com, register and log in
- Click "Add" → "Connect Domain" and enter your newly registered domain
- Select the Free plan, scroll to the bottom and click continue
Change DNS Servers to Point to Cloudflare
Cloudflare will provide two DNS server addresses that you need to configure at your registrar:
- Find the corresponding domain in your registrar's domain management panel
- Click "Modify DNS" and select "Use custom DNS" or "Use non-default DNS"
- Enter the two DNS addresses provided by Cloudflare
- Submit, then return to Cloudflare and click "I've updated my nameservers"
DNS propagation typically takes 5-10 minutes. After refreshing the page, if the domain status shows "Active" or "Protected," the configuration is successful.
DNS Servers and Domain Hosting Explained
DNS (Domain Name System) is one of the internet's core infrastructure components, responsible for resolving human-readable domain names (like example.com) into computer-recognizable IP addresses. When you purchase a domain from a registrar, it defaults to using that registrar's DNS servers to manage domain resolution records. Changing the DNS servers to Cloudflare's addresses essentially transfers resolution control from your registrar to Cloudflare, enabling Cloudflare to provide a suite of free services including CDN acceleration, DDoS protection, and email routing for that domain. This process doesn't affect domain ownership — you still own the domain at your registrar; only "who answers queries about this domain" has changed.
Step 3: Configure Cloudflare Email Routing Rules
This is the core step for achieving unlimited email and the most critical part of the entire tutorial.
Cloudflare Email Routing and MX Records
Cloudflare's email routing feature relies on MX records (Mail Exchange Records) under the hood. MX records are a DNS record type specifically for designating mail servers — they tell the sender's mail server: "emails destined for this domain should be delivered to which server." When you enable Cloudflare email routing, Cloudflare automatically adds MX records pointing to its mail processing servers for your domain. This way, any email sent to your domain first reaches Cloudflare's servers, which then forward it according to your configured rules. Unlike traditional email services (such as self-hosted mail servers or enterprise email), Cloudflare only acts as a "relay station" and doesn't provide full mailbox functionality.
Add Email Forwarding Destination Address
In the Cloudflare dashboard:
- Click "Email" → "Email Routing" in the left sidebar
- First add a "Destination address" — your real email that will receive the forwarded messages (e.g., Gmail)
- Enter the email address and save, then go to your destination inbox to click the confirmation verification link
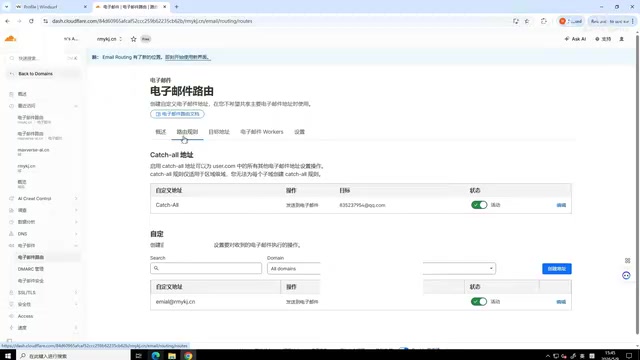
Set Up the Catch-All Forwarding Rule
After adding the destination address, configure the routing rule:
- Click "Routing rules" and select Catch-All
- Edit the action, select "Send to an email"
- Choose the email address you just added as the destination
- Save and ensure the status is green (enabled)
Technical Meaning of the Catch-All Rule
Catch-All is a classic concept in mail server administration, originally appearing in traditional mail server software like Postfix and Sendmail. In a standard email system, if an email is received for a non-existent mailbox address, the server returns a Non-Delivery Report (NDR) informing the sender that the address is invalid. With Catch-All enabled, the server accepts all emails sent to that domain regardless of whether the prefix was previously defined. This mechanism is commonly used in enterprise environments to prevent email loss due to typos, and in this article's scenario, it's cleverly repurposed to achieve the "unlimited email" effect.
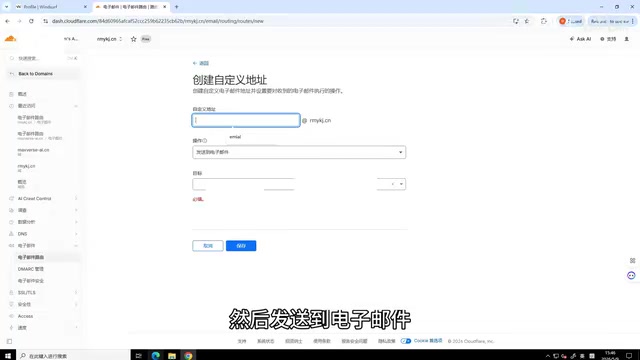
Catch-All means: regardless of the email prefix, as long as the suffix is your domain, all emails will be forwarded to the destination mailbox. You can also create specific custom rules to set different forwarding destinations for particular prefixes.
Important: Make sure all rule status toggles are turned on (green indicator), otherwise forwarding won't work.
Step 4: Verification Testing and Daily Use
Once configured, you can start using your unlimited email:
- When registering for a service, enter
anything@yourdomainas the email - Click send verification code
- Check your Gmail (or other destination inbox) for the verification code
- Complete the verification and registration
Each time you register for a new service, simply change the email prefix. For example:
cursor001@yourdomain.cnclaude002@yourdomain.cnwindsurf003@yourdomain.cn
All verification emails will be forwarded to your real inbox, making management very convenient.
Use Cases and Important Notes
Use Cases
- Registering for overseas AI services (Claude, ChatGPT, Gemini, etc.) to access free trial quotas
- Registering for development IDE free tiers (Cursor, Windsurf, etc.)
- Any scenario requiring multiple accounts without wanting to register multiple email addresses
Important Notes
- Receive only, cannot send: Cloudflare email routing only supports receiving and forwarding — you cannot actively send emails from these addresses. If you need sending capability, consider pairing it with third-party email sending services like Resend or Mailgun, or use enterprise email solutions (like Zoho Mail free tier) for full send/receive functionality.
- Renew your domain on time: Remember to renew your domain before it expires, otherwise the email functionality will stop working.
- Use responsibly: Please comply with the terms of service of relevant platforms and avoid abuse.
- Forwarding delay: Email forwarding may have a delay of a few seconds to a few minutes — just be patient.
Summary
The entire unlimited email setup process can be summarized in four steps: Purchase a domain ($1-2/year) → Host on Cloudflare (free) → Configure email routing Catch-All rule → Start using. One-time configuration, long-term benefits — it's an extremely low-cost yet highly practical technique. If you frequently need to register for various AI services and development tools, this solution is worth the ten minutes it takes to set up.
Related articles
 Tutorials
Cursor + Codex Dual-IDE Collaboration: A Practical Methodology for Open-Source Project Customization
A complete methodology for open-source project customization based on real-world experience, detailing the Cursor+Codex dual-IDE workflow, seven-stage process, MVP validation, and AI source code reading techniques.
 Tutorials
Cursor Multi-Agent in Practice: Building a Full-Stack Next.js Blog in 50 Minutes
Build a full-stack blog in 50 minutes using Cursor IDE's multi-Agent mode with Next.js, Clerk auth, and Supabase. Learn the 4-phase AI Agent workflow and key integration pitfalls.
 Tutorials
Building an AI Software Factory from Scratch: A Cursor Engineer's Hands-On Experience with Multi-Agent Collaboration
Cursor engineer Eric shares practical insights on building an AI software factory: automation levels, guardrail design, parallel Agent management, and scaling to 1000+ Agents for 24/7 development.