From STM32 to AI: A Complete Hardware Architecture Breakdown of the DaSheng II Smart Car
DaSheng II smart car bridges STM32 embedded development to ROS/AI with a modular hardware architecture.
This article systematically breaks down the hardware architecture of the DaSheng II smart car, which uses a tiered design — Basic Edition (STM32 low-level drivers) and Pro Edition (LiDAR + AI vision + ROS) — to create a progressive learning path from embedded development to AI robotics. The hardware features a three-layer modular structure with a core board, main baseboard, and expansion board, covering motor driving, sensor acquisition, communication interfaces, and power management as a complete system.
Introduction: Why Full-Stack Learning Matters
On the journey of learning embedded development and AI robotics, many beginners face a common challenge: after learning microcontrollers, how do you bridge the gap to higher-level AI applications? Bilibili creator "DaSheng" launched the DaSheng II smart car course, aiming to use a single hardware platform to connect the entire learning path — from low-level STM32 drivers to the ROS (Robot Operating System), and all the way up to AI-powered visual navigation. This article systematically breaks down the architectural design of the DaSheng II based on the course's hardware lectures, helping readers build a big-picture understanding of full-stack embedded + AI development.

Product Positioning: A Tiered Design with Basic and Pro Editions
The DaSheng II smart car comes in two versions, and this tiered design itself reflects the progressive learning path from embedded systems to AI.
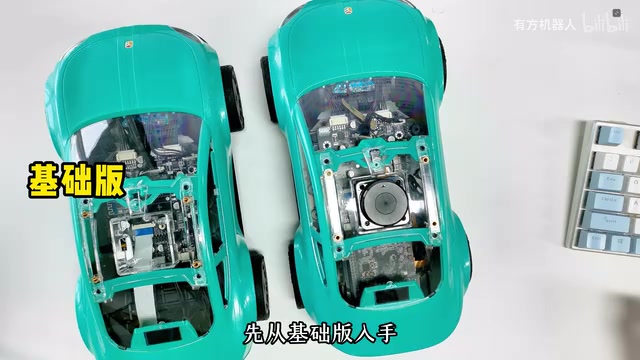
Basic Edition: Making the Car "Move"
The core of the Basic Edition is an STM32F103VGT6 main control board, without a LiDAR or host computer. It covers all the foundational peripheral driver learning tasks — from basic GPIO LED control and servo operation to I2C sensor reading and PWM motor driving. For absolute beginners, this is the essential groundwork that needs to be mastered.
Pro Edition: Making the Car "See the World"
The Pro Edition builds on the Basic Edition by integrating a LiDAR and camera, along with a Horizon Robotics (Sunrise Pi) development board. Future plans include support for Raspberry Pi, NVIDIA Jetson Nano, and other platforms. The Pro Edition is designed for autonomous decision-making, AI vision, and autonomous navigation, corresponding to ROS application-layer learning.
This tiered approach — "Basic Edition handles perception and execution, Pro Edition handles decision-making and intelligence" — maps perfectly to the classic Perception-Decision-Execution architecture in robotics. It's a design philosophy worth learning from.
Deep Dive into the Three-Layer Modular Hardware Architecture
The DaSheng II chassis hardware uses a three-layer modular structure: the main baseboard, the core board, and the rear expansion board. This design not only makes repairs and replacements easier but also provides flexibility for future controller upgrades or feature expansions.
Core Board: The System's "Brain"
The core board carries the STM32F103VGT6 MCU, which offers rich timer resources and I/O pins. It also integrates:
- SPI Flash chip: for data storage
- NTC thermistor: for temperature sensing
The core board connects to the main baseboard via a gold-finger card-edge connector. This design means that if you want to upgrade to a higher-performance MCU in the future (such as the STM32F4 series), you only need to swap out the core board.
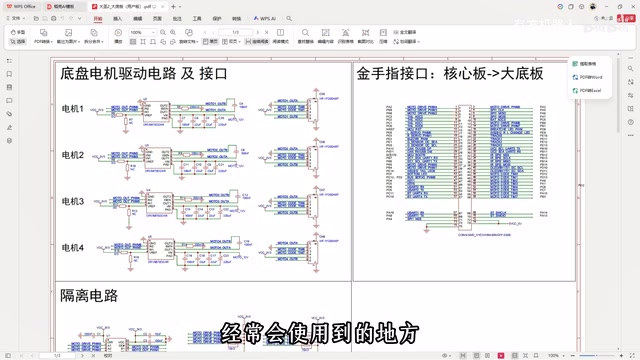
Main Baseboard: The Hardware "Skeleton"
The main baseboard serves as the hardware backbone of the entire system, packed with various functional interfaces:
- Motor connectors: connecting to the 4 chassis drive motors (Motor 1–4)
- Servo connectors: connecting to front and rear steering servos (MG996R), supporting a dual-steering structure
- Sensor interfaces: including MPU6050 (IMU/attitude sensor), line-tracking modules, etc.
- Communication interfaces: Bluetooth module, PS2 remote control receiver, host computer communication port
- Expansion interfaces: WS2812 RGB LED strip, serial bus servo reserved ports, FPC connectors, etc.
Notably, the main baseboard features isolation circuitry to prevent current backflow from stalled motors from damaging the development board — a critically important protection measure in real-world engineering that beginners often overlook.
Rear Expansion Board: The Window for Debugging and Interaction
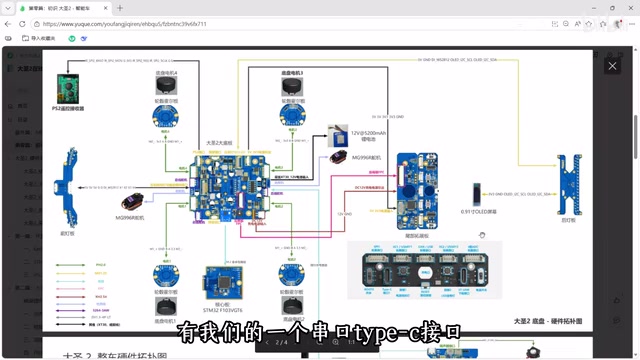
The rear expansion board consolidates development debugging and user interaction features:
- Serial Type-C port: for serial communication and debugging
- ST-Link download interface: for firmware flashing
- Expansion pin headers: providing SPI, I2C, UART, GPIO, USB, ADC, and other peripheral interfaces for DIY expansion
- BOOT0 toggle switch: for switching boot modes (needed for graphical programming learning)
- User buttons and LEDs: including customizable side/tail lights — the tail light control circuit covered in the next lesson is located here
Power System and Schematic Highlights
Power Topology
The DaSheng II's power system uses a cascaded step-down design:
- 12V charging circuit → main power switch circuit
- 12V to 5V: powering servos, sensors, etc.
- 5V to 3.3V: powering the STM32 MCU and digital peripherals
The battery voltage sensing circuit is a module that will be heavily used in later lessons. It uses ADC to sample the divided battery voltage, enabling features like low-battery alerts.
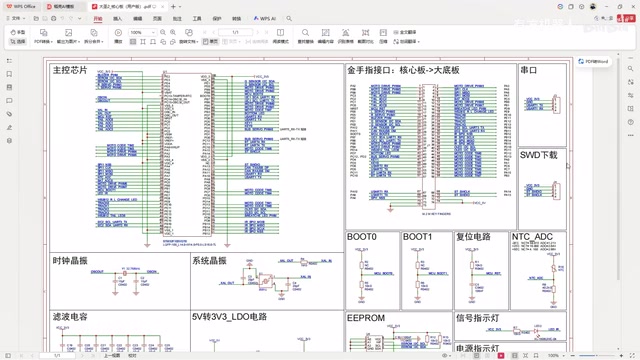
Key Points in the Core Board Schematic
From the core board schematic, you can see that the STM32F103VGT6's pins are routed through the gold-finger interface to the main baseboard. The course emphasizes two circuits to pay special attention to:
- NTC thermistor circuit: involves ADC sampling and temperature conversion
- SPI Flash circuit: involves practical application of the SPI communication protocol
From Basic Edition to ROS: A Seamless Learning Transition
The ROS hardware architecture of the DaSheng II Pro Edition is equally noteworthy. The host computer (Sunrise Pi / Raspberry Pi, etc.) communicates with the main baseboard through an adapter board, which also connects to an independent power supply module to power high-consumption devices like the LiDAR and speakers.
This design creates a complete ROS hardware architecture:
- Low level: STM32 handles real-time tasks such as motor control and sensor data acquisition
- High level: A Linux development board runs ROS, handling computationally intensive tasks like SLAM mapping, path planning, and AI vision
- Communication: The upper and lower computers exchange data via serial/USB
This is exactly the typical architecture of mainstream robot systems today. Learners can complete the entire journey from bare-metal development to ROS applications on a single hardware platform.
Summary and Takeaways
The DaSheng II's hardware design has several highlights worth learning from:
- Modular layering: The core board, main baseboard, and expansion board each serve distinct roles — if one breaks, just swap it out; if you want to upgrade, just swap it out
- Progressive learning path: The Basic Edition builds low-level foundations, the Pro Edition advances to AI applications, avoiding the learning gaps that come from trying to "do everything at once"
- Engineering-minded details: Isolation circuits, voltage sensing, BOOT0 switching, and other design choices reflect real-world product development thinking
For learners who want to progress from microcontroller basics to AI robotics development, understanding a complete hardware architecture like this is far more valuable than just learning individual peripheral drivers. When you configure a GPIO pin in your code, being able to clearly identify which sensor it connects to and where it sits in the system hierarchy — that kind of holistic perspective is the key step from "knowing how to write code" to "knowing how to build systems."
Related articles
 Tutorials
Cursor + Codex Dual-IDE Collaboration: A Practical Methodology for Open-Source Project Customization
A complete methodology for open-source project customization based on real-world experience, detailing the Cursor+Codex dual-IDE workflow, seven-stage process, MVP validation, and AI source code reading techniques.
 Tutorials
Cursor Multi-Agent in Practice: Building a Full-Stack Next.js Blog in 50 Minutes
Build a full-stack blog in 50 minutes using Cursor IDE's multi-Agent mode with Next.js, Clerk auth, and Supabase. Learn the 4-phase AI Agent workflow and key integration pitfalls.
 Tutorials
Building an AI Software Factory from Scratch: A Cursor Engineer's Hands-On Experience with Multi-Agent Collaboration
Cursor engineer Eric shares practical insights on building an AI software factory: automation levels, guardrail design, parallel Agent management, and scaling to 1000+ Agents for 24/7 development.