Getting Started with Codex Desktop: Connecting DeepSeek and Running Your First Project Task
A step-by-step guide to installing Codex Desktop, connecting DeepSeek, and completing your first AI coding task.
This beginner-friendly tutorial walks you through setting up Codex Desktop, connecting it to DeepSeek via CC Switch as a local API proxy, and running your first complete project task. It covers installation, configuration with built-in presets, enabling routing, and a three-step approach to your first task: project understanding, planning, and execution. Includes practical tips on permissions, prompt clarity, and building trust with AI coding agents.
Many people hear "Codex" for the first time and assume it's just another AI chat tool. But the real value of Codex isn't in chatting with you — it's in its ability to enter your project directory, read files, understand code, modify content, run commands, and then continue making corrections based on the results. This is the fundamental difference between it and ordinary chatbots.
From a technical architecture perspective, Codex belongs to a category of tools known as "AI Coding Agents." Unlike traditional conversational AI, coding agents have Tool Use capabilities — they can not only generate text responses but also invoke a series of external tools such as file system read/write, terminal command execution, and code parsing. At runtime, Codex creates an isolated sandbox environment for each task, where it reads your project files, executes modifications, runs test commands, and determines the next action based on command output. This cycle of "perceive environment → take action → observe results → continue reasoning" is the core characteristic of the Agent paradigm, and the fundamental reason it can actually "do things" rather than just "talk."
This article is aimed at complete beginners and addresses one core question: how to install Codex Desktop, how to connect it to DeepSeek, and how to get it to complete its first small task in your project — running through a complete end-to-end workflow.
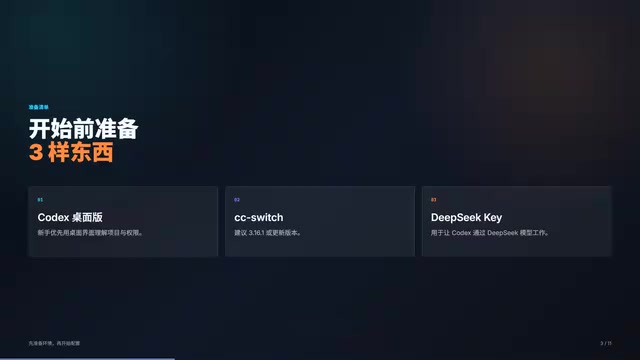
Before You Start: Three Things You Need to Prepare
Before getting hands-on, make sure the following three prerequisites are ready:
- Codex Desktop: For beginners, the desktop version is recommended because its interface is more intuitive — you can clearly see your project, conversations, permissions, and task status without having to face the command line right away.
- CC Switch (version 3.16.1 or newer recommended): This version lets you configure DeepSeek directly from the Codex menu, saving you a lot of manual configuration hassle. CC Switch is essentially a local API proxy and routing tool. Codex Desktop only supports OpenAI's official API interface by default, so if you want to use third-party models like DeepSeek, you need a middleware layer to handle "translation" and "forwarding." CC Switch launches a proxy service on your local machine that intercepts API requests from Codex and redirects them to DeepSeek's API endpoint, while handling authentication, model mapping, and other details. Think of it as a bridge between Codex and DeepSeek.
- A DeepSeek API Key: You'll enter this into CC Switch later so that Codex can work through the DeepSeek model. DeepSeek is a leading Chinese AI company whose DeepSeek-V3 and DeepSeek-Coder series models excel at code generation, code comprehension, and multi-turn reasoning tasks. They offer a significant cost advantage — API call prices are far lower than overseas models like GPT-4, making them ideal for individual developers and learners. You can register an account and create an API Key on the DeepSeek Open Platform (platform.deepseek.com), and new users typically receive a certain amount of free usage credits.

With these three things ready, we can get started.
Step 1: Install Codex Desktop
Windows users can download it from the official Codex page, or go directly to the Microsoft Store, search for Codex, find the corresponding page, and click install.
After installation, open it once to confirm that Codex can enter the main interface normally. If you're stuck on the Microsoft Store download or the store won't open, that's a system environment issue that requires separate troubleshooting, which we won't cover here.
The key point is: confirm that the desktop version launches normally and the interface loads correctly. That completes the first step.
Step 2: Connect DeepSeek via CC Switch (Key Step)
This step is the most error-prone part of the entire process, so please follow the steps in order.
Add DeepSeek as a Provider
After opening CC Switch, go to the Codex menu and click the Add button in the upper right corner. Select DeepSeek from the provider list.
Here's an important tip: Use the built-in preset first — don't start by manually filling in the configuration. The built-in preset has already handled the Base URL, model name, environment variables, and other parameters for you. Manual entry is actually more error-prone.
Let me explain what these parameters mean: Base URL is the DeepSeek API service address (similar to https://api.deepseek.com/v1), which tells CC Switch where to forward requests; Model name is the specific model identifier you want to call (such as deepseek-chat or deepseek-coder); Environment variables are configuration items that CC Switch injects into the Codex runtime environment to override Codex's default API endpoint settings. The built-in preset is recommended precisely because it pre-configures all these easy-to-mistype fields, avoiding common issues like spelling errors and missing paths.
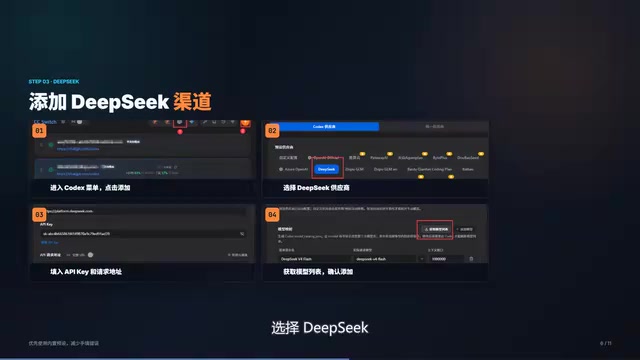
After selecting the preset, enter your own DeepSeek API Key, then click "Fetch Model List." If the configuration is correct, you'll see DeepSeek's models properly recognized. Confirm the model, then save and add.
Don't Miss This: Enable Routing
This is a very commonly overlooked step. After adding DeepSeek, you must enable routing. You can enable DeepSeek routing from the CC Switch main page, or go to the settings page and confirm that the routing toggle for Codex is turned on.
"Routing" here means: CC Switch needs to know which API requests from Codex should be intercepted and forwarded to DeepSeek, rather than being sent to the default OpenAI endpoint. Enabling routing activates this forwarding rule. If routing isn't enabled, CC Switch has saved the DeepSeek configuration but won't actually process any of Codex's requests — Codex's requests will still try to reach the default address, which will naturally fail or return errors.
After enabling routing, you also need to properly restart Codex for the new configuration to take effect. Many beginners find their configuration doesn't work, and it's usually because they're stuck at this step — either they forgot to enable routing or forgot to restart. The reason for restarting is that Codex reads environment variables and API configuration at startup and doesn't dynamically refresh these settings during runtime, so you must restart after modifying the configuration for the new settings to take effect.
At this point, the basic configuration is complete.
Step 3: Have Codex Complete Its First Project Task
After configuration is complete, I don't recommend opening Codex for the first time and immediately saying "build me a complete project." Instructions like that are too broad, and beginners can't easily judge whether it's doing things correctly. A more reliable approach is to take it in three steps.
First Instruction: Project Understanding Only
After opening your project, type:
Please read this project's directory structure first and tell me what it does. Don't modify any files — just do project understanding.
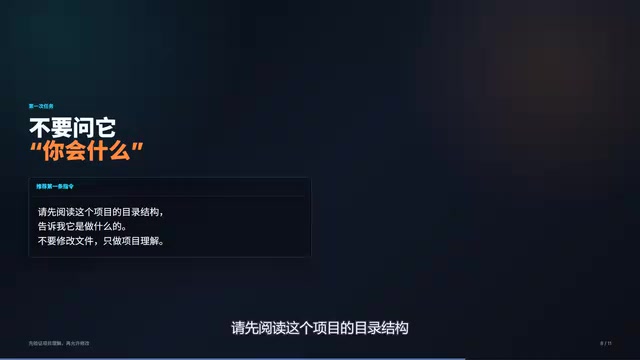
The purpose of this step is to confirm that Codex can properly read your project while verifying whether it truly understands the current code. If it can clearly describe the project structure and functionality, it means the connection configuration is working.
From a technical perspective, when you issue this instruction, Codex calls file system tools in the background to traverse the project directory, read key files (such as package.json, README.md, entry files, etc.), and then passes this file content as context to the DeepSeek model for analysis. This process verifies the entire chain is working: Codex Desktop → CC Switch routing → DeepSeek API → model inference → result returned → interface display. If any link in the chain has a problem, you'll discover it at this step.
Second Instruction: Have It Find a Small Task
Once you've confirmed project understanding is working, you can go further:
Please find a small task suitable for a beginner to modify, and explain which files you plan to change. Don't start yet.
Let Codex present a plan first, and only let it execute after you've reviewed it. This process itself builds your trust in AI collaboration. This "plan first, execute later" interaction pattern is known as the Plan-then-Execute paradigm in the AI Agent field. Its advantage is keeping humans in control of the task — you can review the AI's plan before it takes action, catch anything unreasonable and correct it in time, rather than cleaning up after it's already modified a bunch of files.
Third Instruction: Execute the First Task
The first task doesn't need to be complex. It could be:
- Modifying a README file
- Adjusting some page copy
- Fixing a simple error
- Adding a very small feature
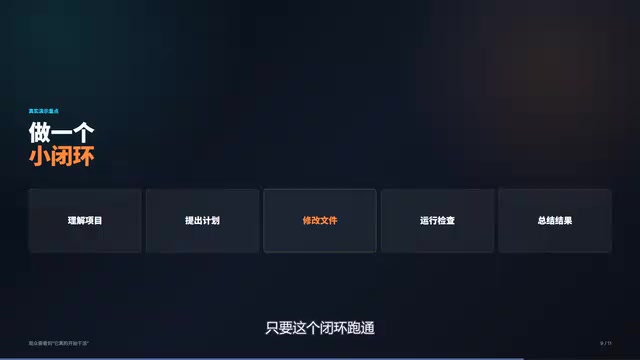
The key isn't how advanced the task is, but running through a complete end-to-end workflow: understand the project → propose a plan → modify files → run verification commands → summarize what was changed.
This workflow corresponds to the classic "Perceive-Plan-Act-Verify" cycle in AI Agent research. Traditional code completion tools (like early Copilot) only covered the "Act" phase — helping you complete the next line while you write code. Codex, as a coding agent, covers all four phases: it first perceives the project environment (reads files and directories), then plans the modification approach (analyzes which files need changing and how), then executes the modifications (actually edits files), and finally verifies the results (runs tests or build commands to check for errors). If verification fails, it automatically enters the next cycle to make corrections. This end-to-end autonomous working capability is the true value of AI coding agents.
Once this workflow runs successfully, you'll truly understand the difference between Codex and ordinary chatbots — ordinary chatbots mostly answer questions, while Codex enters your project and helps you get things done.
Four Practical Tips for Beginners
Based on real-world experience, here are four areas where beginners most commonly stumble:
-
Don't start with big projects: Build trust with small tasks first. You need to understand Codex's capability boundaries before you can give more precise instructions later. AI coding agents currently perform best on localized, well-defined tasks, while large-scale cross-module refactoring or vague requirements still need human decomposition and guidance.
-
Don't switch between too many models at once: Otherwise, when something goes wrong, you can't tell whether it's a model issue, a configuration issue, or a network issue. Get one model running stably first, then consider switching. Different models vary significantly in code task performance — some excel at generating new code, some at understanding and explaining existing code, and some are stronger at long-context reasoning. It only makes sense to compare other models after you have a clear understanding of one model's capabilities.
-
Pay attention to permission prompts: When Codex wants to read files, modify files, or run commands, you should be clear about what you're allowing. This isn't just a formality — it's a basic safeguard for your project's security. Codex Desktop typically offers three permission levels: read-only mode (can only view files), suggest mode (can propose modifications but requires your confirmation), and auto mode (can directly execute modifications and commands). Beginners should start with suggest mode and consider granting higher permissions only after becoming familiar with Codex's behavior patterns.
-
When things fail, check yourself first: It's not necessarily the model's fault — it could be that your instructions are too vague, the project context is insufficient, or the configuration hasn't been refreshed. Good instructions are the prerequisite for good results. In AI collaboration, "Prompt Engineering" applies equally to coding agents — clear task descriptions, explicit constraints, and specific expected outputs can significantly improve Codex's execution quality.
Summary
The key to getting started with Codex isn't memorizing commands — it's getting the AI to complete one small task in your project first. Install the desktop version, connect DeepSeek, run through the first complete workflow — once these three steps are done, you've already crossed the most critical threshold.
After this workflow runs successfully, diving into MCP plugins, Agent mode, and more complex automated workflows won't leave you lost. Here's a brief preview of these advanced concepts: MCP (Model Context Protocol) is a standardized protocol that defines how AI models communicate with external tools and data sources. Through MCP plugins, you can let Codex connect to databases, call third-party APIs, access documentation systems, and more, greatly expanding its capability boundaries. Agent mode refers to letting Codex run with greater autonomy — you only need to describe the final goal, and it will decompose tasks on its own, select tools, execute multi-step operations, and handle intermediate errors, with much less human intervention throughout the process. These advanced capabilities all build on your proficiency with the basic workflow, so run through the basics first, then level up — that's the correct learning path.
Related articles
Codex AI Coding Agent Explained: What's the Real Difference from ChatGPT?
Deep dive into OpenAI's Codex coding agent, comparing Codex vs ChatGPT in programming scenarios and how AI agents are reshaping software development.

Databricks Open-Sources Omni: A Meta-Framework for Unified Management of All AI Agents
Databricks open-sources Omni under Apache 2.0 — a meta-framework unifying Claude Code, Codex & more AI Agents with shared sessions, cross-vendor review & enforced security policies.
Generating 10 Web Games with One-Line Prompts: A Hands-On Claude Code Experience
A senior developer uses Claude Code to generate 10 playable web games including 2048, Gomoku, and Tetris with one-line prompts in under an hour. A deep dive into AI programming's real capabilities.