Getting Started with Vibe Coding: Setting Up Your AI Development Workspace from Platform to Local

A beginner's guide to setting up a local AI development workspace for Vibe Coding.
This guide walks beginners through the full process of transitioning from online AI code platforms (like Bolt and Lovable) to a local development environment. It covers exporting projects, setting up an AI IDE like Trae Coder or Cursor, running projects locally, handling common errors, and completing your first local edit using three key prompt patterns: understand, locate, and constrain.
Why Bring Your Project Back to Local?
Many beginners have a question after completing their first project prototype on a platform: if the platform can handle edits, why bother setting up a local environment?
The "platforms" referred to here are online AI code generation platforms like Bolt, Lovable, and v0, which provide complete development environments within the browser — users can generate and preview projects without installing any software locally. But these platforms are essentially cloud-hosted sandbox environments — your code runs on someone else's servers, constrained by the platform's feature boundaries, network conditions, and terms of service. The moment a platform adjusts pricing, limits free quotas, or experiences a service outage, your workflow is passively affected.
The answer comes down to a sense of control. A platform is more like a rented tool — you can quickly generate, preview, and make simple tweaks, but you have to give it back when you're done. A local workspace, on the other hand, is like your own desk: it's not necessarily fancier, but it's more stable and controllable. You know where things are, and you know exactly where to pick up next time. Bringing a project to local means the code files are physically stored on your own hard drive — you can open, modify, and back them up anytime without depending on any third-party service being online.
This sense of control directly affects whether you can keep pushing the project forward. Because after this chapter, the focus shifts from "generating something" to "continuously improving it." And continuous iteration works best when it starts from your own workspace.
How to Export a Project from a Platform to Local
Different platforms use different button names, but the process is generally similar. You'll find options like "Export Code," "Download Project," or "Sync Code" somewhere near your project page. You can also ask the AI to generate downloadable files or walk you through the complete steps.

Here's the recommended order of operations:
- Confirm you're downloading the current working version, not an old draft
- If the download is a compressed file, extract it normally
- Rename the project folder to something you'll recognize later
- Place it in a dedicated directory — don't leave it sitting in your Downloads folder
The Art of Naming Your Project Folder
Don't underestimate the naming step. Many people later struggle because their folder names are too vague — they can't tell which is the production version and which is the test version, and things get messy fast.
A practical approach is to use simple, recognizable English names like manual-homepad, linear-homepad, or digital-twin-site. Avoid names like "New Folder," "Project Final Version," or "Project Final Really Not Changing This Time" — because in a few days, even you won't recognize them.
Important reminder: Avoid Chinese characters in file paths. Chinese paths frequently cause issues when running code — a pitfall many beginners have stumbled into. The root cause is that many development tools and programming language libraries default to ASCII or UTF-8 encoding when handling file paths, while Chinese paths on Windows systems may involve GBK or other encoding formats. The conversion between these encodings is error-prone. Common symptoms include: dependency installation failures, modules not found, and hot reload not working. It's recommended to place projects under a clean English directory like C:\Projects or ~/projects and make it a habit to use a consistent workspace.
Opening and Running the Project with an AI IDE
What Is an AI IDE?
An AI IDE is essentially a code editor with integrated AI capabilities. The most commonly used IDE is VSCode (Visual Studio Code), an open-source code editor by Microsoft that has become one of the world's most popular development tools thanks to its rich plugin ecosystem. However, connecting VSCode to AI requires installing plugins like Copilot or Cline and configuring API keys or subscriptions, which can be a hurdle for beginners.
For those starting from zero, tools like Trae Coder are more beginner-friendly. Trae Coder is an AI IDE from ByteDance with a built-in large language model chat capability that works out of the box — no extra configuration needed. Similar products include Cursor (an AI editor deeply built on top of VSCode). These AI IDEs are free to use and share a highly consistent interface layout: a file explorer on the left (showing the project directory structure), a code editing area in the center, a terminal at the bottom (for executing command-line instructions), and an AI chat panel on the right or side. Once you learn one, switching to any other AI IDE will feel natural.

Don't Be Intimidated by the Interface
What scares beginners most after opening an IDE isn't the operations themselves — it's the interface. A bunch of files on the left, a terminal at the bottom, code in the middle. But you absolutely don't need to understand everything at this point. The most important goal of this section is simple: just get the project running. Once you see a local page open in your browser, a lot of that anxiety will immediately drop.
A perfectly adequate sequence of steps:
- Open the project folder with your AI IDE
- Ask the AI to determine what type of project this is and how to start it
- Follow the AI's instructions to install dependencies and run the project
- Confirm the page is running in your browser
When the AI tells you to run commands like npm install or pnpm install, it's actually reading the package.json file in the project's root directory — this file records all the third-party code libraries (called "dependencies") the project needs to run. The install command downloads these dependencies from the npm registry (a global JavaScript package hosting platform) into the project's node_modules folder. After that, running a start command like npm run dev launches a local development server, typically listening on an address like localhost:3000 or localhost:5173. When you visit this address in your browser, the page you see is running entirely on your own computer, and any code changes are reflected in real time.
A Universal Way to Start the Conversation
If you're not sure how to begin, just say:
"I just exported a personal homepage project to my local machine. Please first help me figure out what kind of project this is and tell me how to run it locally. If I need to execute commands, walk me through them step by step. If there are errors, help me troubleshoot based on the error messages."
This kind of prompt is straightforward but highly effective. It doesn't pretend you know a lot, nor does it ask the AI to explain all the theory at once — it simply asks the AI to help you get the most important thing done right now.
What to Do When You Hit an Error?
Don't guess on your own. Many beginners see red text and immediately start catastrophizing: Did I install something wrong? Was the export broken? Am I just not cut out for this?
In reality, the vast majority of the time it's just a specific issue — a missing dependency, a wrong command, an incompatible Node version, or an environment that isn't set up yet.
A quick note on Node version issues: Node.js is a runtime environment for JavaScript that allows JavaScript code to run outside the browser. Different projects may depend on different versions of Node.js, and version mismatches are one of the most common sources of errors for beginners. For example, certain newer syntax features are only supported in Node 18 and above, but your computer might have Node 16 installed. When you encounter this kind of issue, the AI will typically suggest using nvm (Node Version Manager) to manage and switch between Node versions — it's a lightweight command-line tool that lets you freely switch between versions without them interfering with each other.
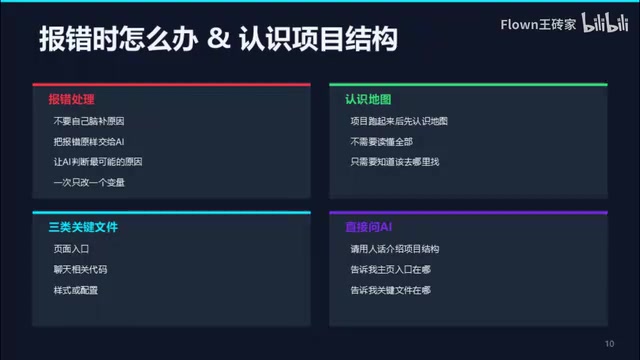
The most reliable move isn't to try random fixes — it's to hand the error message directly to the AI, let it determine the most likely cause, and then tell you exactly what to do next.
Completing Your First Local Edit
After getting the project running, the most worthwhile thing to do immediately isn't to attempt a major overhaul — it's to complete one very small edit. The smaller, the better:
- Change the homepage tagline to something more like you
- Change a button's text from the default wording to something more natural
- Change the chat area's prompt text to something more specific
Why so small? Because what you're practicing right now isn't "scale of changes" — it's process fluency. Once you've gone through the cycle of "propose a change → AI makes the edit → local page updates → I verify the result," every more complex change after that has a solid foundation to build on.
Three High-Frequency Prompt Patterns
This is a great time to establish three prompt patterns you'll use repeatedly going forward:
Pattern 1: Understanding — helps you quickly grasp the project map
"Please explain the current structure of this project in plain language. Tell me roughly where the homepage entry point, chat-related code, and style-related files are located. Don't go too deep."
Pattern 2: Locating — helps you find the right entry point before making changes
"I want to modify the homepage tagline and the main button text. Please first tell me which files these two things are in."
Pattern 3: Constraining — helps you keep the scope of changes tight
"Please only modify the chat box's prompt text. Don't change the layout, don't add new modules, and don't adjust the color scheme."
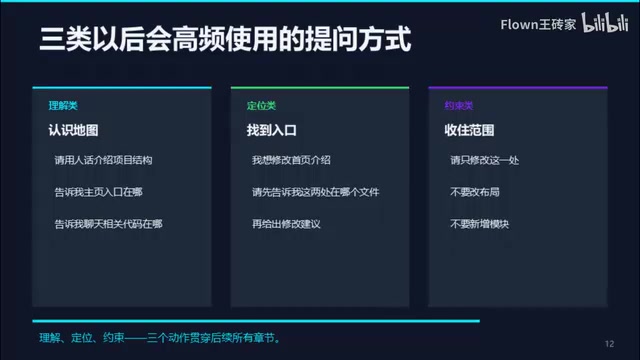
These three prompt patterns aren't fancy, but they're incredibly practical. They directly correspond to the three most common actions you'll take as an independent Vibe Coder: understand, locate, constrain.
Vibe Coding was coined by OpenAI co-founder Andrej Karpathy in early 2025, describing a new programming paradigm that relies entirely on AI to write code — you simply describe your intent in natural language, the AI generates and modifies the code, and you review the results. In this model, the "understand, locate, constrain" three-step method is especially critical: understanding builds a mental map of the project so you know roughly what modules exist; locating precisely identifies where changes need to be made before you start, preventing the AI from editing the wrong place; constraining explicitly tells the AI "only do this, don't do that," preventing the AI from over-engineering and causing cascading changes. These three steps essentially compensate for the loss of control that comes from not directly reading and writing code yourself.
Acceptance Checklist: Did You Pass This Chapter?
The acceptance criteria are actually quite simple:
- ✅ The project has a permanent home on my computer
- ✅ I can open it with an AI IDE and run it locally
- ✅ I know roughly where a few key files are located
- ✅ I've completed at least one small but real local edit
Two Core Principles
At this point, two key principles are worth remembering:
First, when learning a new skill, using the tool is more important than comparing which tool is best. This principle applies whether you're learning Vibe Coding, video editing, document management, or anything else.
Second, always ask the AI first when you encounter a problem. No matter how basic or how "stupid" you think the question is, let go of the shame of asking — because you're talking to a machine.
After completing this chapter, you're no longer just viewing results on a platform — you're truly driving a project forward. The next chapter will tackle a more visual layer — style, layout, hierarchy, and how to articulate that feeling of "I want it to look more like this" to the AI.
Related articles
Beginner's Guide to Agent Skills: Structure Breakdown & Custom AI Skill Development
A deep dive into Agent Skill's core concepts and internal structure, covering skill.md, references, scripts, and assets with a restaurant poster Skill example.
Complete Guide to Commercial AI Agent Development: From Requirements Analysis to Production Deployment
Complete guide to commercial AI agent development from scratch, covering requirements analysis, architecture design (ReAct framework, deep search, intent recognition), hands-on Coze platform implementation, workflow creation, and production deployment.
Hermes AI Kanban: A Five-Layer Autonomous Architecture for Fully Automated Delivery from Idea to Finished Product
Deep dive into Hermes Kanban 2.0's five-layer autonomous architecture covering intelligent planning, human approval gates, multi-agent execution, and Obsidian integration for fully automated delivery.