OpenAI Codex IDE Extension in Practice: A Complete Guide to AI Programming in VS Code

Complete guide to using OpenAI's Codex IDE extension for AI-assisted coding in VS Code.
This article provides a hands-on walkthrough of the OpenAI Codex IDE extension for VS Code, covering installation, Agent/Chat mode switching, and a real-world demo generating a reusable Modal component with natural language prompts. It also compares GPT-5 Codex (Medium Reasoning) vs GPT-5 Medium models and discusses platform compatibility considerations.
Codex IDE Extension's Position in the Tool Family
The OpenAI Codex tool family has evolved into four core products: Codex Cloud (remote task execution), Code Review (GitHub PR code review), Codex CLI (local command-line tool), and the focus of today's article — Codex IDE Extension. This extension integrates directly into VS Code, Cursor, Windsurf, and VS Code Insiders, providing developers with a visual AI programming interaction interface.
These four products represent a complete coverage strategy for AI programming assistance tools, spanning from cloud to local, and from command line to graphical interface. Codex Cloud is based on a sandboxed cloud execution environment where each task runs in an isolated container, ensuring security while providing a complete development environment. Code Review deeply integrates with the GitHub API, understanding PR context differences and providing structured review suggestions. Codex CLI leverages local file system permissions to directly manipulate code files. This layered architecture reflects OpenAI's "full-stack coverage" strategy in the developer tools space — regardless of which workflow developers prefer, they can find a corresponding AI-assisted entry point.
This article will demonstrate how to use the Codex IDE extension for AI-assisted development in a local project through a complete hands-on example, including extension installation, mode selection, code generation, and model performance comparison.
Installation and Configuration
Extension Installation Steps
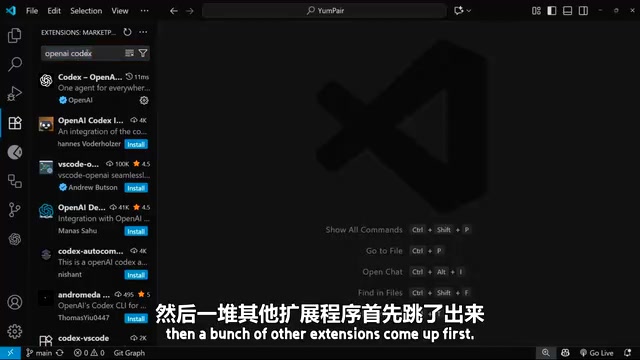
Search for "OpenAI Codex" in the VS Code extension marketplace (be careful not to search just "Codex," as that will return many unrelated extensions), find the official extension, and click install.
After installation, an OpenAI logo icon will appear in the sidebar. Click it to open the Codex panel. First-time use requires logging into your ChatGPT account — click the login button to be redirected to the authentication page. After successful login, you'll see a brief onboarding flow, after which you can enter the chat interface.
The reason the Codex IDE extension can simultaneously support multiple editors like VS Code, Cursor, and Windsurf is thanks to the architectural design of the VS Code extension ecosystem built on the Extension API and Language Server Protocol (LSP). LSP was originally proposed by Microsoft in 2016 with the goal of decoupling editor language intelligence features from specific editor implementations. Cursor and Windsurf are essentially forks of VS Code that retain the complete extension compatibility layer, allowing a single extension to run across editors with virtually zero additional cost.
Core Feature Interface Overview
The Codex IDE extension's interface design is clean and intuitive, consisting of the following main areas:
- Chat window: Enter prompts to interact with Codex
- Context control buttons: Manage the context information provided to the AI
- Mode selector: Switch between Agent, Chat, and Full Access modes
- Model selector: Choose different GPT models
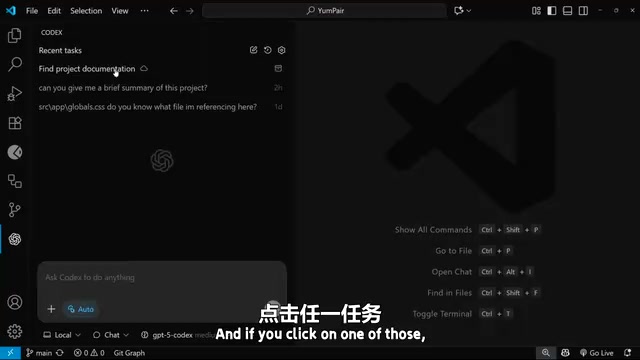
- Task history: Displays recent task list from Codex Cloud at the top
The three working modes are identical to the CLI version: Agent mode is for project code editing, Chat mode is for conversational consultation only, and Agent with Full Access additionally supports internet access and files outside the project.
Agent mode employs a reasoning framework similar to ReAct (Reasoning and Acting) behind the scenes. ReAct was proposed by Yao et al. in 2022, with the core idea of having large language models alternate between "thinking" and "acting" steps before generating a final answer. In Codex's implementation, "actions" include reading files, searching the codebase, executing shell commands, and other operations. Unlike pure Chat mode, Agent mode has state memory and multi-step planning capabilities — it first analyzes the project structure, then formulates a modification plan, and finally executes and verifies results step by step. This explains why code generated in Agent mode typically better conforms to the project's existing architecture.
Hands-On Demo: From Project Understanding to Code Generation
Step 1: Use Chat Mode to Understand Project Structure
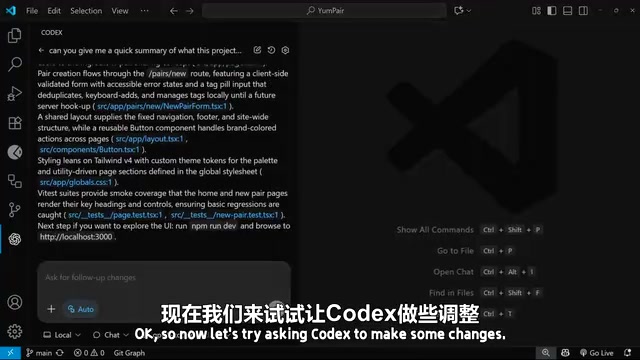
In Chat mode, we can first have Codex understand the current project. Enter the prompt: "Can you give me a quick summary of what this project is" — Codex will automatically scan project files and generate a structured summary.
Codex returned a project overview in a clear bullet-point format: including the homepage route (Hero CTA, Popular Pairs list), pair creation page (with client-side form validation), shared layout, Tailwind v4 styling approach, and Vitest testing framework. While the language style isn't very conversational, the information extraction is very accurate.
Step 2: Create a Feature Branch
Before having Codex modify code, good development practice is to create a feature branch first:
git switch -c feature/modal
This step is crucial — setting up version control before AI-generated code makes it easy to roll back or compare changes later.
Step 3: Generate Code by Describing Requirements in Natural Language
After switching to Agent mode, enter a detailed feature requirement description:
"Can you make a reusable modal component complete with a semi-transparent backdrop. The modal should be white and allow content to be passed in via a slot. Clicking on a cross should trigger the modal to close. Can you then show the modal with a success message when a user submits the new pair form with no validation errors."
This prompt contains several key requirements:
- Create a reusable Modal component
- Semi-transparent backdrop overlay
- Pass content via Slot
- Clicking the close button triggers closure
- Display a success message when the form has no validation errors
The "pass content via Slot" requirement involves a core content distribution mechanism in modern frontend frameworks. The Slot concept originated from the Web Components standard and was later widely adopted by frameworks like Vue.js and Svelte. It allows parent components to inject arbitrary template content into predefined positions in child components, achieving high component reusability. Unlike React's children prop, named Slots support multiple insertion points, enabling container components like Modal to separately receive content for the title, body, and action areas — following the "Open/Closed Principle" where components are open for extension but closed for modification.
Once Codex starts working, it displays its thinking process and operation steps in real-time in the panel, which users can expand to view detailed information.
Generated Results and Model Selection
Code Generation Verification
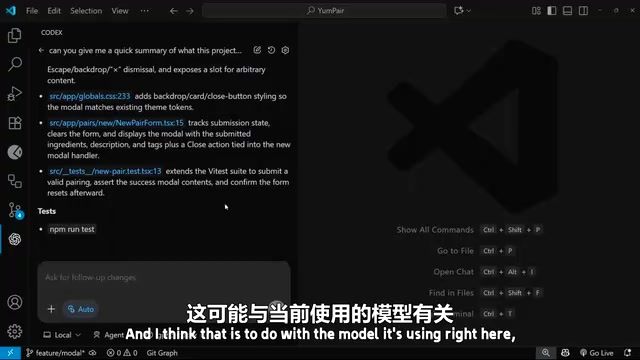
After Codex completed the task, it generated the following files:
- A Modal component file in the
components/directory - A corresponding test file
- Modified the New Pair form page to integrate the Modal
Actual preview verification: After filling in form data and submitting, the Modal correctly pops up displaying a success message; clicking the close button properly closes the Modal; submitting without filling required fields does not show the Modal — all functionality works as expected.
GPT-5 Model Performance Comparison
In this demo, the default model used was GPT-5 Codex (Medium Reasoning). While the generation quality was very high, the speed was relatively slow. For everyday simple coding tasks, switching to GPT-5 Medium standard model is recommended for much faster response times.
The difference between GPT-5 Codex (Medium Reasoning) and GPT-5 Medium reflects OpenAI's tiered strategy for reasoning models. Since the o1 series models, OpenAI introduced the concept of "thinking time" — where the model expands an internal Chain of Thought before outputting the final answer. Medium Reasoning means the model spends more tokens on internal reasoning, which is significantly effective for complex coding tasks requiring multi-step logical deduction, but represents unnecessary overhead for simple code completion or formatting changes. This tiered design allows developers to make trade-offs between speed and reasoning depth, similar to choosing different cloud server instance configurations.
Applicable scenarios for both models:
| Model | Use Case | Characteristics |
|---|---|---|
| GPT-5 Codex (Medium Reasoning) | Complex coding tasks, multi-file coordinated modifications | Strong reasoning capability, slower speed |
| GPT-5 Medium | Simple code modifications, quick Q&A | Fast response, suitable for daily use |
Platform Compatibility Notes
Currently, the Codex IDE extension is still marked as experimental on Windows. In actual use, the Windows platform occasionally experiences interface flickering and MCP server issues, but no other major obstacles.
The MCP (Model Context Protocol) mentioned here is an open standard proposed by Anthropic in late 2024 that defines a standardized communication protocol between AI models and external tools/data sources — similar to a "USB port" for the AI domain. Through MCP, the Codex extension can securely access the local file system, execute terminal commands, call APIs, and more. Windows platform compatibility issues are typically related to MCP server process management and file path handling — Windows uses backslash path separators and different process signal mechanisms, which are common adaptation challenges in cross-platform tools.
Overall, the experience is smoother and more stable on Mac. If you encounter issues on Windows, it's likely due to platform compatibility rather than configuration errors.
Summary
The Codex IDE extension is essentially a visual version of Codex CLI — the underlying functionality is the same, but it provides a more user-friendly interaction interface. It's similar to GitHub Copilot but integrates Codex's full capabilities — including project understanding, code generation, test writing, and more.
For developers who prefer working within an IDE, the Codex IDE extension lowers the barrier to AI programming: no need to remember command-line arguments, no need to switch to terminal windows — you can complete the entire workflow from requirement description to code generation directly in the editor sidebar. If you're already using VS Code for daily development, this extension is worth trying.
Key Takeaways
Related articles

NestJS + LangChain: A Practical Guide for Frontend Engineers Transitioning to AI Full-Stack Architecture
How can frontend engineers transition to AI full-stack? This guide covers NestJS + LangChain, TypeScript fundamentals, AI Agent development, local model deployment, and cross-language architecture skills.
Building a Complete Mini Program with Codex: A Full-Process Walkthrough from Zero to Launch
A detailed walkthrough of building a complete WeChat Mini Program from scratch using OpenAI Codex, covering seven image tool features, membership system, WeChat Pay integration, and AI-assisted development strategies.
OpenAI Codex Deep Dive: The AI Develop…
OpenAI Codex Deep Dive: The AI Development Tool That Makes Programming Feel Like Flying
Deep dive into how OpenAI Codex redefines programming. From real developer feedback to the Time to Fly project, analyzing Codex's strengths in code generation, context understanding, and the AI coding tool competitive landscape.