Practical Guide to Claude Code Plan Mode and Auto Accept Mode

Detailed explanation and practical demo of Claude Code's Auto Accept and Plan Mode features
This article covers two core features of the terminal AI coding assistant Claude Code: Auto Accept mode and Plan Mode. Auto Accept, toggled via Shift+Tab, automatically approves file changes while still requiring permission for command execution, embodying the principle of least privilege. Plan Mode analyzes the codebase with read-only tools first, generating a detailed plan before execution, ideal for complex tasks. The article demonstrates Plan Mode's effectiveness through a dark mode implementation case and summarizes key principles for writing quality prompts.
Overview
Claude Code, as a terminal-based AI programming assistant, interacts similarly to regular AI conversations but offers more granular control options. Unlike IDE-based AI coding assistants such as GitHub Copilot and Cursor, Claude Code runs directly in the terminal environment, accessing the file system, executing shell commands, and deeply integrating with version control systems. This design philosophy stems from Unix's pipe concept—treating AI capabilities as a composable unit in the development workflow rather than binding them to a specific editor, making it particularly suitable for server-side development, DevOps scenarios, and developers who prefer terminal editors like vim/emacs.
This article will walk through a practical case—adding dark mode to an application—to detail two core features of Claude Code: Auto Accept mode and Plan Mode, helping developers use this tool more efficiently and safely.
Auto Accept Mode: Controlling the Granularity of Code Changes
Claude Code provides two file change authorization methods, and developers can toggle between them using the Shift + Tab shortcut.
Auto Accept Mode
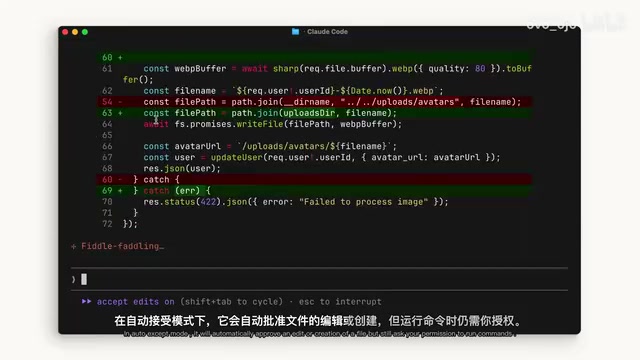
In Auto Accept mode, Claude Code automatically approves file edits or creation operations without requiring individual confirmation. However, it's worth noting that even in this mode, running commands (such as terminal instructions) still requires explicit user permission. This is an important security boundary—file modifications can be automated, but command execution always requires human oversight.
This design reflects the "Principle of Least Privilege" in AI safety. File modifications are reversible—developers can review changes with git diff and roll back with git checkout; but command execution (like rm -rf, database migrations, network requests, etc.) may produce irreversible side effects. This layered authorization mechanism is known as "Human-in-the-Loop" in AI Agent design, and is the mainstream approach for balancing autonomy and safety in current AI tools. By separately authorizing operations with different risk levels, developers can enjoy the efficiency gains of automation without worrying about AI executing dangerous system commands.
Manual Confirmation Mode
If you want to maintain full control over every change, you can switch to manual confirmation mode. In this mode, Claude Code will ask for your permission before each file modification or creation.
There's no absolute right or wrong between the two modes—the choice depends on your use case and comfort level. For small changes in familiar projects, Auto Accept can significantly boost efficiency; for critical code or unfamiliar changes, manual confirmation is more prudent.
Plan Mode: Best Practices for Complex Tasks
What is Plan Mode
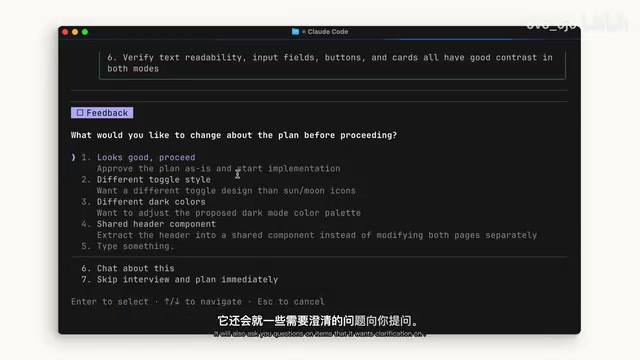
Plan Mode is an extremely practical feature in Claude Code, also accessed through the Shift + Tab menu. When you activate Plan Mode, Claude Code won't immediately execute code modifications. Instead, it will:
- Analyze your codebase using read-only tools — making no modifications
- Research your suggested implementation approach — evaluating feasibility and optimal paths
- Ask clarifying questions — proactively inquiring about unclear requirements
- Return a detailed execution plan — for your review before deciding whether to proceed
From an AI Agent architecture perspective, Plan Mode's "plan first, execute later" paradigm corresponds to a variant of the ReAct (Reasoning + Acting) framework in AI research. Traditional AI Agents use a "think-act-observe" loop to progress incrementally, while Plan Mode front-loads the entire reasoning process, forming a complete execution blueprint before taking unified action. This is similar to the difference between "waterfall" and "agile development" in software engineering—Plan Mode is closer to waterfall-style comprehensive planning, suitable for scenarios with clear requirements and high change costs. The use of read-only tools ensures zero side effects during the analysis phase, which in functional programming is called "pure function" characteristics, guaranteeing absolute safety during exploration.
When to Use Plan Mode
Plan Mode is particularly suitable for:
- Complex multi-step feature implementation — such as refactoring across multiple files
- Safe code review — analyzing problems without modifying any code
- When requirements aren't fully clear — letting AI help you organize implementation ideas
Often, developers need Claude Code to complete a multi-step implementation of a feature, and this is exactly where Plan Mode excels.
Practical Demo: Implementing Dark Mode with Plan Mode
Requirements Description
To demonstrate Plan Mode's practical effectiveness, here's a typical scenario: adding a dark mode toggle to an existing application.

Dark mode may seem simple, but it's actually a systematic engineering effort involving multiple technical layers. It requires handling CSS Custom Properties for theme variable definitions, prefers-color-scheme media queries for system preference detection, localStorage for user preference persistence, and potential FOUC (Flash of Unstyled Content) issues. Additionally, dark mode color schemes aren't simple color inversions—they need to consider contrast ratio requirements (at least 4.5:1) from WCAG (Web Content Accessibility Guidelines), as well as visual adaptation of shadows, images, and icons on dark backgrounds. This is precisely why this case is suitable for Plan Mode—AI needs to comprehensively analyze the existing style system before proposing a reasonable solution.
Steps
First, launch Claude Code in the project root directory, then press Shift + Tab twice to enter Plan Mode. Then enter the prompt:
"My app needs a dark mode implemented across the entire app. Can you create a toggle switch on the header that allows user to toggle between light mode and dark mode? I need you to find a good contrast color that works based on my existing light theme."
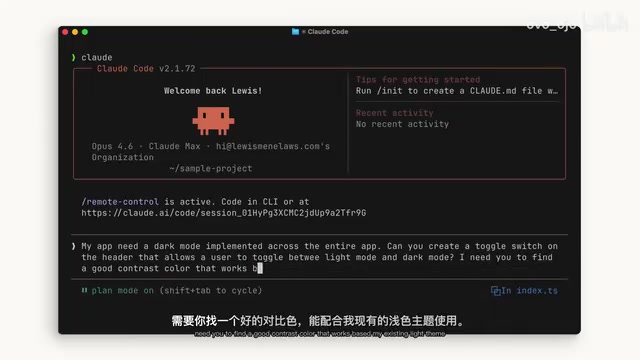
This prompt contains several key elements:
- Clear scope: Dark mode across the entire app
- Specific requirement: Add a toggle switch in the header
- Design constraint: Find suitable contrast colors based on the existing light theme
Results
After completing its analysis in Plan Mode, Claude Code returned a detailed implementation plan. After review and confirmation, it executed step by step according to the plan, successfully implementing dark mode. At the end of the entire process, developers can clearly see what Claude Code did and how it reached its conclusions.
Prompt Writing Tips
From this practical case, we can summarize several key principles for using Claude Code:
Prompt Engineering for coding scenarios differs significantly from general conversation scenarios. Code generation requires extremely high precision—a single missed edge case can cause bugs. Effective coding prompts typically include four dimensions: functional description (What), technical constraints (How), scope (Where), and acceptance criteria (Done). The example prompt reflects this structure: "dark mode" is the function, "toggle switch on header" is the specific implementation, "across the entire app" is the scope, and "good contrast color based on existing light theme" is the constraint and acceptance criteria. Research shows that structured prompts can improve AI code generation first-pass rates by over 40%.
Based on these insights, specific recommendations are:
- Write prompts as descriptively as possible — the more detailed the better, including scope, constraints, and expected outcomes
- Make good use of Plan Mode — let Claude Code deeply understand your intent before execution
- Choose authorization mode based on task complexity — use Auto Accept for simple tasks, manual confirmation for complex ones
- Stay in the loop — if you want to participate in every decision, proactively tell Claude Code
Summary
Claude Code's Plan Mode and Auto Accept mode provide developers with flexible control granularity. Plan Mode lets you fully understand the AI's implementation approach before execution, while Auto Accept mode lets you decide your level of involvement in changes. Using both together allows you to enjoy AI programming efficiency while ensuring code quality and safety. For developers new to Claude Code, it's recommended to start with Plan Mode + manual confirmation, then gradually increase automation as trust builds.
Key Takeaways
- Claude Code toggles authorization modes via Shift+Tab shortcut; Auto Accept automatically approves file changes but command execution still requires permission
- Plan Mode uses read-only tools to analyze the codebase, generating a detailed execution plan for user confirmation before proceeding
- Plan Mode is particularly suited for complex multi-step feature implementations and safe code review scenarios
- Prompts should be as detailed as possible, including scope, constraints, and expected outcomes
- The choice between modes depends on task complexity and developer comfort level—there's no absolute right or wrong
Related articles
 Tutorials
Cursor + Codex Dual-IDE Collaboration: A Practical Methodology for Open-Source Project Customization
A complete methodology for open-source project customization based on real-world experience, detailing the Cursor+Codex dual-IDE workflow, seven-stage process, MVP validation, and AI source code reading techniques.
 Tutorials
Cursor Multi-Agent in Practice: Building a Full-Stack Next.js Blog in 50 Minutes
Build a full-stack blog in 50 minutes using Cursor IDE's multi-Agent mode with Next.js, Clerk auth, and Supabase. Learn the 4-phase AI Agent workflow and key integration pitfalls.
 Tutorials
Building an AI Software Factory from Scratch: A Cursor Engineer's Hands-On Experience with Multi-Agent Collaboration
Cursor engineer Eric shares practical insights on building an AI software factory: automation levels, guardrail design, parallel Agent management, and scaling to 1000+ Agents for 24/7 development.