Vibe Coding in Practice: From Idea to Deployment in Just Five Steps
Vibe Coding in Practice: From Idea to …
Five-step Vibe Coding workflow: build and deploy a complete app using free AI tools
This article introduces a zero-coding Vibe Coding development workflow that combines free tools—Google Stitch (UI design), AI Studio (frontend code), AntiGravity (backend code), Supabase (database), GitHub (version control), and Vercel (cloud deployment)—to turn an idea into a live application in just five steps. Using an online pet adoption app as a case study, it demonstrates a development approach where AI generates all the code while developers only describe requirements and review results, making it ideal for MVP validation and personal projects.
Overview: Build a Complete App with Zero Coding Experience
With AI tools maturing rapidly, the barrier to web development is being dramatically lowered. This article introduces a complete Vibe Coding development workflow that combines free tools like Google Stitch, AI Studio, and AntiGravity to take an idea from UI design to deployment in just five steps.
What is Vibe Coding? Vibe Coding is a concept coined in 2025 by OpenAI co-founder Andrej Karpathy. It refers to a development approach where developers no longer write code line by line, but instead describe requirements in natural language and let AI handle the code generation. The developer's role shifts from "coder" to "director"—responsible for describing the vision, reviewing output, and guiding revisions. This concept has gained traction thanks to the rapid improvement in code generation capabilities of large language models (LLMs), particularly GPT-4, Claude, and Gemini, which have reached practical levels in understanding complex requirements and generating structured code.
The core philosophy of this entire workflow is: let AI handle code generation at every stage, while the developer only needs to describe requirements, review results, and fine-tune details. Using an "Online Pet Adoption App" as a practical case study, let's break down the key steps in detail.
Step 1: Design the UI with Google Stitch
Basic Operations and Model Selection
Google Stitch is an AI tool specifically designed for creating app UI interfaces, supporting both mobile and desktop design modes. It's an AI-driven UI design tool launched by Google in 2025, powered by the Gemini multimodal large model. Unlike traditional design tools (such as Figma or Sketch), Stitch combines design and code generation into one, eliminating the handoff cost between designers and developers—after users describe their requirements, the tool simultaneously produces high-fidelity mockups and corresponding HTML/CSS code.
It currently offers two models: Gemini 2.5 and Gemini 3, with a daily free quota of 400 regular credits (text-to-UI generation) and 15 Redesign credits (generating similar designs from screenshots/URLs). The Redesign feature leverages visual understanding capabilities to analyze the layout, color scheme, and component structure of existing websites or screenshots, then generates design proposals with similar style but different content.
Before using it, it's recommended to uncheck the data training option in Settings to prevent your design data from being used for Google's AI model training.
Design Generation and Fine-Tuning
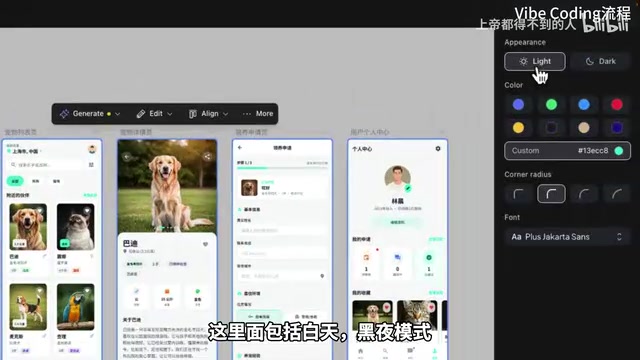
Enter "Design an online pet adoption app," select Gemini 3, and execute. Stitch will automatically generate 5 UI pages: a welcome page, pet list page, pet detail page, adoption application page, and profile page.
Stitch provides multiple editing methods:
- AI Chat Editing: Select all pages and modify through natural language, such as "Change the text to Simplified Chinese, use the copyright-free CNH font"
- Annotate Precision Editing: Select specific areas and add modification notes, similar to "circling and annotating" on a design mockup—AI will only modify the annotated area without affecting other parts
- Edit Theme: One-click switching between light/dark mode, theme colors, border radius, and fonts. These changes apply globally, ensuring design system consistency
- Variations: Generate different design proposals based on existing UI, with adjustable creativity levels (low creativity maintains the original structure with minor tweaks, high creativity may produce entirely different layout schemes)
Additionally, Stitch offers a practical Predict Heatmap feature that generates a heat prediction map—darker colors indicate areas more likely to attract user clicks, helping developers prioritize optimization of key display positions. This feature is trained on eye-tracking research data, simulating users' attention distribution patterns when browsing pages—insights that traditionally require user testing in UX design.
Exporting to Figma
Figma is currently the world's most popular collaborative UI design tool, running in the browser and supporting real-time multi-user editing. The significance of importing Stitch-generated designs into Figma is: you can leverage Figma's rich plugin ecosystem for secondary editing and fine-tuning, while other team members can review and comment on design proposals in a familiar environment.
Design mockups can be imported into Figma in three ways:
- Using the "Stitch Code to Figma" plugin (images may not display)
- Using the "HTML to Figma" plugin (best results, layout and images display correctly)
- Direct copy and paste (imported as images, not editable)
Step 2: Generate Frontend Code with AI Studio
In Stitch, select all pages, click Export → AI Studio → Build with AI Studio. The system will automatically redirect and import 5 UI design images along with their corresponding HTML code.
AI Studio's core function is to organize independent pages into an interactive frontend application, implementing page navigation and response logic. Simply put, Stitch generates individual "static screens," while AI Studio connects these screens into a complete application with clicking, navigation, and interaction capabilities.
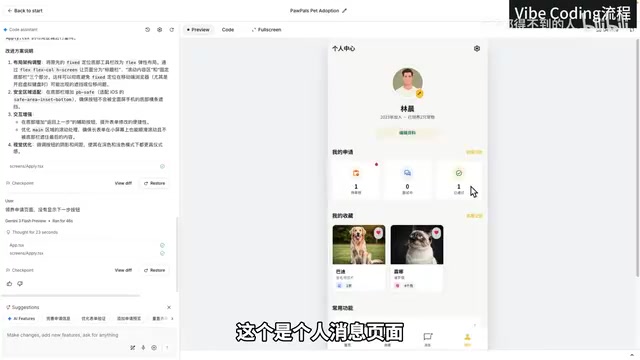
Debugging and Precision Modifications
After generation, you need to test each page's functionality one by one. For example, if you find that the "Apply for Adoption" page is missing a next button, or message notifications don't respond when clicked, you can have AI Studio fix these through conversation.
AI Studio also supports precision editing mode (brush tool):
- Add comments to select specific areas
- Use arrows to point to specific elements
- Add text descriptions of modification intent
After making changes, click "Add to Chat" to sync them to the AI conversation for execution.
Important Note: AI Studio generates only a pure frontend application with data hardcoded in the code. Here it's important to understand the difference between frontend and backend—the frontend is the interface part that users directly see and interact with, typically composed of HTML (structure), CSS (styling), and JavaScript (interaction logic); the backend is the program running on the server, responsible for handling business logic, data storage, and security verification. A pure frontend application has data written directly into the code and cannot implement user registration, data persistence, or similar features. Only when frontend and backend work together, along with database storage, can you have a truly functional complete application. That's what the next step addresses.
Step 3: Generate Backend Code with AntiGravity
Download the frontend code generated by AI Studio, import it into AntiGravity, and ask it to analyze the frontend code and generate corresponding backend code, using Supabase as the online database.
About Supabase
Supabase is an open-source Backend-as-a-Service (BaaS) platform, often called the "open-source alternative to Firebase." Built on PostgreSQL, it provides real-time database, authentication, file storage, Edge Functions, and more—developers don't need to set up and maintain servers themselves. Supabase's free tier offers 500MB database storage and 5GB bandwidth, sufficient for personal projects and MVP validation. Its Data API automatically generates RESTful endpoints for database tables, allowing the frontend to perform CRUD operations directly through HTTP requests, greatly simplifying backend development complexity.
Execution Plan and Code Generation
AntiGravity will first generate an execution plan containing: technology stack selection, database parameter configuration, technical architecture, database table design, etc. After confirming everything is correct, click Proceed to start code generation.

Database Configuration
After creating a new project in Supabase, you need to configure two key parameters:
- The Data API URL (a unique access address assigned by Supabase for each project)
- The API Key (a key for authentication, ensuring only authorized applications can access the data)
Write these two parameters into the project's .env configuration file (.env files are a standard practice for storing environment variables, separating sensitive information like keys and database addresses from the code to prevent leakage into code repositories), then execute the table creation SQL generated by AntiGravity in Supabase's SQL Editor to create the complete database structure: adoption application records, favorites, message notifications, pet information, shelter organizations, and user information tables.
Local Testing
After running npm run dev to start the service (npm is Node.js's package manager, and run dev is the command to start the development server, which creates a temporary local server for testing), test core features one by one: user registration/login, viewing pet information, applying for adoption, message notifications, etc. If issues arise, continue having AntiGravity make fixes—after a few iterations, everything should be working.
Step 4: Push Code to GitHub
After development is complete, push the code to GitHub for version control. GitHub is the world's largest code hosting platform, based on the Git version control system. It not only provides code storage but also supports team collaboration, code review, issue tracking, and more. The benefits of pushing code to GitHub include: cloud backup of your code, the ability to trace the history of every modification, and most importantly, providing the foundation for automated deployment in the next step.
git init
git add .
git commit -m "initial commit"
git remote add origin <SSH地址>
git push -u origin main
If you're unfamiliar with Git operations, don't worry—you can have AI guide you through each step.
Step 5: Deploy to the Cloud with Vercel
Choose Vercel for free deployment. Vercel is a cloud deployment platform focused on frontend and full-stack applications, developed by the team behind Next.js. It supports Serverless Functions, meaning it can not only host static HTML files but also run server-side logic. This is why this app cannot be deployed to GitHub Pages—GitHub Pages can only host purely static files (HTML/CSS/JS) and cannot execute server-side code.
Vercel's deployment process is extremely streamlined: after connecting a GitHub repository, every code push automatically triggers a build and deployment, achieving Continuous Integration/Continuous Deployment (CI/CD) without manual intervention.
Steps:
- Install the GitHub plugin in Vercel and import the project
- Configure the build command:
npm run build(compiles and packages source code into a deployable production version) - Configure the output path:
dist(the directory where build artifacts are stored) - Configure the install command:
npm install(installs third-party libraries the project depends on) - Add environment variables (Supabase URL and API Key, matching the contents of the local .env file)
- Click Deploy
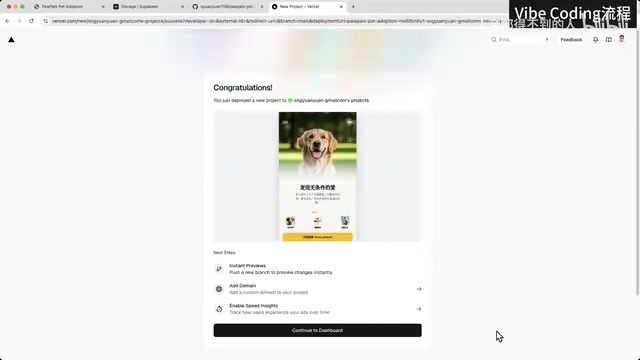
After successful deployment, Vercel assigns a public access URL (e.g., your-app.vercel.app), and you can also bind your own domain. At this point, the application is officially live, and anyone can access and use it through a browser.
Advanced: Building an Admin Dashboard
Beyond the user-facing app, you can use the same workflow to generate an admin dashboard that enables:
- Pet information entry and editing
- Adoption application approval
- Data dashboard display
If the admin dashboard is for personal use only, it doesn't need to be deployed to the cloud—just run it locally. The entire pet adoption workflow forms a complete loop: admin enters pet info → users browse and apply → admin approves → user receives notification → adopted pets are automatically delisted.
Summary and Reflections
The core value of this Vibe Coding workflow lies in:
- Extremely low technical barrier: AI generates code throughout the entire process; developers only need to describe requirements and review results
- Zero-cost tool chain: Stitch, AI Studio, AntiGravity, Supabase, and Vercel all offer free tiers
- Complete product loop: Covers the full workflow from UI design to frontend/backend development to deployment
- Rapid iteration capability: Features can be modified through natural language, dramatically shortening development cycles
Of course, this workflow is best suited for MVP validation and personal projects. MVP (Minimum Viable Product) is a core concept in lean startup methodology, systematically articulated by Eric Ries in The Lean Startup. The core idea is: build a product version with minimal resources that has core functionality, quickly launch it to market to validate business hypotheses. Traditional MVP development typically requires weeks to months and tens of thousands of dollars, while the Vibe Coding workflow compresses this process to hours, enabling entrepreneurs to test multiple ideas at near-zero cost and quickly find Product-Market Fit.
For complex enterprise-level applications, professional developers are still needed to perform deep optimization on top of AI-generated foundations—including security hardening, performance tuning, high-concurrency handling, automated testing, and other engineering practices. But for entrepreneurs and indie developers looking to quickly validate ideas, this is undoubtedly an extremely valuable tool combination.
Related articles
 Tutorials
Cursor + Codex Dual-IDE Collaboration: A Practical Methodology for Open-Source Project Customization
A complete methodology for open-source project customization based on real-world experience, detailing the Cursor+Codex dual-IDE workflow, seven-stage process, MVP validation, and AI source code reading techniques.
 Tutorials
Cursor Multi-Agent in Practice: Building a Full-Stack Next.js Blog in 50 Minutes
Build a full-stack blog in 50 minutes using Cursor IDE's multi-Agent mode with Next.js, Clerk auth, and Supabase. Learn the 4-phase AI Agent workflow and key integration pitfalls.
 Tutorials
Building an AI Software Factory from Scratch: A Cursor Engineer's Hands-On Experience with Multi-Agent Collaboration
Cursor engineer Eric shares practical insights on building an AI software factory: automation levels, guardrail design, parallel Agent management, and scaling to 1000+ Agents for 24/7 development.