Three Essential Tools to Install Before Setting Up OpenAI Codex
Three Essential Tools to Install Befor…
A step-by-step guide to installing Git, Node.js, and VS Code as prerequisites for OpenAI Codex.
Before installing OpenAI Codex, you need three essential tools: Git for version control, Node.js for package management and dependency installation, and VS Code as a code editor. This guide provides complete installation steps for each tool, explains their roles in the Codex toolchain, covers verification methods, and addresses common errors like PATH configuration issues.
Introduction
OpenAI Codex is one of the most talked-about AI programming tools today, attracting a large number of developers and coding enthusiasts eager to try it out. However, many beginners skip the prerequisite environment setup when installing Codex, only to run into frequent errors and compatibility issues down the road.
Based on a detailed Bilibili tutorial, this article systematically walks through the three core tools you need to set up before installing Codex — Git, Node.js, and VS Code — helping complete beginners finish their environment configuration in 10–15 minutes.
Why Do You Need to Configure Prerequisite Software Before Installing Codex?
Before diving into the Codex installation, there's a key concept to understand: Codex itself is an AI programming tool, but it's not a standalone, self-contained development environment. It relies on version control tools to manage code, a package manager to install dependencies, and a code editor for fine-tuning details.
From a technical architecture perspective, OpenAI Codex is powered by a large language model (LLM) that understands natural language instructions to generate, modify, and explain code. But unlike a traditional integrated development environment (IDE), Codex is essentially an AI inference engine — not a complete development toolkit. Modern software development follows the "toolchain" philosophy, where multiple specialized tools work together to handle everything from coding to deployment. As the AI-assisted component of this toolchain, Codex needs to collaborate with version control, package management, and code editing infrastructure to deliver maximum value. This is exactly why skipping the prerequisite environment and jumping straight to Codex installation leads to all sorts of compatibility issues — without the underlying tools in place, AI-generated code can't be properly managed, executed, or debugged.
Each of the three prerequisite tools serves a distinct purpose:
- Git: The foundational tool for version control and collaborative development
- Node.js: Handles dependency installation and provides the runtime environment
- VS Code: The primary tool for code editing and fine-tuning
All three are essential (strictly speaking, VS Code isn't mandatory, but it's highly recommended), and together they form the complete toolchain for using Codex.
Step 1: Install Git (Version Control Tool)
Git's Role in the Codex Environment
Git is the most fundamental collaboration tool in software development. Nearly all AI development tools and mainstream agents (such as Hermes Agent, Claude Code, etc.) depend on Git. Regardless of which AI programming tool you use in the future, Git is a must-have.
Git was created by Linus Torvalds (the creator of Linux) in 2005, originally to manage the Linux kernel source code. It uses a distributed version control architecture, meaning every developer's local machine holds a complete copy of the repository history rather than relying solely on a central server. Git's core capabilities include: tracking every modification to files, supporting code merging during parallel development by multiple contributors, and quickly rolling back to any historical version when issues arise. In the context of AI programming tools, Git's importance is even more pronounced — when Codex generates or modifies code, Git can precisely record what changes the AI made, allowing developers to review the AI's output line by line and decide whether to accept or revert each change. Platforms like GitHub and GitLab are built on top of Git, forming the world's largest open-source code collaboration ecosystem.
Git Installation Steps
- Visit the Git official website (git-scm.com)
- Click the "Install for Windows" button on the page
- On the download page, click "Click here to download" to start the download
- Double-click the installer and follow the wizard — just click Next all the way through
Git installation is a classic "no-brainer" setup — all you need to do is click Next. The installer is small and the installation is fast. If the download is slow due to network issues, you can obtain the installer from alternative sources.
Step 2: Install Node.js (Runtime Environment & Package Manager)
Node.js's Role in the Codex Environment
In the Codex environment, Node.js is primarily responsible for package management and dependency installation. One detail worth noting: different AI programming tools may have different Node.js version requirements. For example, some tools require a specific 22.x version, but Codex has no strict version constraints — just install the latest stable version.
Node.js is a JavaScript runtime environment built on the Chrome V8 engine, created by Ryan Dahl in 2009. Its revolutionary significance lies in extending JavaScript from the browser to server-side and command-line tool domains. Node.js comes bundled with npm (Node Package Manager), the world's largest software package registry with over 2 million open-source packages. The Codex CLI (command-line tool) itself is installed via npm — when you run the npm install command, npm automatically downloads Codex and all its dependencies from the registry and handles version compatibility. "Dependencies" refer to third-party code libraries that Codex needs to run; a modern JavaScript project may indirectly depend on hundreds of packages, and npm's job is to automate the management of these complex dependency relationships. Regarding version selection, even-numbered versions (e.g., 20.x, 22.x) are Long-Term Support (LTS) releases suitable for production environments, while odd-numbered versions are experimental releases that include the latest features but may be slightly less stable.
Node.js Installation Steps
- Visit the Node.js official website (nodejs.org)
- Click the "Get Node.js" button
- Select the version corresponding to your operating system (supports Windows, macOS, and Linux)
- After downloading, double-click the installer to proceed
Verifying a Successful Node.js Installation
After installation, make sure to verify that Node.js was installed correctly:
- Press
Win + Rto open the Run dialog - Type
cmdand press Enter to open the Command Prompt - Type
node -vand press Enter - If a version number is displayed (e.g.,
v24.15.x), the installation was successful
This verification step involves an important operating system concept — Environment Variables. When you type node in the command line, the operating system doesn't search your entire hard drive for the node.exe file. Instead, it only looks in the directories listed in the PATH environment variable. The Node.js and Git installers automatically add their installation paths to the system PATH, which is why you can use these commands from any directory after installation. If the node -v command returns a "not recognized as an internal or external command" error, it usually means there's a PATH configuration issue — you may need to manually add the path or restart your computer for the environment variables to take effect. The same principle applies to verifying with git --version. Understanding this mechanism helps troubleshoot "command not found" errors you might encounter when installing Codex later.
Tip: Node.js installation takes slightly longer than Git. Please be patient and wait for the installation to complete.
Step 3: Install VS Code (Code Editor)
Why Is VS Code Recommended Alongside Codex?
While VS Code is technically not a strict requirement for Codex, it's highly recommended. The reason is simple: as an AI programming tool, Codex itself doesn't provide code editing capabilities. After the AI generates code, if you need to fine-tune or make detailed modifications, you still need a traditional code editor. VS Code integrates well with Codex and can significantly boost development efficiency.
Visual Studio Code (VS Code) was released by Microsoft in 2015 and is built on the Electron framework — essentially a web application running on the desktop. The reason it became the world's most widely used code editor in just a few years (according to Stack Overflow surveys, over 70% of developers use VS Code) is its powerful extension ecosystem. The VS Code extension marketplace offers tens of thousands of plugins covering language support, debugging tools, theme customization, AI assistance, and more. In the context of using Codex, VS Code's value goes beyond code editing: it has a built-in Terminal that lets you run command-line instructions directly within the editor; its Git integration visually displays code changes; and most importantly, by installing relevant extensions, VS Code can interact directly with the Codex API, enabling a seamless experience of invoking AI capabilities from within the editor. Compared to traditional editors like Vim and Sublime Text, VS Code offers more comprehensive native support for AI programming tools.
VS Code Installation Steps
- Visit the VS Code official website (code.visualstudio.com)
- The website will automatically detect your operating system and recommend the appropriate version
- Click "Download for Windows" (or the corresponding option for your system) to download
- Double-click the installer and follow the wizard to complete the installation
Regarding the installation path, the default C drive location is fine. VS Code itself is not large, and the installation location has no meaningful impact on performance. If your C drive is running low on space, you can choose another partition.
Installing the Chinese Language Pack for VS Code
A freshly installed VS Code defaults to an English interface. To switch to Chinese, follow these steps:
- Click the Extensions icon in the left sidebar (the icon made up of four small squares)
- Type
Chinesein the search box - Find the "Chinese (Simplified) Language Pack" plugin and click Install
- After installation, a restart prompt will appear in the bottom-right corner
- Click Restart, and VS Code will switch to a Chinese interface
FAQ and Important Notes
Version Recommendations
| Tool | Recommended Version | Notes |
|---|---|---|
| Git | Latest version | No specific version requirements |
| Node.js | Latest stable version (LTS) | If you also use tools like Claude Code, pay attention to their version requirements; prefer even-numbered versions |
| VS Code | Latest version | No specific version requirements |
Recommended Installation Order
It's recommended to install in this order: Git → Node.js → VS Code. While there are no strict dependencies between the three, this order aligns with the logical flow of subsequent configuration. Git, as the most foundational version control tool, should be set up first. Node.js provides npm, which is the direct pathway for installing Codex. VS Code, as the upper-layer editor, can be configured last.
No Need to Learn Them In-Depth Right Away
Once all three tools are installed, you just need to confirm the installations were successful — there's no need to learn how to use them in detail yet. As you start actually using Codex, you'll gradually encounter the specific operations for each tool.
Troubleshooting Common Errors
If you type node -v or git --version in the command line and get a "not recognized as an internal or external command" error, try the following solutions:
- Restart the Command Prompt: Close the current cmd window, reopen it, and try again
- Restart your computer: Some systems require a restart for environment variables to take effect
- Manually configure PATH: Right-click "This PC" → Properties → Advanced system settings → Environment Variables, then add the installation path of the corresponding tool to PATH
Conclusion
Setting up the prerequisite environment for Codex isn't complicated — it boils down to installing three tools: Git, Node.js, and VS Code. The entire process is essentially a series of "click Next" operations, and even complete beginners with no programming experience can finish the full setup in 10–15 minutes. Once the environment is ready, you can move on to the actual Codex installation and start using it.
For developers looking to get started with AI programming, preparation is half the battle — a solid environment configuration is the foundation for efficiently using Codex later on. These three tools don't just serve Codex; they're cornerstones of the entire modern development workflow. No matter how AI programming tools evolve in the future, Git's version control capabilities, Node.js's package management ecosystem, and VS Code's editing and extension framework will continue to play essential roles.
Related articles
OpenAI Codex Cloud Task Delegation: The Complete Workflow from VS Code to PR
A detailed guide to OpenAI Codex extension's cloud task delegation, covering the complete workflow from initiating cloud coding tasks in VS Code to reviewing changes and creating Pull Requests.

Coze Workflow in Practice: Complete Tutorial for AI One-Click Product Promo Video Generation
Step-by-step guide to building a Coze workflow for AI product promo videos, integrating HappyHours and Jimeng across 12 nodes with nine-grid storyboards and polling loops.
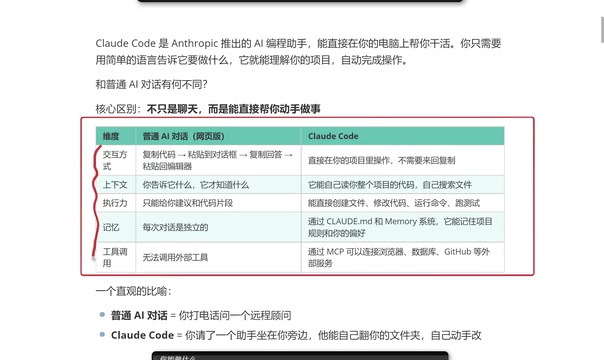
Getting Started with Claude Code: 5 Key Differences from Traditional AI Chatbots
Explore 5 key differences between Claude Code and traditional AI chatbots like ChatGPT, covering interaction, context, execution, memory, and tool integration.