Complete Guide to Connecting Claude Code Desktop with DeepSeek: Zero-Barrier AI Programming Setup Tutorial
Complete Guide to Connecting Claude Co…
Connect Claude Code Desktop to DeepSeek via CCSWitch for zero-barrier AI programming in China.
Claude Code Desktop now supports third-party model integration, allowing users in China to connect DeepSeek V4 and other domestic models via CCSWitch middleware — no VPN or official account required. The setup involves installing Git, CCSWitch, obtaining a DeepSeek API key, enabling Windows virtualization (WSL2), and activating developer mode. The desktop interface is intuitive and beginner-friendly, and real-world tests confirm DeepSeek V4 handles programming tasks effectively.
Claude Code Desktop Now Supports Third-Party Model Integration!
Claude Code Desktop now supports third-party model integration! This means users in China can experience the power of AI programming through domestic large language models like DeepSeek — no VPN required, no Claude account needed. This article provides a complete step-by-step configuration guide from scratch, getting your Claude Code desktop environment up and running in just 10 minutes.
Why Claude Code + DeepSeek Integration Matters
Claude Code is an AI programming assistant developed by Anthropic, built on their Claude series of large language models. Unlike code completion tools such as GitHub Copilot, Claude Code positions itself as an "agentic programming tool" — capable of understanding full project context, autonomously planning development steps, invoking terminal commands, and iteratively modifying code. It functions more like an "AI programmer" that can independently complete tasks, rather than a simple code completion plugin. This is precisely why it has been a standout product in the AI programming space.
However, using Claude Code in China has always been extremely difficult — it requires an official account login, a VPN, an overseas phone number, a credit card, and more. Recently, Claude Code Desktop quietly rolled out third-party model integration, which completely changes the game.
We can now connect domestic models like DeepSeek and Kimi to Claude Code's desktop client, enjoying its excellent interactive interface and engineering capabilities while using model services that are directly accessible within China. DeepSeek is a domestic large language model series developed by DeepSeek (the company), known for its highly competitive cost-performance ratio. Its V4 version performs close to or even surpasses some top international models on multiple programming benchmarks, while API costs are far lower than competitors like OpenAI GPT-4o — making it an ideal backend inference engine for Claude Code. Compared to the command-line version, the desktop edition offers a more intuitive interface where most operations can be completed through clicking and dragging, making it extremely beginner-friendly.
Prerequisites: Three Essential Components
Before starting the configuration, make sure the following three components are installed.
1. Install Git Version Control
Many Claude Code commands depend on Git to execute, and missing it will cause startup errors. Visit the official Git download page, select the version matching your operating system (typically 64-bit Windows), download it, and double-click to install — just click "Next" through the entire process.
2. Install CCSWitch (Core Middleware)
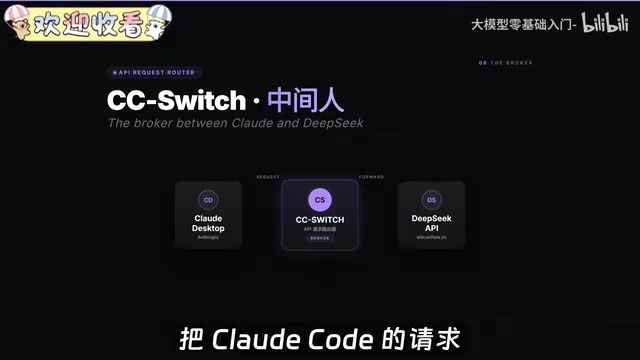
CCSwitch is the key tool in this entire setup. It acts as a "middleman" between Claude Code and DeepSeek, managing various LLM APIs and forwarding Claude Code's requests to the model we specify.
From a technical perspective, CCSWitch implements "API protocol translation": Claude Code originally can only send requests conforming to the Claude API specification to Anthropic's official servers. CCSWitch launches a local proxy server that intercepts these requests, converts them to the API format of third-party models like DeepSeek, forwards them, and then reverse-converts the responses back to Claude Code — making it "believe" it's communicating with the official service. This middleware pattern is the mainstream approach for achieving model interchangeability in today's AI tool ecosystem.
Installation steps:
- Visit CCSWitch's GitHub page
- Download the latest Windows installer release (supports auto-updates)
- Double-click to run and click "Next" through the installation
3. Obtain a DeepSeek API Key
Go to DeepSeek's official API platform, log in with your phone number (new numbers are automatically registered), and top up 10 RMB to get started. Then find "API Keys" in the left menu and create a new key. Note: The key is only displayed once — make sure to copy and save it immediately.
Configuring CCSWitch to Connect with DeepSeek
Open CCSWitch, which defaults to Claude Code selected. Click the plus button to add a model provider, find DeepSeek and select it, then paste the API Key you just copied into the corresponding field. You can click "Test Latency" — a green indicator means the connection is working properly.
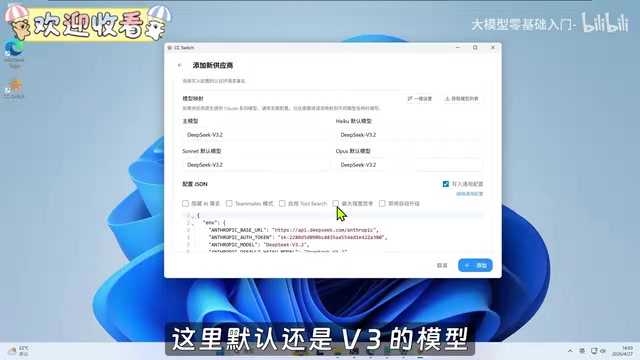
Important model mapping settings: DeepSeek is now on V4, and you need to manually modify the model mappings:
- Primary models (Haiku, Sonnet) → Change to V4 Flash
- Opus → Change to V4 Pro
Once configured, go to the "Routing" tab in the settings page and enable the following options:
- Show local routing toggle on the homepage
- Master routing switch
- Enable routing for Claude
Note the routing port number — you'll need it when configuring the desktop version.
Enabling Windows Virtualization Platform
Claude Code doesn't execute code directly on Windows. Instead, it runs in an isolated virtual environment to protect the host system. Specifically, Claude Code Desktop relies on WSL2 (Windows Subsystem for Linux version 2) to run its code execution environment. WSL2 uses the Hyper-V hypervisor to run a full Linux kernel on top of the Windows kernel, providing genuine Linux system call compatibility. This isolation mechanism ensures both code execution security (sandboxed environment) and access to the rich development toolchain available in the Linux ecosystem — forming the foundational layer of Claude Code's cross-platform engineering capabilities.
Steps to enable:
- Search for "Turn Windows features on or off" in the Start menu
- Check the following three items: Virtual Machine Platform, Windows Hypervisor Platform, and Windows Subsystem for Linux
- Click OK, wait for the installation to complete, then restart your computer
This step is a prerequisite for Claude Code Desktop to function properly — skipping it will prevent code execution.
Installing and Configuring Claude Code Desktop
Important Notes for Downloading Claude Code Desktop
Do not download from the Claude homepage — that version will show an error saying it cannot be used. You need to go to the dedicated download page, find the Claude Code Desktop installer, and download the 64-bit Windows version.
Enabling Developer Mode
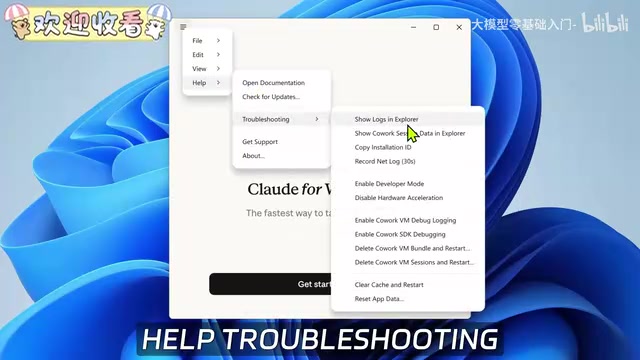
After installation, do not click the "Start" button in the center (that will take you to the official account login flow). The correct steps are:
- Click the three-line menu icon in the top left
- Navigate to Help → Publishing → Enable Developer Mode
- Claude Code will automatically restart
Configuring Third-Party Inference to Connect with DeepSeek
After restarting, click "Developer" → "Configure Third-Party Inference" in the menu, and fill in three key parameters:
- Gateway Address: Enter the routing address shown in CCSWitch
- Gateway API Key: Enter the wildcard character (automatically picks up the API configuration from CCSWitch)
- Gateway Authorization Mode: Keep the default
Scroll to the bottom of the page and toggle on "Hide Login Options" so that it goes directly into third-party API mode on startup.
Exporting Registry Configuration
Click "Save as JSON" in the bottom left to verify the configuration is correct, then click the export button in the bottom right and select the .reg format (Windows registry file). Do not double-click to run it immediately after exporting. First, open it with Notepad and add the model option configuration entry at the last line (used for switching models in the interface). Save the file, then double-click to import it into the registry.
Afterward, you need to fully exit Claude Code from the system tray (simply clicking close only minimizes it), then reopen it.
Hands-On Experience and Programming Capability Test
After reopening, Claude Code automatically enters the main interface — no login required.

The interface layout is very clean:
- Center: Main conversation window with token usage statistics at the top and an input box at the bottom
- Left: Session management, pinned projects, task buttons, and conversation history
- Right: Preview window, real-time file viewer, terminal interface, and debug panel
Compared to the command-line version, the desktop edition allows most operations to be completed through clicking and dragging, with a significant improvement in interface intuitiveness.
Programming Capability Test Powered by DeepSeek
In our hands-on test, we sent Claude Code a prompt requesting a local web app combining a "To-Do List + Pomodoro Timer" with the following features: adding to-dos, completing tasks, a 25-minute Pomodoro countdown, and data persistence in the browser's local storage.
We used "Plan Mode" to have it write a development plan first — this mode exemplifies the "Agent paradigm" in modern AI programming tools: the model doesn't generate code directly but first performs task decomposition and creates a development plan before executing step by step. This two-phase workflow (Plan → Act) effectively reduces "hallucination" issues that large models encounter in complex tasks, giving users the opportunity to review and correct the plan before execution. This is a design pattern widely adopted by mainstream AI programming frameworks (such as Cursor and Devin). The plan file can be viewed directly in the right-side preview window — much more convenient than having to manually open files in the command line. After switching to "Allow Edit Mode," it executed according to the plan and generated complete code files.
Final results: The Pomodoro timer counted down correctly, the to-do list supported adding and completing tasks, and data persisted even after closing and reopening the browser. A follow-up request to add "custom duration" was also quickly implemented.
Conclusion
Through the CCSWitch middleware, Claude Code Desktop achieves zero-barrier usage in China's network environment. While the configuration process involves quite a few steps, none of them are complicated. For users who want to experience AI programming, build small tools using natural language, or automate repetitive daily tasks, this is currently one of the most beginner-friendly approaches available. DeepSeek V4's capabilities combined with Claude Code's engineering-oriented interface deliver a genuinely solid programming experience.
Key Takeaways
- Claude Code Desktop's new third-party model integration allows users in China to use it without a VPN or official account
- CCSWitch middleware handles API protocol translation, seamlessly forwarding Claude Code requests to DeepSeek V4
- The setup process includes installing Git, CCSWitch, obtaining a DeepSeek API key, enabling Windows virtualization (WSL2), and activating developer mode
- The desktop version offers a more intuitive interface than the command-line version, with click-and-drag operations that are much more beginner-friendly
- Real-world testing confirms DeepSeek V4 can successfully complete programming tasks like Pomodoro timers and to-do lists, with the two-phase "Plan Mode" workflow ensuring quality execution of complex tasks
Related articles
 Tutorials
Cursor + Codex Dual-IDE Collaboration: A Practical Methodology for Open-Source Project Customization
A complete methodology for open-source project customization based on real-world experience, detailing the Cursor+Codex dual-IDE workflow, seven-stage process, MVP validation, and AI source code reading techniques.
 Tutorials
Cursor Multi-Agent in Practice: Building a Full-Stack Next.js Blog in 50 Minutes
Build a full-stack blog in 50 minutes using Cursor IDE's multi-Agent mode with Next.js, Clerk auth, and Supabase. Learn the 4-phase AI Agent workflow and key integration pitfalls.
 Tutorials
Building an AI Software Factory from Scratch: A Cursor Engineer's Hands-On Experience with Multi-Agent Collaboration
Cursor engineer Eric shares practical insights on building an AI software factory: automation levels, guardrail design, parallel Agent management, and scaling to 1000+ Agents for 24/7 development.