Connecting DeepSeek V4 API to Copilot in VSCode: A Detailed Tutorial with Two Methods
Two methods to integrate DeepSeek V4 API with GitHub Copilot in VSCode for enhanced AI coding.
This tutorial covers two approaches to connect DeepSeek V4 API to GitHub Copilot in VSCode. Method 1 uses the DeepSeek for Copilot extension for a 2-minute quick setup but is limited to 128K context. Method 2 uses the OAI extension for full customization including 1M token context window, temperature control, and thinking depth settings—recommended for daily development.
Why Connect a Custom API to Copilot?
GitHub Copilot has long been a solid AI programming assistant in VSCode. However, recent changes to Copilot's subscription plans have significantly reduced token quotas for various models, frustrating many developers.
Since its official launch in 2022, GitHub Copilot has evolved from supporting a single model to multiple models. From late 2024 to early 2025, GitHub made major adjustments to Copilot's subscription tiers, introducing Free, Pro, Pro+, and Enterprise levels. The most controversial change was imposing strict daily/monthly request counts and token usage limits on premium models (such as Claude 3.5 Sonnet, GPT-4o, etc.). Pro users only get limited premium model quotas per month, and once exceeded, they're automatically downgraded to base models. This shift has driven many developers to seek alternatives by connecting third-party APIs to bypass these restrictions.
That said, DeepSeek V4 Pro has become a top choice for many developers thanks to its powerful coding capabilities and massive 1-million-token context window. DeepSeek V4 is a next-generation large language model released by DeepSeek in 2025. Its Pro version uses a Mixture of Experts (MoE) architecture and excels in code generation, mathematical reasoning, and long-text comprehension. A 1-million-token context window means the model can process approximately 750,000 English words or about 500,000 Chinese characters in a single pass—enough to cover the complete codebase of most medium-to-large software projects. By comparison, GPT-4o has a 128K context window and Claude 3.5 has 200K. DeepSeek V4's million-level context offers significant advantages for cross-file dependency analysis, large-scale code refactoring, and similar scenarios.
So the question is: can you keep using the familiar Copilot interface while connecting to DeepSeek V4's API? The answer is yes. Below are two methods to help you connect DeepSeek V4—or any mainstream model's API—to GitHub Copilot in VSCode.
Prerequisites: Getting a DeepSeek API Key
Regardless of which method you choose, the first step is obtaining a DeepSeek API Key. Log in to the DeepSeek Open Platform and create a new key on the API management page.
Important notes:
- API Keys are sensitive information—never share them with others
- Copy and save the key immediately after creation, as some platforms only display it once
- DeepSeek's API pricing is relatively affordable; a small top-up is enough to get started
Method 1: DeepSeek for Copilot Extension (2-Minute Quick Setup)
This is the simplest and fastest approach, ideal for users who don't need extensive customization.
Installation and Configuration Steps
- Open the VSCode Extension Marketplace, search for "DeepSeek," find the DeepSeek for Copilot extension, and install it
- After installation, press
Ctrl+Shift+Pand enter your API Key as prompted in the command palette - In Copilot's model selection, click "Other Models" → "Manage Models" to find DeepSeek V4 Pro and Flash versions

Adjustable Parameters
This extension only provides two adjustable parameters:
- Thinking Effort: Reasoning depth, with options of High or Max
- Temperature: Controls output randomness
Limitations of Method 1
The biggest drawback of this extension is that the context window is limited to 128K (approximately 130,000 tokens), while DeepSeek V4 Pro natively supports a 1-million-token context. The gap between 128K and 1 million is roughly 7.5x—a critical limitation for developers working with large projects.
If you need to fully leverage DeepSeek V4's million-level context capability, Method 2 is recommended.
Method 2: OAI Extension (Fully Customizable Configuration)
The OAI extension offers rich customization options, including custom context length, thinking depth, and other parameters. This is the more recommended approach.
Installing the OAI Extension
Search for "OAI" in the VSCode Extension Marketplace, find the corresponding extension, and install it. The extension's README is in English—you can click the Quick Start link to view it in your browser with a translation plugin for easier reading.
Configuring a Provider (API Provider)
Type OAI configuration in the VSCode command palette to enter the configuration interface.
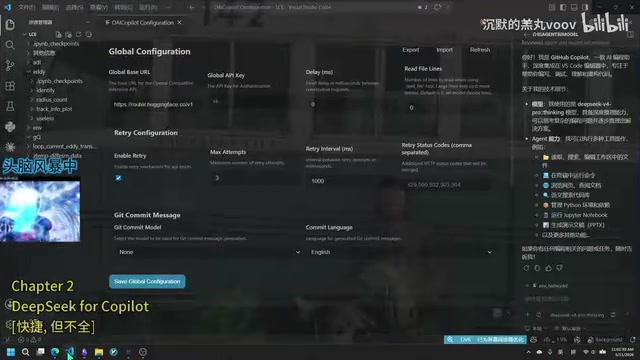
Global Settings:
- Global Base URL: You can enter
https://api.deepseek.com, but if you plan to connect other model APIs in the future, it's better to leave this blank - Allow Retries: Recommended to enable, with max attempts set to 3
- Other global settings can remain at their defaults
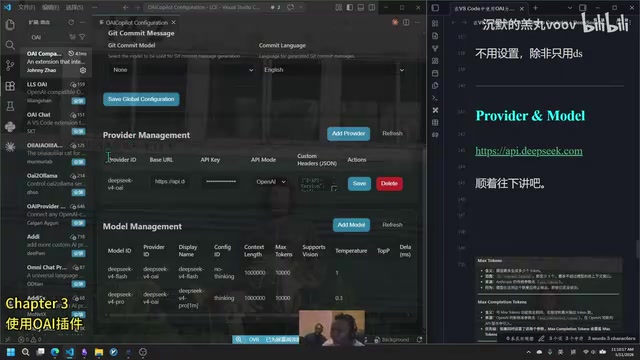
Creating a New Provider:
- Create a new Provider and enter an ID (e.g., "DS-TEST")
- URL:
https://api.deepseek.com - Paste your API Key
- Set API Mode to OpenAI
- Save
Selecting "OpenAI" for API Mode means communicating using the Chat Completions API standard format defined by OpenAI. This format has become the de facto standard for LLM APIs—many providers both domestic and international, including DeepSeek, Moonshot, and Qwen, are compatible with this interface specification. At its core, it sends a JSON message array (containing system, user, assistant, and other roles) via HTTP POST request to the /v1/chat/completions endpoint, and the server returns the model's generated response. This standardization means that as long as a model provider is OpenAI-compatible, you can seamlessly switch between different model services by simply changing the Base URL and API Key without modifying client-side code logic.
Configuring the Model (Model Parameters)
Create a new Model, select the Provider you just created, and configure the following key parameters:
Context Length: Default is 128K. You can change it directly to 1000000 (1 million) to fully leverage DeepSeek V4's capabilities.
Max Output Tokens: There are two options to note here:
max_tokens: The parameter format from Anthropic's legacy APImax_completion_tokens: OpenAI's new standard parameter format
You only need to set one. If both are set, the system will prioritize max_completion_tokens. A recommended value is around 10000; DeepSeek V4 supports up to 384K output.
The difference between these two parameters stems from the evolution of API specifications. max_tokens was the parameter used in early OpenAI and Anthropic APIs to limit the maximum length of a single model response. With the emergence of reasoning models (like o1, o3), model output now includes both "thinking process" (reasoning tokens) and "final response." OpenAI introduced the max_completion_tokens parameter in 2024, which encompasses the total of both reasoning tokens and response tokens, more accurately reflecting actual token consumption. For models that support deep thinking like DeepSeek V4, using max_completion_tokens provides more precise control over total output, preventing the final response from being truncated due to an overly long thinking process.
Temperature: This is an easily overlooked but very important parameter.
| Temperature Value | Characteristics | Use Cases |
|---|---|---|
| Low (0–0.5) | High determinism, stable output | Code modifications, precise planning |
| Medium (0.5–1.0) | Balances creativity and accuracy | General tasks |
| High (1.0–2.0) | High creativity, diverse output | Creative writing, brainstorming |
Simple explanation: the higher the temperature, the more "uninhibited" the model becomes, with greater uncertainty and creativity in output; the lower the temperature, the more "conservative" and deterministic the output. For programming scenarios, a lower value is recommended.
From a technical perspective, the Temperature parameter directly affects the "sharpness" of the model's output probability distribution. When generating each token, an LLM calculates a logit score for every possible next token in the vocabulary, then converts these into a probability distribution via the softmax function. Temperature serves as the divisor in the softmax function: when T=1, the original probability distribution is used; when T<1, the distribution becomes "sharper," amplifying the advantage of high-probability tokens so the model tends to select the most likely token; when T>1, the distribution becomes "flatter," giving lower-probability tokens more chances of being selected. In programming scenarios, T=0 or near 0 means the model almost always selects the highest-probability token, generating code that better aligns with common patterns and best practices.
Advanced Settings
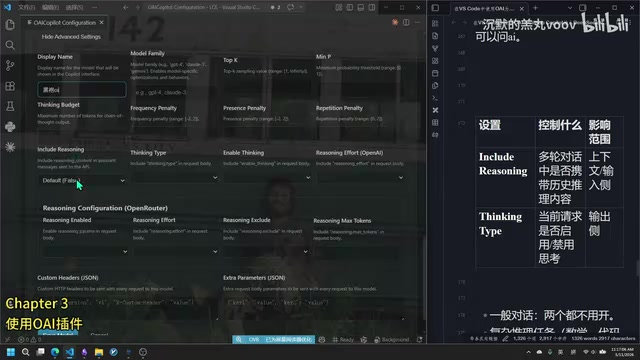
Enter the model's advanced settings:
- Display Name: The display name—do not use Chinese characters, as this may cause compatibility issues
- Configure ID: A configuration note, such as "thinking" or "no-thinking," to help distinguish between different configurations
- Include Reasoning: Recommended to enable; this carries historical reasoning content back to the API
- Enable Thinking: Whether to allow the model to perform deep thinking—strongly recommended to enable when writing code
- Reasoning Effort: Thinking depth, with options of minimal/low/medium/high/max; high is recommended
The Enable Thinking (deep thinking) feature is based on Chain-of-Thought reasoning technology. When enabled, the model performs an internal reasoning process before generating the final answer—analyzing the problem, breaking down steps, considering edge cases, and verifying logic. This reasoning content is typically returned to the user with special markers (displayed as a collapsible "thinking process" in the interface). For programming tasks, thinking mode significantly improves code correctness and completeness because the model clarifies algorithm logic, considers exception handling, and plans code structure before generating code. The Reasoning Effort parameter controls how much computational resources the model devotes to thinking—high level performs deeper multi-step reasoning, suitable for complex architecture design and algorithm implementation; while minimal level quickly provides answers, suitable for simple code completion.
Finally, select the Model ID as the deepseek-v4 Pro or Flash version, and click Save Model.
Verifying the Configuration
After configuration, find the model corresponding to your Display Name in Copilot's model selection. Send a test message and confirm that the Agent shows as GitHub Copilot and the Model shows your configured name—this indicates successful configuration.
Comparison Summary of Both Methods
| Comparison | Method 1 (DeepSeek for Copilot) | Method 2 (OAI Extension) |
|---|---|---|
| Setup Time | ~2 minutes | ~5 minutes |
| Context Window | 128K (fixed) | Up to 1 million (customizable) |
| Adjustable Parameters | 2 | Extensive (temperature, thinking depth, etc.) |
| Multi-model Support | DeepSeek only | Any OpenAI-compatible API |
| Recommended For | Quick trial | Daily development use |
For everyday programming and development, Method 2 with the OAI extension is undoubtedly the better choice. A 1-million-token context window means you can let the model understand your entire project's code structure, while the rich parameter configuration allows you to fine-tune settings for different task scenarios.
Important Notes
- Don't set parameters beyond the limits specified in DeepSeek's official documentation (e.g., max context of 1 million, max output of 384K), or you may encounter errors
- Avoid using Chinese characters in Display Name to prevent compatibility issues
- Refer to the DeepSeek official API documentation to confirm valid ranges for each parameter
- Using your own API Key means you bear the costs, but DeepSeek's pricing is quite affordable
Key Takeaways
Related articles

AI Agent Development: A Complete 6-Week Systematic Learning Roadmap
A 6-week systematic learning roadmap for AI Agent development, covering core architecture, ReAct principles, multi-agent collaboration, RAG integration, and deployment.
Four Core Advantages Frontend Developers Have When Transitioning to AI Agent Development
Frontend developers have key advantages for AI Agent development: TypeScript ecosystem fit, low-barrier full-stack bridging, and state management isomorphism. Learn the transition path here.
DiffusionGemma: Google's Open-Source Diffusion Language Model Exceeding 500 Tokens/s
Google releases DiffusionGemma, an open-source diffusion language model with Apache 2.0 license. The 26B-parameter MoE model achieves over 500 tokens/s in real-world tests.