Developing Figma Plugins with Codex: A Zero-Code Guide for Designers

A designer's guide to building Figma plugins using OpenAI Codex with zero coding experience.
This guide walks designers through building Figma plugins using OpenAI Codex without writing code. It covers Codex's project management structure, quota and permission settings, Plan Mode for requirement analysis, a hands-on demo building a batch AutoLayout plugin in under three minutes, and tips for Git versioning, conversation management, and publishing to the Figma Community.
As a designer, have you ever wished you could build a custom Figma plugin to eliminate repetitive tasks in your daily workflow? With OpenAI's Codex, that's now easier than ever. Bilibili creator "New Pixel" (草帽老师/Straw Hat Teacher) walked through a complete real-world example — a batch AutoLayout plugin — demonstrating the entire process from project creation to publishing. This article systematically covers the key takeaways and practical tips from that workflow.
Understanding Codex's Project Management Logic
Unlike ChatGPT's pure conversational mode, Codex uses a project (folder) + chat window organizational structure. Each project corresponds to a local folder, and you can create multiple chat windows within a project. This means you need to plan your file structure upfront.
OpenAI Codex is a cloud-based software engineering agent launched by OpenAI in 2025. Its biggest difference from ChatGPT is that while ChatGPT is a general-purpose conversational assistant, Codex is purpose-built for code development scenarios, with built-in file system awareness, terminal command execution, and code version management capabilities. It runs in a sandboxed cloud environment and can directly read and write code files in your local project folder while executing commands in an isolated environment. This "project + chat" organizational approach essentially mimics how professional developers use an IDE (Integrated Development Environment) — each project has its own independent workspace, and chat windows serve as communication channels with an AI pair-programming partner.
Straw Hat Teacher's recommended approach: create a master code folder on your desktop, organize subfolders by category (e.g., Figma plugins, script tools, etc.), then drag the folder into Codex's left panel to link the project. Note that the right-side chat window displays the currently linked project — make sure you've selected the correct one, or your code will end up in the wrong location.
A useful personal habit: create a folder called "CodeDraft" specifically for storing miscellaneous, unrelated small tasks — similar to the "Personal Drafts" concept in Figma. While Codex does support a "no project" temporary chat mode, a dedicated folder makes management and retrieval much easier.
Quota Management and Permission Settings
Quota System
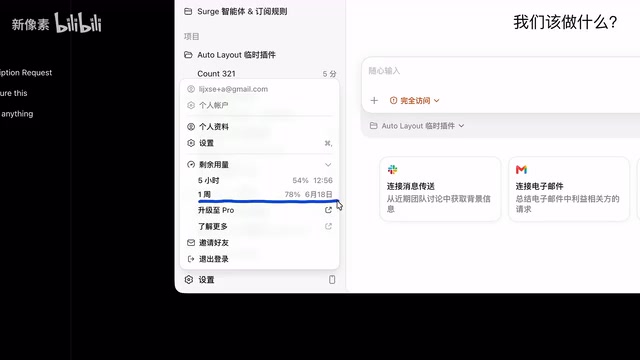
Codex has a rather unique quota system: there's no clear monthly quota — instead, it's allocated weekly and broken down into 5-hour usage windows. Each 5-hour window's consumption is deducted from the weekly quota, and once it's used up, you need to wait for the next 5-hour window to refresh. Even with this structure, heavy users can typically burn through a week's quota in two to three days.
A minor note: recently, pricing in lower-cost regions (like Turkey) has increased from around 80 to approximately 110, a jump of about 30 yuan. For frequent users, the quota can feel quite tight.
Three Permission Levels
Permission settings are a critical aspect of using Codex, with three levels available:
- Restricted Mode (default): Requests confirmation for every command executed — safe but extremely tedious
- Medium Mode: Only requests confirmation for risky operations — smoother for daily use
- Full Access: Never requests confirmation — maximum efficiency but also maximum risk
Full access means Codex can manipulate any file on your computer — theoretically, it could delete system files. This risk is essentially the same as granting any program administrator privileges — when an AI agent has unrestricted file system and terminal access, a vaguely worded instruction could be interpreted as a destructive operation. Straw Hat Teacher's advice: if you choose full access, be extremely precise in describing your requirements to avoid ambiguous statements that could lead to unintended actions.
From Requirements Gathering to Plan Mode
Think It Through Before You Start
Using the batch AutoLayout plugin as an example, before chatting with Codex, you should walk through the usage scenarios yourself:
- When adding AutoLayout to multiple selected elements, what should the default spacing be?
- Should there be input fields for users to customize spacing?
- Should width and height default to Hug or Fill?
- If a selected element already has an AutoLayout frame, should it be skipped or wrapped in another layer?
It's worth explaining the core concept of AutoLayout here. AutoLayout is one of Figma's most essential layout features, inspired by the CSS Flexbox model in front-end development. When AutoLayout is enabled, child elements within a container automatically arrange themselves in a specified direction (horizontal or vertical), with unified control over spacing, padding, alignment, and other properties. "Hug" means the container size is determined by its content, similar to CSS's fit-content; "Fill" means child elements expand to fill the parent container's available space, similar to flex-grow. For designers, batch-adding AutoLayout to multiple elements is a frequent but repetitive operation, especially when building design systems or organizing large component libraries — manually adding it one by one is extremely time-consuming. This is precisely the motivation for developing this plugin.
Even a rough sketch on paper can help you clarify the basic structure of your plugin's interface.
Make Good Use of Voice Input Tools
Straw Hat Teacher strongly recommends using Typeless for voice-to-text input. The reasoning is practical: the more context you provide in AI conversations, the better the results — but typing it all out is exhausting. Typeless excels at mixed Chinese-English recognition, automatically organizes sentence logic, and the free tier offers 8,000 characters per week, which is more than enough for daily use.
The Right Way to Use Plan Mode
Codex's Plan Mode is an extremely important feature. When enabled, Codex won't write code directly. Instead, it first analyzes requirements, breaks down steps, and confirms the technical approach through a series of Q&A exchanges to refine the execution plan.
Plan Mode reflects an important paradigm in current AI programming — "reason first, execute second." This aligns with the software engineering principle of "design before coding." In Plan Mode, Codex leverages more powerful reasoning models (such as o3-level) for requirements analysis and architecture design, generating a structured execution plan. This process is similar to how senior developers draw architecture diagrams and write technical specifications before writing code. Switching to a lighter model during the coding phase makes sense because code generation itself requires relatively less reasoning depth — it's more about pattern matching and syntax completion — allowing for significant token savings while maintaining quality.
Key tip: Use the "Ultra" model during the planning phase for stronger reasoning capabilities, then switch to "Medium" or "High" during actual coding to conserve quota. Before executing code, remember to uncheck Plan Mode — otherwise, it will stay in the planning phase.
Additionally, proactively providing reference materials significantly improves output quality. For example, paste the Figma plugin development documentation URL directly to Codex so it has authoritative references while coding.
Hands-On: Building a Figma Plugin in Two and a Half Minutes
Once the plan is confirmed, click execute and Codex will automatically create the project structure and write the code files. The entire process takes roughly two and a half minutes. It automatically recognizes the manifest.json and other configuration files required for Figma local plugins, and calls the relevant AutoLayout APIs.
Some additional context on Figma plugin technical architecture is helpful here. Figma plugins are built on web technologies, primarily using TypeScript or JavaScript. Every plugin project requires at minimum a manifest.json configuration file (declaring the plugin name, entry files, permissions, and other metadata) and a main logic file. If the plugin needs a user interface (UI), it will also include an HTML file. Figma's plugin architecture uses a dual-thread model: the main thread (sandbox) can access Figma's Document API to read and write design data, while the UI thread runs in an iframe responsible for interface rendering. The two communicate via postMessage. This architecture ensures plugins don't directly impact Figma editor performance or security. Understanding this background helps you describe requirements more precisely when talking to Codex — for example, explicitly stating "iterate through selected nodes in the main thread and set AutoLayout properties."
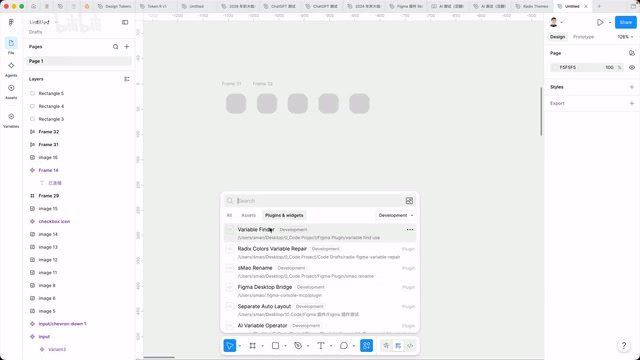
Importing the plugin into Figma is also straightforward: right-click the canvas → Plugins → Development → Import plugin from manifest → select the manifest.json file in your project folder.
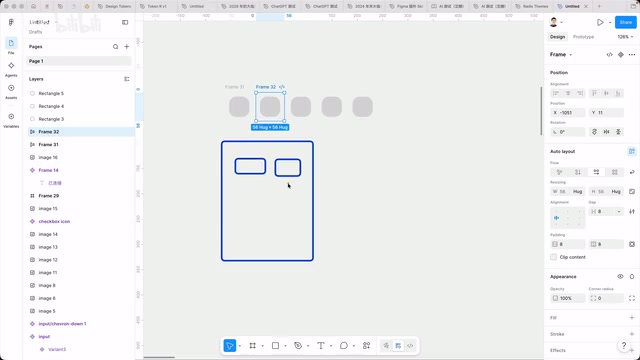
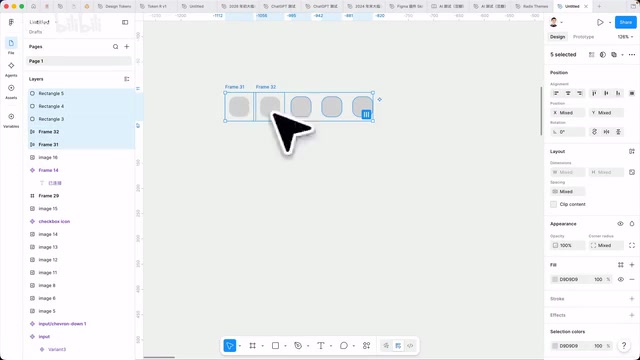
Test results: after selecting multiple elements and running the plugin, each element was individually wrapped in an AutoLayout frame with width and height defaulting to Hug and spacing defaulting to 8 — the core functionality worked exactly as expected. However, a minor issue appeared: the padding was supposed to show only two input fields (horizontal and vertical), but four were generated instead, requiring a follow-up iteration to fix. These kinds of detail discrepancies are very common in AI-generated code and typically only require pointing out the issue in a follow-up conversation for Codex to quickly fix it.
Advanced Tips and Long-Term Maintenance
Conversation Management
Overly long single conversations cause the AI to "lose its memory" and consume more tokens. This is because large language models have a context window limitation — when conversation content exceeds the maximum token count the model can process, earlier conversation content gets truncated, causing the AI to lose previously discussed requirement details and technical decisions. When you need to start a new conversation, right-click to copy the previous conversation's ID, paste it in the new window, and say "continue based on the context from this chat window" to achieve conversation continuity.
Git Version Backup
Make it a habit to have Codex add Git version control to your projects. Git is currently the world's most widely used distributed version control system. Its core value lies in recording the complete change history of every file, allowing developers to roll back to any historical version at any time. For non-programmers, think of Git as an "unlimited undo" system — each commit is like taking a snapshot of your project, and you can return to any previous snapshot at any time. In AI-assisted coding scenarios, Git is especially important because AI-generated code may have unpredictable issues, and having version history lets you experiment safely.
Before each major modification, simply say "make a backup, then start the next change." This way you can roll back to any historical version at any time, avoiding the frustration of breaking something with no way to recover.
Leveraging Skills for Efficiency
You can ask Codex to search GitHub for mature Figma plugin development-related Skills (skill packs), such as Skills for plugin interface styling. Once you find a suitable Skill, simply have Codex install it in your current project, saving you the hassle of manual configuration.
Skills in Codex are reusable instruction sets or configuration templates, typically existing as Markdown files within a project. Think of them as pre-loaded "professional knowledge manuals" for the AI — when you install a Figma plugin development Skill, Codex automatically references the best practices, coding standards, and common patterns it contains while coding. The GitHub community has already accumulated a large number of open-source Skills covering front-end development, API design, UI component libraries, and many other areas. The mechanism essentially improves AI output quality through structured context injection, eliminating the need to describe technical constraints and preferences from scratch in every conversation.
Publishing to the Figma Community
Once development is complete, you can directly ask Codex how to package and publish to the Figma Community, including icon size requirements, description formatting guidelines, and more — it can provide detailed guidance on all of these. Figma Community's plugin review process typically takes a few business days, with review criteria focusing on functional completeness, security, and compliance with community guidelines. Once published, Figma users worldwide can search for and install your plugin — this is also an effective way for designers to build their personal technical brand.
Summary
Codex opens a door for designers into the world of plugin development. The core workflow can be summarized as: gather requirements → confirm the plan in Plan Mode → execute coding → test and iterate → publish. Throughout the entire process, designers don't need programming skills, but they do need to express requirements clearly and understand basic project management logic. As Straw Hat Teacher put it, this is "truly addictive" because it genuinely solves specific, personalized workflow needs.
Related articles

AI Agent Learning Roadmap: A Four-Step Practical Guide from Zero to Job-Ready
A proven AI Agent learning roadmap covering four core elements, mainstream architecture patterns, multi-agent collaboration, and hands-on projects to go from zero to job-ready in three months.

HarmonyOS 7 Developer Beta Launches: A Deep Dive into System-Level Transformation for the Agent Era
HarmonyOS 7 developer Beta launches, claiming to be the world's first AI-native OS. Deep analysis of Xiaoyi Agent, StarShield security, Galaxy Interconnect, and the OS AI competition landscape.
Deploying a Multimodal AI Agent Locally on a 3080Ti: VRAM Management and a Deep Dive into All Five Modules
A detailed guide to deploying a multimodal AI Agent on a 3080Ti with 12GB VRAM, covering LLM, STT, TTS, image and video generation module selection, dynamic VRAM loading, and real-world performance.