Freely Switch Between Claude/DeepSeek and Other AI Models in Codex: CPA Deployment Guide

Deploy CPA on a VPS to aggregate multiple AI models and switch freely between them in OpenAI Codex.
This guide walks through deploying CLI Proxy API (CPA) on a VPS to aggregate AI models from Claude, DeepSeek, Grok, Gemini, and others into a unified gateway. Combined with Codex++, users can seamlessly switch between any model within OpenAI's Codex interface. The tutorial covers VPS setup, Docker installation, CPA configuration, OAuth and API Key integration, and Codex++ connection.
Want to use Claude, DeepSeek, Grok, Gemini, and other AI models within OpenAI's Codex? The open-source project CLI Proxy API (CPA), combined with Codex++, can aggregate models from multiple AI providers into a unified interface, enabling one-click model switching in Codex. This article is based on a comprehensive tutorial by Bilibili creator Ray King, covering the complete deployment process.
How It Works: Why Do You Need CPA?
Core Concept
CPA (CLI Proxy API) is essentially an AI model aggregation gateway. It unifies models from Claude, Grok, DeepSeek, Gemini, and other AI providers into a single entry point with a single API Key. Then, through Codex++, this unified API Key is imported into Codex, allowing you to switch between different providers' models at any time within the Codex interface.
AI model aggregation gateways have emerged as a category of middleware tools alongside the proliferation of large language models. Since OpenAI, Anthropic, Google, xAI, and other providers each maintain independent API specifications, developers often need to modify endpoints, authentication methods, and request formats when switching models. An aggregation gateway uses a unified adaptation layer to convert different providers' proprietary protocols into a standardized OpenAI-compatible format (i.e., the Chat Completions API), enabling multi-model access through a single entry point. This approach mirrors the API Gateway pattern in microservices architecture, with the core value of reducing integration complexity and operational costs.
The overall workflow can be summarized as:
- Prepare accounts or API Keys from various AI providers
- Deploy CPA on a VPS to aggregate all models into a unified entry point
- Use Codex++ to input CPA's unified API Key into Codex
- Freely switch between different providers' models in Codex
Why Deploy on a VPS?
The tutorial recommends deploying CPA on a VPS rather than a local computer for two practical benefits:
- Continuous operation: The service runs uninterrupted regardless of whether your computer is on — a VPS is essentially a cloud server running 24/7
- Multi-device sharing: Both your office and home computers can connect directly without redundant environment setup
A VPS (Virtual Private Server) is an independent computing instance created through virtualization technology on a physical server, where users have full root access and a dedicated IP. Choosing an overseas VPS also has an implicit advantage: some AI providers restrict API access from mainland China IPs. Routing through an overseas VPS circumvents this issue, ensuring stable API connectivity to all models.
Step 1: Prepare VPS and Connection Tools
Purchase a VPS
The tutorial recommends Racknerd VPS, which supports Alipay payments. Select Ubuntu 22.04 as the operating system and choose Los Angeles as the region (the West Coast is geographically closer to mainland China).
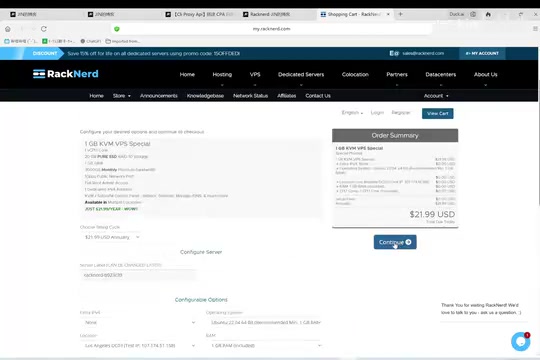
After purchase, you'll receive an email containing three key pieces of information:
- VPS IP address
- VPS root username and password
- VPS control panel login credentials (not needed for now)
SSH into the VPS
Download MobaXterm as your SSH connection tool. Open it, click Session → SSH, and enter the VPS IP address and root password to connect. Note that MobaXterm doesn't display characters when typing passwords — just press Enter to confirm.
SSH (Secure Shell) is an encrypted network protocol for securely operating remote servers over insecure networks. MobaXterm is a feature-rich terminal emulator for Windows that includes built-in SFTP file transfer, X11 forwarding, and other capabilities, making it ideal for server management scenarios.
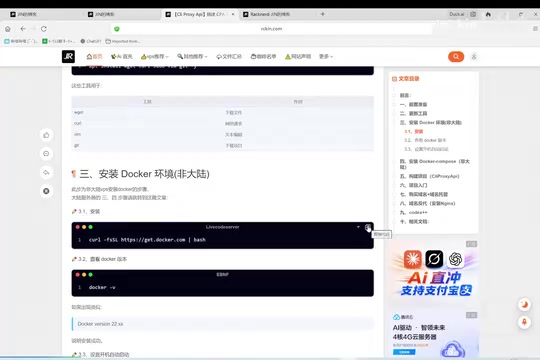
Step 2: Install Docker Environment
After connecting to the VPS, execute the following operations in sequence:
- Switch to root user (Racknerd defaults to root)
- Upgrade the system and install common utilities
- Install Docker and Docker Compose
Docker is currently the most mainstream containerization technology. It packages applications and their dependencies into lightweight, portable container images, ensuring consistent execution across any environment. Docker Compose is Docker's orchestration tool that defines multi-container application services, networks, and storage volumes through a single YAML file, allowing you to start and manage an entire application stack with one command. This deployment approach significantly reduces the complexity and error probability of environment configuration compared to traditional manual dependency installation and environment variable setup.
After installation, verify success with docker -v and docker compose version. If version numbers display correctly, the environment is ready. Don't forget to enable Docker auto-start (systemctl enable docker) to ensure services automatically recover after VPS restarts.
Step 3: Deploy the CPA Project
Create Directory and Download Configuration
Use the mkdir command to create a project directory, then cd into it. Download CPA's configuration file and modify it using the nano editor.
Only two changes are needed in the configuration file:
- remote_management: Change
falsetotrueto enable the remote management panel - secret_key: Set a management key — make sure to save it securely (consider messaging it to yourself as a backup)
After editing, press Ctrl+X to exit and type Y to confirm saving.
Start the Service
Once the Docker Compose file is configured, run docker compose up -d to start the project. The -d flag means running in daemon mode — the container runs persistently in the background and won't stop when the terminal closes. Use docker compose ps to check the running status and confirm the service is listening properly.
If using a VPS from providers like Tencent Cloud, you'll also need to open port 8317 in the firewall settings. This is because domestic Chinese cloud providers enable security group policies by default, only allowing a few ports (such as 22, 80, 443). Racknerd, as an overseas VPS provider, doesn't require this step since all ports are open by default.
Step 4: Configure the CPA Management Panel
Log into the Panel
Access http://your_VPS_IP:8317 in your browser to enter the CPA management panel.

Switch the language to your preference, enter the previously set secret_key to log in. Once inside, go to "Manage Keys → Authentication Configuration," delete the three default keys, and generate a new dedicated API Key. This API Key is the sole credential for all clients connecting to CPA — it's essentially a master key that grants access to all models connected behind CPA.
Connect AI Models: Two Methods
Method 1: OAuth Callback Reverse Proxy (Recommended for users with existing subscriptions)
Suitable for users already logged into ChatGPT, Claude, Gemini, Grok, etc. In the CPA panel, click the login button for the corresponding platform, generate an authorization link, complete authorization in your browser, and paste the callback URL back into CPA. The steps are essentially the same across platforms.
OAuth (Open Authorization) is an open authorization protocol that allows users to grant third-party applications access to their resources on specific platforms without exposing account credentials. CPA's OAuth callback reverse proxy leverages this mechanism: when users click the authorization link and complete login on the AI platform, the platform redirects a callback URL containing an authorization token back to the CPA service. CPA intercepts and stores these tokens, subsequently calling the corresponding platform's API on the user's behalf. The advantage of this approach is that even without purchasing independent API quotas, users can reuse their existing subscription allocations (such as ChatGPT Plus or Claude Pro) for API calls — essentially converting web session capabilities into programmatically callable interfaces.
Method 2: Directly Enter API Key
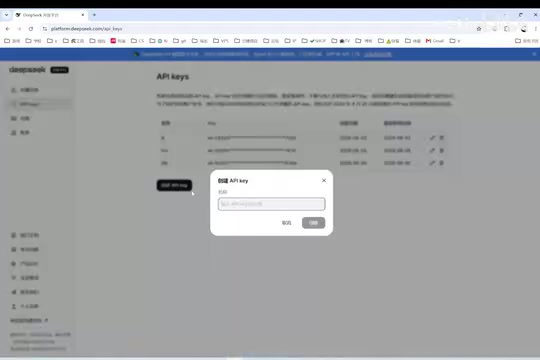
Using DeepSeek as an example:
- Go to the DeepSeek open platform, top up your balance, and create an API Key
- Return to CPA, select "AI Providers → OpenAI Compatible → New"
- Enter a name (e.g., DeepSeek), set the URL to
https://api.deepseek.com - Paste the API Key, click "Fetch from Endpoint" to automatically retrieve available models
- Select the models you need, test them, and click Create
The term "OpenAI Compatible" here means that DeepSeek and many other Chinese LLM providers have adopted the same API specification as OpenAI (i.e., the /v1/chat/completions format), so CPA can interface with these services uniformly without writing dedicated adapter code for each provider.
A green checkmark after testing indicates the model has been successfully connected.
Step 5: Configure Codex++ and Start Using
Install Codex++
Download Codex++ and open it directly. If it doesn't launch properly, try opening it through Codex++ Manager.
OpenAI Codex is OpenAI's cloud-based AI coding agent that can autonomously complete code writing, debugging, testing, and other tasks within a sandboxed environment. Unlike GitHub Copilot's real-time completions, Codex is designed to receive a complete task description and execute independently, similar to an asynchronous AI developer. Codex natively supports only OpenAI's own models, while Codex++ is a community-developed enhancement tool that modifies Codex's model configuration interface to connect to any OpenAI API-compatible backend service, thereby breaking vendor lock-in.
Connect to CPA
In Codex++, click "Provider Configuration → Add Provider" on the left side:
- Change the access mode to Pure API
- Set the URL to:
http://VPS_IP:port/v1 - Enter the API Key from CPA's authentication configuration
Save, select the provider, and click "Use."
Hands-on Experience
After launching Codex through Codex++, wait for the status indicator in the upper right to turn green and the model list to appear in the lower right — then you can freely switch between models. The tutorial tested GPT-4.5 and DeepSeek models, both responding normally with smooth, seamless switching.
The practical value of multi-model switching lies in each model's unique strengths — Claude excels at long-text understanding and detailed reasoning, DeepSeek offers excellent cost-effectiveness for code generation, Gemini features an ultra-long context window, and Grok has unique advantages in real-time information retrieval. Users can select the most suitable model for each specific task.
After closing MobaXterm, the CPA service on the VPS continues running without interruption. This is precisely the advantage of Docker's daemon mode and VPS continuous availability.
Further Optimization Suggestions
The current setup accesses the service via IP + port over HTTP. There are two areas for optimization:
- Bind a domain name: Purchase and configure a domain pointing to the CPA project for easier access
- Configure HTTPS: Obtain an SSL certificate to enhance data transmission security
HTTP transmits data in plaintext, meaning sensitive information like API Keys and conversation content could be intercepted by man-in-the-middle attacks during network transmission. HTTPS adds a TLS/SSL encryption layer on top of HTTP, establishing a secure channel through asymmetric encryption to ensure data cannot be eavesdropped on or tampered with during transit between client and server. For services carrying AI API keys, configuring HTTPS is particularly important — if an API Key is leaked, attackers can consume users' paid quotas or even access sensitive data. Common free SSL certificate solutions include Let's Encrypt with Certbot for automatic renewal, or automatic HTTPS through CDN services like Cloudflare.
These two steps are advanced configurations that will be covered in future tutorials. For daily personal use, the current HTTP setup is fully functional.
The related open-source project repositories can be found by searching for CLI Proxy API and Codex++ on GitHub. Interested readers are welcome to star the projects to show support.
Related articles
12 Practical Tips for Vibe Coding with Trae SOLO: From Getting Started to Efficient Collaboration
12 practical tips for vibe coding with Trae SOLO covering agent selection, Plan mode, context management, custom rules, and more to build an efficient AI programming workflow.
Trae + WPS: Building a Zero-Code JSA Login Authorization System — A Practical Tutorial
Learn how to use Trae AI programming tool with WPS Bitable to build a JSA login authorization system with zero handwritten code, covering online tables, Web API auth scripts, and remote user management.

Superpowers: Installing Work Standards for Your AI Coding Assistant
How the Superpowers methodology constrains AI coding assistants through requirement clarification, task decomposition, TDD, and verification loops — with setup tips for Trae.