Git Tutorial for Beginners: Essential Version Control Skills for AI-Assisted Programming

A beginner's guide to Git version control tailored for AI-assisted programming workflows.
This beginner-friendly tutorial teaches Git from scratch with a focus on AI programming scenarios. Learn why version control is essential when using tools like Cursor and Copilot, how to install and configure Git, understand its three core areas, and master the six commands that cover 95% of your needs. Build the habit of committing after every AI modification to always have a safe rollback point.
In the age of AI-assisted programming, tools like Cursor and Trae have made code generation easier than ever. But a critical question follows: What do you do when AI breaks your code? The answer is Git — a version control tool that lets you "undo" anything, anytime. This article will take you from zero to proficient in the most practical Git skills for AI programming scenarios.
Why Is Git Essential for AI-Assisted Programming?
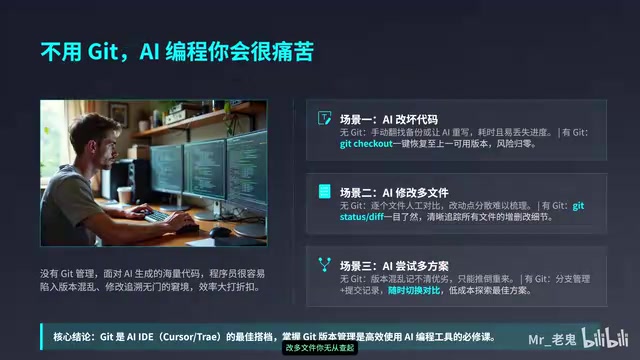
Many people think that having AI write code solves everything, but reality often tells a different story: AI-generated code can introduce bugs, multiple rounds of edits can leave your project unrecognizable, and when you want to go back to a version that actually worked, you have no way to get there.
Here's some important context: Cursor is an AI-powered IDE deeply customized from VS Code, with built-in large language models like GPT-4 that support code completion, conversational programming, and code refactoring. Trae is an AI IDE from ByteDance that offers similar capabilities. There are also tools like GitHub Copilot and Windsurf. What all these tools have in common is the ability to generate large blocks of code from natural language descriptions — but the quality of their output isn't always consistent. Large language models can produce "hallucinations" — code that looks reasonable but is actually incorrect — or accidentally break existing functionality during modifications. This is precisely why version control is an indispensable safety net.
Without Git, if AI breaks your code, your only option is to rewrite it. If files get lost, there's no way to recover them. With Git, every code change is fully recorded, and restoring any historical version is straightforward.
Put simply, Git is a tool that records every change to your code, allowing you to go back to any previous version at any time. Git was created by Linus Torvalds (the creator of Linux) in 2005, originally to manage Linux kernel development. Unlike earlier centralized version control systems (such as SVN and CVS), Git uses a distributed architecture where every developer has a complete copy of the code history locally, enabling version management without relying on a central server. This design allows Git to work offline and far surpasses its predecessors in speed and data safety. Today, Git is the world's most widely used version control system, with hundreds of millions of open-source projects hosted on platforms like GitHub and GitLab. It's not just a fundamental skill for programmers — it's a prerequisite for using AI programming tools effectively.
Downloading and Installing Git
Downloading Git is straightforward — just go to the official website (git-scm.com) and click the Install button. The site will automatically detect your operating system, and it's completely free.
Windows Users
Download the EXE installer and click Next through the setup. Make sure to check "Git Bash" and keep the default line-ending rules. After installation, if you see "Git Bash Here" in your right-click context menu, the installation was successful. Git Bash is a terminal tool that emulates a Linux command-line environment on Windows, allowing you to use Linux-style commands (like ls, cd, cat, etc.), which is very convenient for learning Git commands.
Mac Users
The simplest method is to open Terminal and run a single command:
brew install git
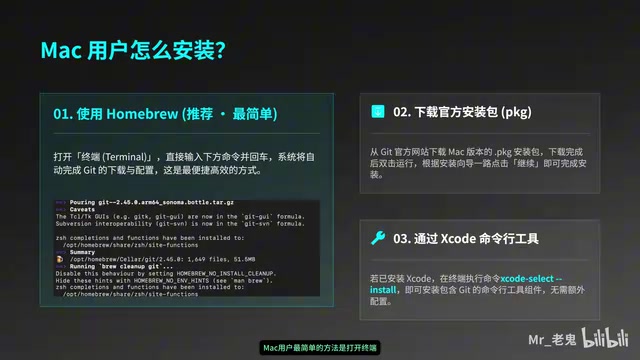
The brew command comes from Homebrew, the most popular open-source package manager for macOS, often called "the missing package manager for macOS." It lets users install, update, and manage various development tools and software through simple command-line instructions. If you don't have Homebrew installed on your Mac yet, visit brew.sh, copy the installation script, and run it in Terminal. Homebrew handles dependencies automatically, greatly simplifying the process of setting up a development environment.
Alternatively, you can download the PKG installer, or if you have Xcode installed, Git comes bundled with it.
Linux Users
Open Terminal and enter the installation command for your distribution. For Ubuntu/Debian users:
sudo apt-get install git
Verifying Installation and Initial Configuration
After installation, open your command line and enter the following command. If a version number appears, the installation was successful:
git --version
Before first use, you must configure your username and email. These two commands only need to be run once — all future projects will use this identity:
git config --global user.name "Your Name"
git config --global user.email "your@email.com"
The --global flag sets a global configuration, saving the information in the .gitconfig file in your home directory. Every time you commit code, Git uses this username and email to tag the commit record, making it easy to identify who made each change in team collaboration. If a specific project requires a different identity (e.g., separating personal and work projects), you can configure it individually in that project's directory by omitting the --global flag.
Git's Three Core Areas
Git has three core areas you need to understand: Working Directory, Staging Area, and Repository.
- Working Directory: Where you actually edit code — the project folder you see in your file manager
- Staging Area: Where changes are temporarily stored before being committed
- Repository: Where the official history is permanently saved
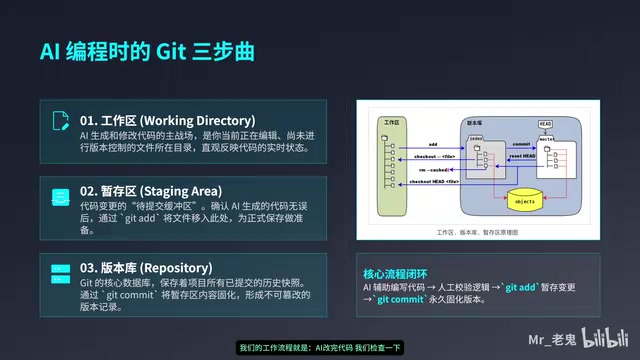
Git's three-area design is one of its most elegant architectural features. The Staging Area (also called the Index) is a hidden index file inside the .git directory. Its existence lets you precisely control which changes go into the next commit — for example, if you've modified 10 files but only want to commit 3 of them, the staging area makes this fine-grained management possible. The Repository stores the project's complete commit history, where each commit contains a unique SHA-1 hash (a 40-character hexadecimal string) as its identifier, forming a tamper-proof version chain. This means any historical version can be precisely located and restored.
The everyday workflow is: edit code → review changes → stage with git add → save with git commit.
Core Command Quick Reference
Project Initialization
When starting a new project, use git init to initialize a repository. This command creates a hidden .git folder in the current directory that stores all the version control data Git needs. If you want to build on someone else's project, use git clone followed by the project URL to copy it locally:
git init                          # Initialize a new repository
git clone https://github.com/xxx  # Clone a remote repository
git clone not only downloads all project files but also pulls down the complete commit history and automatically configures the connection to the remote repository, allowing you to use git push and git pull for syncing right away.
The Three-Step Commit Mantra: Status → Add → Commit
This is the most frequently used operation in daily work — commit it to memory:
git status              # Step 1: See what changed
git add .               # Step 2: Stage all changes
git commit -m "description"  # Step 3: Save as a version
The . in git add . means all files in the current directory. You can also use git add filename to stage specific files only. The -m flag in git commit -m is followed by the commit message. It's best to clearly describe what changed — for example, "Add user login feature" or "Fix AI-generated sorting bug" — so you can quickly locate the version you need when reviewing history.
Remote Syncing
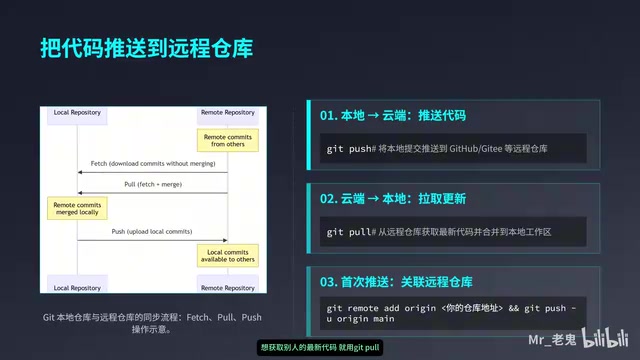
To prevent code loss, use git push to upload your local repository to the cloud (e.g., GitHub). To get the latest code from others, use git pull:
git push    # Push to remote repository
git pull    # Pull latest code
GitHub is the world's largest code hosting platform, acquired by Microsoft in 2018 for $7.5 billion. Built on the Git protocol, it provides cloud repository services along with collaboration features like Issue tracking, Pull Request code reviews, and GitHub Actions CI/CD pipelines. Similar platforms include GitLab (which supports self-hosted deployment) and Gitee (which offers faster access speeds in China). For individual developers, GitHub provides unlimited free private repositories, making it the go-to platform for backing up code and showcasing portfolios. Before using git push/git pull, you need to create a repository on GitHub and configure authentication via HTTPS or SSH.
The Standard AI Programming Workflow
In AI programming scenarios, a standard workflow should look like this:
- Describe your requirements: Tell the AI what feature you want to implement
- AI generates code: Wait for the AI to finish writing code
- Git commit: Immediately save the current state with
git commit - Test and verify: Run the code to check if it meets expectations
- Roll back if there are issues: Use
git checkoutto restore the previous version - Push if everything works: Use
git pushto sync to the remote repository
Core principle: Commit after every AI modification. This way, no matter what the AI changes next, you always have a safe rollback point. This principle is crucial because AI programming tools often modify multiple files at once when handling complex tasks, and the scope of changes may exceed your expectations. Without timely version snapshots, if the AI's modifications introduce subtle issues, it becomes very difficult to pinpoint which step caused the problem.
Practical Scenario Commands
| Scenario | Command | Description |
|---|---|---|
| Code is a mess | git checkout . | Revert to the last committed state |
| See exactly what changed | git diff | Compare current state with last commit |
| AI offers multiple approaches | git branch branch-name | Create branches to try each one |
Regarding branches — this is one of Git's most powerful features. Think of branches as parallel universes — changes made on different branches don't affect each other. When AI offers multiple implementation approaches, you can create a separate branch for each one, test them independently, and then merge the best one into the main branch. Git's branch operations are virtually zero-cost — creating and switching branches takes only milliseconds, because a Git branch is essentially just a pointer to a specific commit rather than a copy of the entire project. Common branch commands include git branch branch-name (create a branch), git checkout branch-name (switch branches), and git merge branch-name (merge a branch).
In modern IDEs like Cursor, these operations can even be performed through a graphical interface with mouse clicks, further lowering the barrier to entry. Cursor's sidebar includes an integrated Git panel where you can visually review file changes, stage files, write commit messages, and commit with a single click — very user-friendly for those who aren't comfortable with the command line.
Six Commands to Rule Them All
For AI programming scenarios, you really only need to master six core commands:
git init      → Initialize a project
git add       → Stage changes
git commit    → Save a version
git push      → Push to the cloud
git pull      → Pull updates
git checkout  → Roll back code
These six commands cover over 95% of version control needs in AI programming. Rather than spending a lot of time learning advanced Git features (like rebase, cherry-pick, stash, etc.), it's better to master these six commands first and gradually expand your knowledge through real projects. Once you're comfortable with these basics, you can explore more advanced topics like .gitignore files (for specifying which files Git should not track, such as node_modules dependency directories or .env environment variable files), git log (viewing commit history), and git reset (more flexible version rollback).
Conclusion
Git is the safety net of the AI programming era. When you let AI make sweeping changes to your code, Git ensures you always have an escape route. Build the habit of "committing immediately after every AI modification," and you'll be free to explore all kinds of AI-generated solutions without worrying about your code becoming an unrecognizable mess. Go install Git now and start your version control journey.
Related articles

Stop Writing Prompts by Hand: Let AI Agents Prompt Themselves
Deep dive into the AI coding paradigm shift: from hand-crafted prompts to self-prompting agent loops. Learn how agent self-review and proactive context fetching enable scalable, high-quality AI coding.

Behind SpaceX's Acquisition of Cursor: Musk's True $60 Billion Ambition
SpaceX acquires Cursor parent Anysphere in a $60B all-stock deal. Musk's real play: an AI-driven software production line and invaluable real workflow data.
Cursor in Action: Building a Library Management System in 15 Minutes — Full Walkthrough
Full walkthrough of building a FastAPI + Vue3 library management system in 15 minutes with Cursor AI, covering structured prompts, Plan & Build strategy, and bug fixes.