NoteGen MCP Configuration Tutorial: Connect AI Tools in Three Simple Steps
Configure NoteGen MCP in three steps: check environment, manage servers, and select tools precisely.
This tutorial walks through the complete MCP (Model Context Protocol) configuration process in NoteGen. It covers three key steps: checking your runtime environment (NPX, UVX, BUNX, Python3), managing the MCP server list with proper testing, and precisely selecting tools using NoteGen's two-level control mechanism. The guide emphasizes a least-privilege approach — control first, use on demand, and expand gradually.
What Is MCP? Don't Rush to Import Servers Just Yet
MCP (Model Context Protocol) has become a hot concept in the AI application ecosystem recently, but many people jump straight into importing a bunch of servers without properly setting up their environment or selecting the right tools — only to end up confused.
MCP is essentially a connection protocol for AI to call external tools. It doesn't make the model itself smarter; rather, it grants the model a set of authorized external tools — such as file operations, data queries, automation scripts, and more. Once you understand this, the configuration approach becomes clear: first confirm your environment, then add servers, and finally select the tools you want to use in your conversations.
NoteGen, a tool that combines note-taking with AI, has a well-structured MCP configuration workflow. This article uses NoteGen as an example to break down the three key steps of MCP configuration.
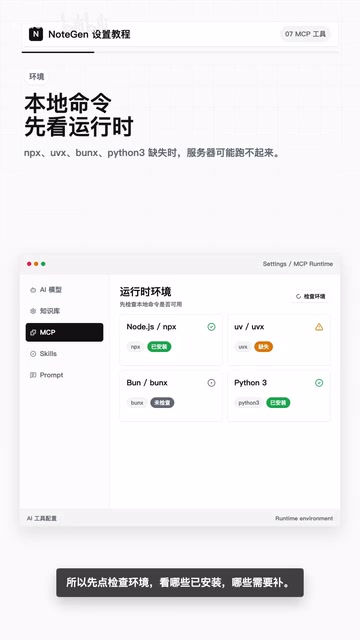
Step 1: Runtime Environment Check
This is the most easily overlooked step — yet the most common source of problems.
The NoteGen desktop client checks whether the following command-line tools are installed locally:
- NPX (Node.js package executor)
- UVX (Python package management tool)
- BUNX (Bun runtime)
- Python3
When people encounter MCP servers that won't start, their first instinct is to check the server configuration. But the actual issue is often a missing runtime environment. For example, a Node.js-based MCP server simply won't launch if NPX isn't installed locally.
Recommended action: Click the "Check Environment" button in NoteGen to confirm which runtimes are installed and which ones need to be added. Resolving environment issues upfront will make the rest of the configuration process much smoother.
Special Limitations on Mobile
It's important to note that mobile devices do not support local command-based MCP servers. This makes sense — phones don't have a full command-line environment. Therefore, when using MCP on mobile, only keep HTTP-type servers.
Step 2: MCP Server List Management
Once your environment is ready, you can start adding MCP servers. A single MCP server can provide a set of tools and resources, and different functionalities can be organized into separate servers — for example, file operations, data processing, and automation each managed independently.
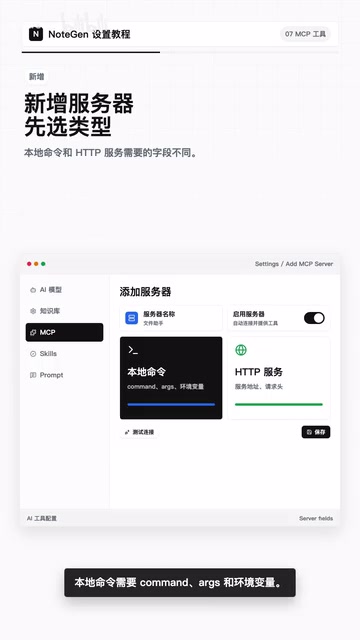
Key Configuration Elements for Adding a Server
When adding a new MCP server, pay attention to the following:
- Name: Give the server a clear, recognizable name for easy management later
- Type selection: Local command-based or HTTP service-based
- Local command-based: Requires configuring Command (execution command), Args (arguments), and environment variables
- HTTP service-based: Requires configuring the service address and request headers
- JSON import: If you have a ready-made JSON configuration file, you can import it directly through the import entry. The system automatically recognizes common server configuration formats, and existing entries with the same name are automatically skipped to avoid duplicates.
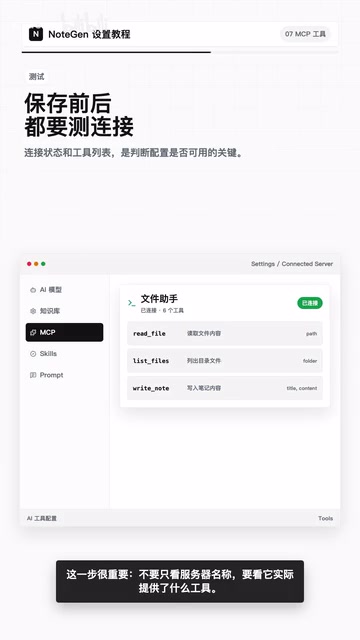
Test the Connection: Don't Skip This Step
After configuration, always test the connection before saving. Once the connection succeeds, the list will display a "Connected" status. More importantly, if the server exposes tools, you can expand it to view the specific tool count, tool names, and parameter information.
This step is crucial — don't just look at the server name; check what tools it actually provides. A server named "File Assistant" might offer multiple specific tools like read, write, and delete, or it might only provide read functionality. Only by understanding this clearly can you make the right choices in subsequent conversations.
Step 3: Tool Activation and Precise Selection
This is where NoteGen's MCP design truly shines — a two-level control mechanism.
Enabled ≠ In Use
Enabling a server means it can automatically connect and provide tools. But to actually use it in a chat session, you still need to manually select the corresponding server in the chat input area.
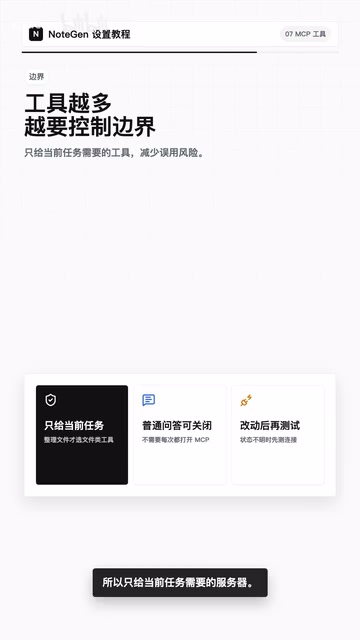
The logic behind this design is clear: the more tools available, the higher the selection cost for the AI, and the greater the risk of misuse. If you dump all tools into every conversation, the model might invoke irrelevant tools in unnecessary scenarios — wasting tokens and potentially causing unexpected operations.
The Principle of On-Demand Allocation
Practical recommendations:
- When organizing local files, only select file-related servers
- For general Q&A scenarios, you don't necessarily need to enable any MCP server
- Disable unused servers rather than deleting their configurations — you might need them again later
- After modifying configurations, remember to re-test the connection
This "least privilege" approach aligns with security design principles in software engineering. The sense of security with MCP comes from control — you know exactly who you're connected to, what tools are available, and when the AI gets to use them.
MCP Configuration Path for Beginners
If this is your first time working with MCP, follow this progressive path:
- Start with a single server — don't try to add too many at once
- Complete the full workflow: Environment check → Add server → Test connection → Review tool list → Select and use in chat
- Once you understand each step, gradually add more servers
The key to MCP configuration isn't quantity — it's clear boundaries. Knowing what each server can and cannot do is far more important than having a long list of servers.
Summary
MCP opens the door for AI applications to connect with external tools, but that door needs to be opened in an orderly fashion. NoteGen's three-step configuration workflow — environment check, server management, and precise selection — provides a clear operational framework. The core philosophy remains: control first, use on demand, expand gradually. Master this mindset, and you'll be able to configure MCP with ease — whether in NoteGen or any other MCP-compatible application.
Related articles
Claude Code Installation Guide & The Five Stages of AI Programming Tools Explained
Complete Claude Code installation guide with the five stages of AI programming tools, from manual coding to agents. Learn 0-to-1 project building and 1-to-100 iteration challenges.
Enterprise-Level AI Project Rules Files: 5 Hard Rules + 6 Writing Techniques
AI keeps messing up your code? Learn 5 hard rules and 6 writing techniques for enterprise-level Rules files in Claude Code, Cursor & more, with templates.

Building Cloud Computing Clusters from Old Phones: Google and UCSD Explore a New Path to Sustainable Computing
Google and UCSD explore building cloud clusters from old phones, leveraging ARM chip efficiency to cut e-waste and data center carbon footprints.