Setting Up Claude Code from Scratch: An Installation & Configuration Troubleshooting Guide
A beginner's complete guide to installing, configuring, and troubleshooting Claude Code in VS Code.
This article walks complete beginners through the entire process of setting up Claude Code — from installing VS Code and switching to Chinese, to installing the Claude Code plugin, configuring API keys, and avoiding the most common hidden pitfall: failing to properly switch models. It also covers real-world usage experience and current limitations in task planning.
Introduction
For non-technical users, AI coding tools like Claude Code are both fascinating and intimidating. This article documents the complete journey of a total beginner — from installing VS Code to configuring Claude Code and actually using it — including all the pitfalls encountered along the way and their solutions. Hopefully, it serves as a step-by-step reference for anyone looking to give it a try.
Setting Up VS Code and Switching to Chinese
First Impressions
When you first open VS Code, you're greeted with a default English interface. The left side shows a history panel, and you can enter the workspace by clicking "Open Editor." To start a new project from scratch, simply create a new folder in the workspace.
VS Code (Visual Studio Code) is a free, open-source code editor released by Microsoft in 2015. It has since become one of the most widely used editors among developers worldwide, with a market share exceeding 70% according to the Stack Overflow Developer Survey. Its popularity stems from its lightweight architecture combined with a powerful extension ecosystem — users can install various plugins to extend functionality, from syntax highlighting and version control to AI-assisted programming. For non-programmers, VS Code's value lies in providing a unified work environment where you can manage files, run a command-line terminal, and use AI tools all in one place, without constantly switching between different applications.
Switching to the Chinese Language Pack
For Chinese-speaking users, the first order of business is switching the interface language to Chinese. The steps are straightforward:
- Open the VS Code Extensions Marketplace (shortcut:
Ctrl+Shift+X) - Search for "Chinese" and find the Chinese language pack
- Click to download and install it
- Click the blue switch button, and the interface will automatically update to Chinese
Although this step is simple, it significantly improves efficiency for subsequent operations and should be done first.
Installing the Claude Code Plugin & Troubleshooting Tips
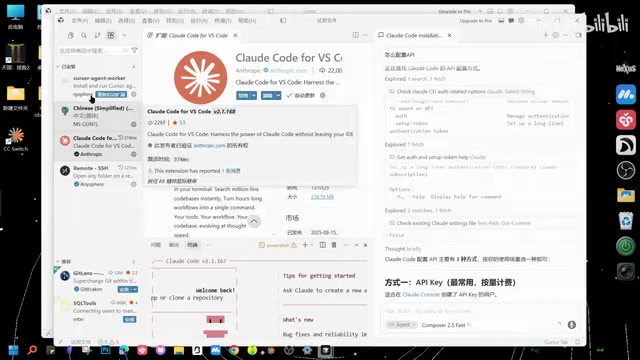
Installing from the Extensions Marketplace
Search for "Claude Code" in the VS Code Extensions Marketplace and download the corresponding plugin. Claude Code is an AI coding assistant developed by Anthropic, built on their Claude large language model. Unlike traditional code completion tools, Claude Code adopts an "Agentic Coding" paradigm — it doesn't just complete code snippets but understands the entire project context, autonomously plans task steps, creates and modifies files, executes terminal commands, and even debugs. This means users can describe their requirements in natural language, and the AI will independently handle the entire workflow from planning to implementation, much like a junior programmer.
In practice, however, many people run into issues at this step — whether due to network problems or compatibility issues — causing the plugin to malfunction after download.

Using VS Code's Built-in AI Assistant for Troubleshooting
Here's an extremely useful tip: The small robot icon on the right side of VS Code is a built-in AI assistant, and you can ask it directly about any installation issues.
Here's the troubleshooting workflow:
- Type in the robot's chat window: "I installed Claude Code but it's not working. Please check and fix the issue."
- The AI assistant will automatically search and diagnose — for example, checking command paths and verifying installation status
- If the first attempt doesn't resolve it, keep asking follow-up questions like "Why can't it find the command even though it's installed?"
- Eventually, the AI assistant will provide a fix, which usually involves restarting the terminal
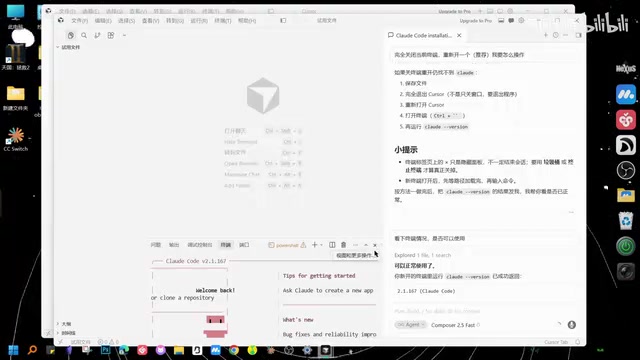
The Right Way to Close the Terminal
This is a common pitfall: When closing the terminal, clicking the X button on the window only hides the panel — the terminal is still running in the background. To fully close the terminal, you need to click the trash can icon to "Kill Terminal," then restart it. This detail directly affects whether configuration changes take effect.
Understanding this requires knowing the basic concept of a "Terminal." A terminal is a text-based interface for interacting with the operating system, where all command-line operations are executed. VS Code has a built-in terminal, so users don't need to separately open the system's Command Prompt or PowerShell. "Hiding" and "killing" a terminal are two completely different operations: hiding simply collapses the panel while the background process continues running, and previously loaded environment variables and configurations won't refresh. Killing, on the other hand, completely ends the process, and reopening will load the latest configuration. This is why you must kill and restart the terminal after modifying configurations — if you just hide and show it again, the terminal is still reading the old configuration.
Critical Pitfalls in Model Configuration & Solutions
Recognizing When Free Credits Are Exhausted
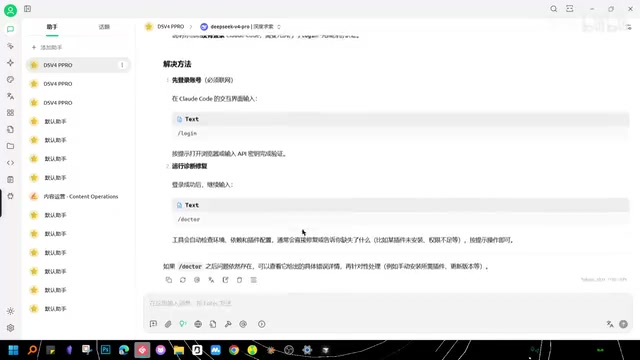
After successful installation, when you enter your first project command in the input box, you might encounter a confusing issue: the command fails to execute, and a red error message appears at the bottom. Is it asking you to log in, or is something else going on?
After investigation, this is most likely a signal that your free credits have been used up. At this point, you need to configure your own API Key to continue using the tool.
An API Key (Application Programming Interface Key) is essentially a string used for authentication — think of it as a digital key. Every time Claude Code sends a request to the backend model, it needs to carry this key to verify your identity and charge your account. Once free credits are exhausted, users need to register an account on the model provider's website, add funds, and generate an API Key, then enter it into Claude Code's configuration. It's important to keep your API Key secure and never share it with others, as it could lead to unauthorized charges on your account.
Model Not Properly Switched — The Most Common Hidden Pitfall
Even after completing the API configuration, there's an easily overlooked issue: the model hasn't been properly switched. Many people find that commands still won't execute after configuring the API, only to discover upon closer inspection that the model shown at the top is still the old default version and hasn't been switched to the target model.
DeepSeek V4, mentioned here, is a large language model from DeepSeek, known for its exceptional cost-effectiveness. Through a "model mapping" mechanism, users can use third-party models within Claude Code's interface to replace the default model. This flexibility is a major advantage of the open-source tool ecosystem, but it also adds configuration complexity. The principle behind model mapping is redirecting requests that Claude Code would normally send to Anthropic's servers to other compatible model providers, which means the API address, key, and model name must all match perfectly.
The correct solution:
- Close the current workbench
- Re-enter and modify the model mapping to the target model (e.g., DeepSeek V4)
- Confirm that the model name displayed at the top has been updated
- Re-enter your command to start working
This detail is absolutely critical — it's the most common hidden pitfall in the entire configuration process. If you've been configuring for a while and nothing works, check first whether the model has actually been switched successfully.
Real-World Experience with Claude Code & Its Limitations
Automated Workflow
Once the model is successfully configured, Claude Code's automated workflow generally follows four stages:
- Task Input: Describe your requirements in natural language in the chat box
- Plan Formulation: The AI will first outline an execution plan and ask for your confirmation
- Automated Execution: After confirmation, it begins working automatically, potentially pausing to ask for details
- Result Output: Finally, it generates project files and planning documents
This four-stage process reflects the mainstream design philosophy of current AI coding tools — the "Human-in-the-Loop" approach. In this workflow, the AI doesn't deliver results all at once. Instead, it first presents an execution plan for user confirmation and proactively pauses to ask questions when encountering ambiguity during execution. This design leverages AI's automation advantages while preserving human decision-making authority, preventing the AI from going further down the wrong path. Fully automatic mode skips the intermediate confirmation steps and is suitable for scenarios where you have confidence in the AI's output. For beginners, however, it's recommended to start with the interactive confirmation mode to gradually build an understanding of the tool's capabilities and limitations.
The system offers multiple modes, including a fully automated mode. For coding beginners, you can let it generate a first draft and see how it turns out.
The Reality Gap in Task Planning
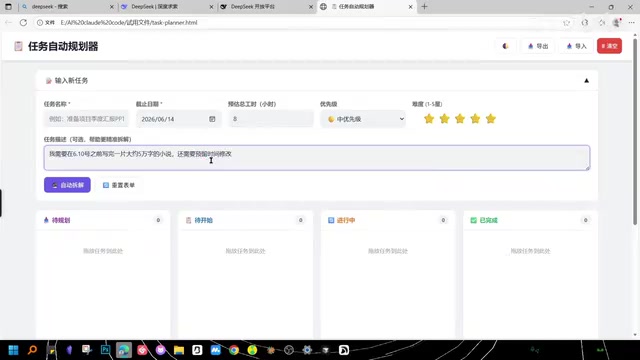
During actual testing, the author originally hoped Claude Code could implement an intelligent task breakdown system — for example, inputting a long-term goal (like preparing for an exam) and having the AI automatically break tasks down by day based on factors like time and urgency, similar to a smart version of TickTick.
However, the actual experience revealed that the current task planning functionality is still quite basic:
- The generated steps are fairly templated, lacking personalized, in-depth breakdowns
- While the interface has drag-and-drop functionality, you can't drag tasks from an inbox to a timeline like in TickTick
- Task adjustment and arrangement still require manual effort; the AI can't automate this yet
Taking "write a novel" as an example, the AI's output looks more like a generic template than a detailed plan tailored to individual circumstances. This limitation reflects a common issue with current large language models: they excel at generating "seemingly reasonable" generic content, but still fall short when it comes to deeply understanding personal context (such as your learning progress, energy levels, and existing knowledge) and making fine-grained decisions accordingly. This is also why specialized task management tools (like TickTick and Todoist) won't be fully replaced by AI coding tools anytime soon — they solve problems at different levels.
For non-programmers hoping to use it for general task management, you'll need to wait for further feature improvements.
Practical Tips for Complete Beginners
Looking at this entire setup process from scratch, Claude Code's installation and configuration does present a significant learning curve. However, with the help of VS Code's built-in AI assistant and external tools (like DeepSeek), most issues can be resolved step by step.
Key advice for beginners:
- Leverage AI for troubleshooting: Don't panic when you hit a problem — use the built-in robot assistant and external AI tools for cross-referencing. This methodology of "using AI to solve AI tool problems" is itself an important skill in today's tech landscape. When one AI tool gives an inaccurate answer, you can pose the same question to another AI tool for cross-validation, which often helps pinpoint the root cause faster.
- Verify model switching: Confirm that the model has actually been switched successfully — this is the most common hidden pitfall
- Close the terminal properly: Use the trash can icon to kill the terminal, not the X button
- Maintain realistic expectations: Claude Code has enormous potential as an AI coding assistant, but its general task management capabilities still have significant room for improvement
Overall, as long as you patiently work through the installation and configuration process, Claude Code can genuinely deliver significant productivity gains for development work. For complete beginners, it's recommended to start with simple projects and gradually familiarize yourself with the tool's capabilities and boundaries.
Related articles
Coze Agent in Practice: Building an AI Test Case Generation Workflow from Scratch
Learn how to build an AI test case generation agent on Coze, covering agent vs. LLM differences, workflow orchestration, model selection, and prompt engineering tips.

Anthropic's Latest Research: AI Recursive Self-Improvement Is Rapidly Approaching Human-Level Capability
Anthropic's new research reveals AI recursive self-improvement progress: Claude writes 80%+ of code, achieves 52x training speedup, and outperforms humans at 64% of research decision points.

Complete Guide to Trae's Chat Features: Four Modes for Efficient AI Programming
A detailed breakdown of Trae AI IDE's four chat modes: Sidebar Chat, Inline Chat, Image Input, and Voice Input, with shortcuts, use cases, and practical tips.